

Originally published in The Village Square newsletter - July 2010
Introduction
Wood is such an incredible media to create with! I know of a few other materials that have such a wide array of variation. There are literally thousands of different species of wood, each with its own unique characteristics. Wood offers a huge range of colors, textures and grain patterns and left its natural color, provides an infinite range of possibilities to make beautiful and distinctive projects. The natural color of wood can range from near white (Holly) to the darkest black (Ebony) and everything in between from orange (Padauk) to greenish (Poplar) to yellow (Yellow Heart) or even purple (Purple Heart). Why then would we want to add color to wood?
There are several reasons why we would want to change the natural color of the wood we use for our projects:
- Appearance: Even though there is a vast range of colors, perhaps we want to have our finished project a color that doesn't come naturally to the wood we are choosing.
- Availability: Many of the beautiful exotic woods are rare and difficult to find. If you happen to live away from a large metropolitan area, it could be very hard to find a certain species of wood that would happen to be the color you were looking for.
- Cost: Even if you were able to find that exotic species of wood that would be exactly right for your project, you may find that not only would the cost of the wood itself be expensive, but also the cost to ship it to you.
There Are Many Options Available
We are fortunate to live at a time where there are several viable options available for adding color to our wood. Many companies offer both oil-based and water-based stains and dyes which will change the appearance of the wood, without hiding the grain. Of course, you could always paint wood solidly, too if that is your preference. Many acrylic and oil-based paints are made specifically for application onto wood and work very nicely. There are even environmentally safe stains that have no odor and will not raise the grain. The best thing to do is to experiment with different products and you will find which ones are most appealing to you.
What if you "Can't Paint?"
In the many years I have worked and taught in the woodworking and painting fields, probably the most common thing I have heard from woodworkers is the phrase "I can't paint!" When I hear Enhancing Projects with Color Page 2 that from people, I pride myself in being able to prove them wrong. Most people look at painting at face value. By that, I mean that they look at the finished product, which to them may seem to be complicated and difficult to accomplish. But I feel that is a mindset which needs to be redirected. As with woodworking, achieving beautiful results doesn't have to be complex and intricate. Some of the best patterns on the market are those which the result is exceptional, yet the process is easily implemented once it is approached one step at a time. As with scroll sawing, it is best to look at a painting project as a progression, where each step is small, yet adds greatly to the finished piece. Most of us know from our own experience just what was involved in creating our scroll sawing pieces. Laypeople who don't do scrollwork are completely fascinated when they see fretwork. They see hundreds of holes, cut out in complex shapes and the process of creating such a piece is unfathomable to them. I believe the same is true when painting. Many times projects require only a touch of color to accent your piece and give it an entirely different look. Further, by adding a couple of layers of color, you are able to change the entire appearance of the project. Following are some examples of simple painting techniques that anyone can do with little experience that will enhance the beauty of your scroll saw projects.
Staining
 Probably one of the easiest ways to change or enhance the color of the wood is staining. Most stains are semi-transparent and allow the natural grain of the wood to show through, keeping the interest and the integrity of the grain pattern. There are many oil-based stains on the market, as well as some water-based ones. Choosing which stain to use can be confusing and is greatly a matter of personal preference. I found that most of the oil-based stains come in only natural wood colors, so if you are looking for an unusual color such as red or green it could be difficult to find. However, oil-based stains are the traditional choice for most woodworking projects because the oil does not tend to raise the grain and in itself, it offers better protection of the wood. However, with many advances in technology along with our raising concerns for the environment, water-based stains have gained a great deal of popularity recently. I have been very impressed with the "Saman" line of stains for many reasons. Being water-based, they have no odor, dry quickly and are environmentally friendly. They also need no conditioner and the 27 colors are intermixable, allowing you an endless color palette. They don't leave any overlapping marks, (which is important when staining larger projects or furniture) and don't raise the grain. Clean up is easy with soap and water. With the type of projects I do, this has been one of my favorite products. The results I have had from these stains have been great and I have had friends who are cabinet builders that have been equally impressed in using the products on larger projects. I will, however, note that I found that in order to achieve a durable finish, you need to use either an acrylic sealer or an oil-based one (after the stain is completely dry). The water-based sealer that Saman offers has not proven to be durable in my use. If you would like more information on these products and where to obtain them, please visit their website at http://www.dtep.com/saman.htm or contact me and I will forward the information to you.
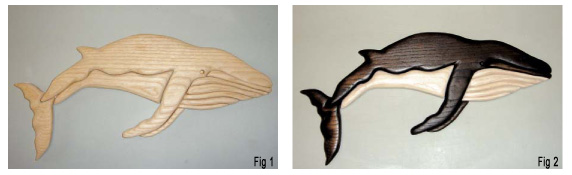
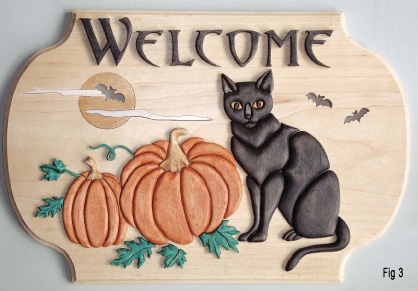
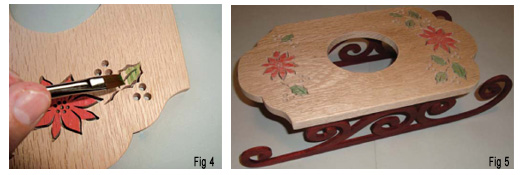
I made a segmentation of a hump-backed whale using Ash. Figure 1 shows the original whale and Figure 2 shows the dramatic difference using a stain. I had also created this project using Maple, but the results were not as interesting and rather "flat." Maple, which is a good choice for many segmentation projects due to its tight, even grain and strength, proved to look a bit a better choice for the segmentation project in Figure 3, in which the focus was more on the details of the design rather than the texture. I found the deeper grain of the Ash allowed more interest in the Whale design and was a better choice for that project.
It is strictly your own preference as to which wood you choose for your project. Experiment and see what is available to you and also what you desire for your end result.
Acrylic Paint Washes
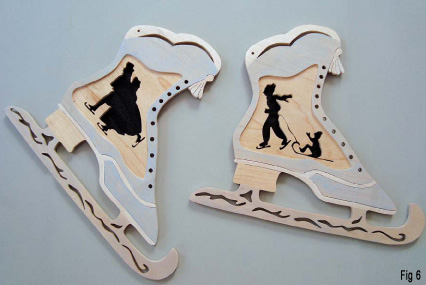
 Another method of adding interest to wood is by using acrylic paint as a wash. Creating a wash with acrylic paint is achieved by simply adding water to the paint until the desired opacity is reached. You can do this with any brand of acrylics, either bottle or tube, and the result is pretty much the same. Just add a drop or two of paint onto a palette (I use the round bubble palette that is available where most painting supplies are sold) and little by little drop some water into the paint and mix. Test the opacity on a scrap of wood from your project until you reach the results you desire and you are ready to go. Since the use of washes incorporates additional water into the paint, I found that it is best to use them primarily on hardwoods to minimize raising of the grain. Using washes on softwood such as pine can cause the wood to swell and depending on the amount of area that is going to be colored, can cause unsightly problems. It is best to use washes sparingly or only as accents on most pieces. If a broader coverage is desired, I would recommend staining, as above. Accents on pieces, however, can be very effective and appealing and because of the huge range of acrylic paint colors available, using acrylic washes is an economical and easy way to enhance your projects. In figures 4 and 5, I have shown how brushing on a simple wash of color, following the stylized scroll saw lines, can add lots of interest to this Oak sled. Because the wood is Oak and only a small amount of color is added, there is very little rising of the grain and the results are dramatic.
 In Figure 6, I have used washes to tint the Maple skates and accent them. Again, I am following the scroll saw lines and just filling in the areas with light color. Since the Maple has a hard, tight grain, there is very little swelling and the acrylic paint tends to sit on top of the wood. Once dry, I sprayed the skates with a coat of polyurethane varnish to set the colors.
Actual Painting of Wood
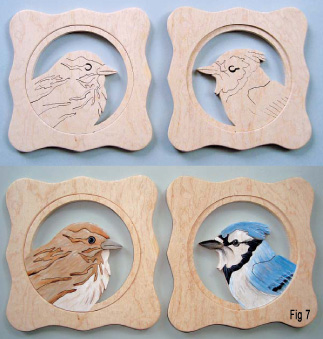 Finally, I am going to talk about painting wood using acrylic paints. Since acrylic paints are insoluble once dry, they form a durable surface which won't fade with time and can be a nice way to enhance your scroll saw projects. In Figure 7, I show two songbird plaques I designed for scroll sawing. Although I realize that it is a matter of personal preference, I see the plaques as a bit lifeless. By adding some simple painting techniques, following the scroll saw lines that were already there, I used only five colors (besides black and white) to bring these birds to life.
When painting wood in this matter, I begin with a base coat which is a solid blocking in of color. Base coating not only gives you an even color to build your design upon, but also acts to seal the wood and allow additional shading and detailing without saturating the wood or bringing up the grain. In this project, I used Curly Maple, as again, it is a hardwood with tight grain that is a good choice for painting. I also liked the additional grain properties, as they added some interest to the frames, and also some texture to the birds. The grain is small and subtle and suitable for a project of this size without overpowering the main design elements.
For the first base coat, I used the acrylic paint and very little water (just enough to keep my brush moist and allow the paint to move) and blocked in the main colors. After allowing this to dry, I was able to add some shading and detailing in the form of washes and line work without worrying about raising the grain or warping the wood. The first coat of acrylic acts as a barrier on the wood and inhibits additional layers to penetrate the wood. This gives us the freedom to paint on the piece without damaging it. Although there is a bit more detail to this type of painting for scroll saw projects, when approached in a step-by-step manner, it is a simple and effective way to enhance our overall projects. The results can be very dramatic and look as if it took us a lot of time and skill to achieve it.
Conclusion
These have been just a few techniques to add interest and color to your scroll saw projects. Each method described here is a simple, cost-efficient and fun way to expand your skills and add interest to your projects. I hope you are inspired to try a few of them and discover the inner artist lurking deep within yourself. I think you may be surprised at how easy it is!
If you have any questions or comments, or if you wish to send me pictures of your accomplishments, I would love to hear from you. As always, I try to be here to help. Happy Painting!
If you have any questions regarding this project, please email me at sheilalandrydesigns@gmail.com. You may also see and purchase other patterns at www.sheilalandrydesigns.com and download free articles and a catalog of my designs.
Come join me on Facebook at Sheila Landry Designs Scroll Saw Art! See previews and updates of articles and projects.

Recommended Comments
Join the conversation
You can post now and register later. If you have an account, sign in now to post with your account.
Note: Your post will require moderator approval before it will be visible.