
Search the Community
Showing results for tags 'boxes'.
Found 13 results
-
Wanted to make some small gift boxes and ordered some mahogony. 6 each 24 x 4" 1/8" boards (should have ordered 5-6" wide boards to better fit pattern). Stack cut 2 at a time. finish with gloss laquer. I had done the 2 center boxes with bubinga wood previously but it is getting very expensive. (twice as expensive as mahogony) Fun cutting.

- 19 replies
-
- 30
-

-

-
 This is a picture story that shows how to make micro drawers using a scroll saw. These would be good for ornaments, small boxes, or gnome and troll doors. Step1 I chose some Easter shapes of a rabbit and an egg. I scaled pictures to be about 0.75 inches wide. I printed them out and used Super 77 spray glue to attach them to the wood. Step 2 From here we need to drill holes for blade access. I tried to place the drill holes in a position that can easily cover them up. I chose the top of the egg and the eyes for the rabbit. Step 3 Now I just cut the outlines of the shapes. I chose #7 skip blade. This wood was standard construction 1.75"x1.75" lumber. 7 inches tall. I wanted to show how I will cut the middle of the drawer so it can be accessed. I marked the area I will cut out with green ink. I wanted to keep the front and back shape. Step 4 The next picture shows the access area cut off. The rabbit is easily shown with the middle section cut out. The egg is sideways in the clamp to hold it level. Step 5 The next step is to cut the core out for the drawer cavity. I wanted to angle the blade so that the core can be used for the bottom. A 10-degree angle seemed to be a good guess. This is to prevent the bottom of the drawer from falling through the bottom. On the bunny piece on the left of the image you can see the green ink that will be cut out. So, I also drilled a 10-degree hole for blade access. Step 6 Here, I show the core cut out for both the rabbit and egg. See the angle of the drawer's sides? The core's bottom slice will eventually be cut off and discarded. The middle slice will be used as the drawer bottom. Lastly, the top slice will also be discarded. The green ink shows what will be waste. The non-green slice (middle slice) is the drawer bottom. Step 7 Here, I show to use the clamp to hold the angled wood 90-degrees to the blade, or close to it. The second picture, notice the first bottom slice missing. The next cut we will save for the bottom of the drawer. Step 8 Here, I showed the saved middle slices. This will be glued back in place for the bottom of the drawers. Step 9 Now let's put the drawers back into the holders. In the rabbit drawer, you can still see the drawer bottom. The second picture shows the front view of them. Step 10 I was not very clever about drawer handles. I just put short screws in the drill access holes. Then it was time to remove the pattern paper. Conclusion I hope this picture story shows how to make micro drawers. This last picture shows a different application for a micro drawer. It is a thick slice of wood ( 2.25" thick) carved Bobcat with a face as a micro drawer. I should have kept the ears as part of the drawer like I did the rabbit, though. I hope this inspires new ideas and applications!
- 3 comments
-
- 6
-
-
- trinket boxes
- boxes
- (and 2 more)
-
A couple of things I have been working on, now completed. The 2 boxes are Steve's I just personalized them. with some Railroad Heralds. Mingo is my pattern. It took longer than I had thought it would to paint the Railroad box. I waited until it was done, then as a second I decided to paint it. That's the reason it looks a little crooked in some places. Found a small screw for the knob. If I make another one no painting. Well maybe not as much.


- 12 replies
-
- 16
-
-
Howdy All. It's been a brutal winter, and I'm itching to get things done. I've been focusing on organizing the house and shop, lately. So I thought it would be fun to do some organizing projects. This month's scroll saw challenge is called Boxes, Bowls, & Trays. Basically, any kind of vessel, which could also include vases and other holders. Post a pic of boxes, trays, bowls, vases, pencil holders, totes, caddies, or whatever else you made to hold or organize stuff. It doesn't have to be completely done with a scroll saw, but a scroll saw should be involved in some way. Be sure to tell us a little about your project and what it was used for, or any other story that comes with the project (I love the story behind the project just as much as I like the project). Have fun! I can't wait to see what you come up with.

- 69 replies
-
- 2
-
-
- scroll saw challenge
- boxes
- (and 3 more)
-
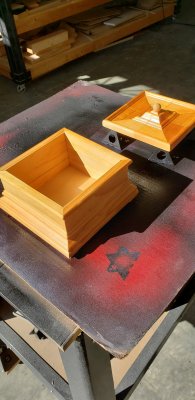
The other day I was wandering around the atic and found several door frame molding boards the builder had left. The pattern was distinctive and decided to make a box from the moulding. Used my mitre saw to make some standing 45 degree cuts for the sides. Rabbitted in a 1/8" groove on the bottom of the sides to accept a 1/8" square base. The top was a little more complicated. I had to get the 45 degree angle cuts in the right direction since it required 8 pieces. Lots of sanding to get everything flush (filler helped too). Finish is shellac and several coats of black lacquer rubbed out. I may look for some other moulding patterns for another box.


-
I finally have the domed box top set up down pat. I made a clamping form. I glued up several 2x4 blocks and cut out the ellipse shape on the band saw and smooth it all out with the oscillating sander. I bought the suggested steamer from Rockler and built a double steam box so I could do small and large bending. I worked well and the 1/8" was easy to bend up. I still need assorted clamps but now it goes quicker. I made 3 boxes at once (except the gluing) The joint box thing is now a snap and after a few hours of glue up time on the tops and some trimming/sanding it all comes together pretty well. Then I hand it over to the artistic side of the house. My wife uses the Donna Dewberry style of "One Stroke" of painting that loads up several colors on the brush at one time. Finish it up with several coats of gloss lacquer for that extra sheen. There are some boxes I made earlier in the pictures but now I'll stick to a standard shape because of the top form. Its time to get back to scrolling.


-
Table Saw Lonely, Scroll Saw Tired. I had made a 8 sided box a while back and my wife wanted some more. Since these boxes are painted, I used 1/2 poplar for sides and top. It's easier to make more when the table saw is set up for multiple cuts. (22.5 or 67.5 degrees) I still had to sneak up on the exact dimension. Sequencing is important. Once sides are glued up, top is cut to match and mitered to 45 bevel. Carpet tape to hold everything together for sanding on belt sander. Trace and cut for inside top to be felted along with inside bottom. Mount hinges using carpet tape to position and a 5/32 hinge drill to center and start holes. (3/4" hinges from Woodcraft) Use wax on screws to prevent splitting. Used 1/4 poplar for base (like sides and top) slightly oversize from sides and save cut offs as feet for base. Paint the insides and start the PITA of mounting the felt. Position the inside top felt for a good fit to top and glue, then position the bottom felt and glue box sides to base. Glue the triangle cutoffs for feet and paint. I know this description was a little long and drawn but if I have to make these again and I can reference back to this posting. My wife did her usual excellent painting of the box tops.


-
I'd normally use my CNC router for stuff like this, but it was tied up with another project. I wanted to try a new (for me) hinge, experiment with different wood combinations, and spray lacquer from a gun for the first time. Erik = Santos Mahogany with Figured Eucalyptus inlay. I learned from this one that it looks better when the figure is on the box and the letters are plainer. Sherry = Bubinga with Guatambu inlay. I like Bubinga, thought I had some yellowheart scraps for the letters but couldn't find it. Edward = Low figured Leopardwood with Wenge inlay. The blade went a bit wonky on the final d. Both nice woods, but next time I'd brush on a 2nd or 3rd coat of sealer before spraying because the pores are very open. All approx 5W x 9L x 2.25H.

-
I make and sell cedar boxes with images inlaid into the hinged lids and today I sold thirty-five of them! My average, at the twenty five or so sales I attend, is only about twelve and my best this year was thirty-nine. My next scheduled sale is in Mid June 2016. I also make and sell intarsia, toys and wall hung items like crosses and 38" stars but boxes are my best seller.

-
I had a small sale today. In an out of the way place, and not a whole lot of shoppers, but I did manage to sell fourteen cedar boxes with images inlaid into the hinged lids. I also sold a custom order for two more. Not a whole lot of shoppers there but still well worth my effort. I only took boxes with me today because it was an inside sale with only two six foot tables to display my stuff. I left my wooden stars at home. I have only one more show scheduled this year but I am still looking for any others that may pop up nearby.
-
 Had a sale on Saturday Sept 12th at a once a year craft sale here in Lubbock. Poor shopper turnout this year but OK sales totals. Sold more than I did at this sale last year but about one half of the total sales of previous years. Still worth the effort though. I sold twenty five of the boxes, one star and some crosses. Lots of $5 rubber band shooters too. In the photo you can see how I displayed sixty four boxes and the other items there. I built four simple display racks to set on tables, that present the boxes well and are simple to make,set up, and transport. I have another similar ,once a year, sale next weekend but it is a two day event. Hope the turnout is better there.
- 26 replies
-
- 3
-
-
- selling drafts
- inlay
- (and 1 more)
-
This is something I cut today and want to share with this community.


-
Here's a great tutorial on how to use flocking. Flocking is that velvety stuff you find inside of jewelry boxes. It really completes a small box, especially for jewelry boxes. You probably have to buy it online, unless you're lucky enough to be close to a Woodcraft store.


