


preprius
-
Posts
1,543 -
Joined
-
Last visited
-
Days Won
10
About preprius

Recent Profile Visitors
7,857 profile views


preprius's Achievements

Obsessed Scroller (8/11)
2.4k
Reputation
-
 MarieC reacted to a post in a topic:
Update on Scrappile (Paul Douglass)
MarieC reacted to a post in a topic:
Update on Scrappile (Paul Douglass)
-
yea yippee. i see he is even outdoors. That is great. Now we need a pattern made for the above picture. Mark
-
preprius reacted to a post in a topic:
Text Placement Help
-
preprius reacted to a post in a topic:
Text Placement Help
-
 FrankEV reacted to a post in a topic:
Chinese Dragon Plaque - Intarsia
FrankEV reacted to a post in a topic:
Chinese Dragon Plaque - Intarsia
-
Frank, I see how you say the deep red and wenge needs higher contrast. My opinion is the deep red adds so much danger feel. A light red oak would not danger lurking. Maybe make an outer hiliter around the dragon? flames surounding dragon? I like it the way you did it. Excellently. Mark
-
Be_O_Be reacted to a post in a topic:
inlay -> inlay -> inlay -> inlay (tips and tricks)
-
heppnerguy reacted to a post in a topic:
Father and Son set of hats.
-
heppnerguy reacted to a post in a topic:
Father and Son set of hats.
-
barb.j.enders reacted to a post in a topic:
inlay -> inlay -> inlay -> inlay (tips and tricks)
-
JackJones reacted to a post in a topic:
inlay -> inlay -> inlay -> inlay (tips and tricks)
-

inlay -> inlay -> inlay -> inlay (tips and tricks)
preprius replied to preprius's topic in General Scroll Sawing
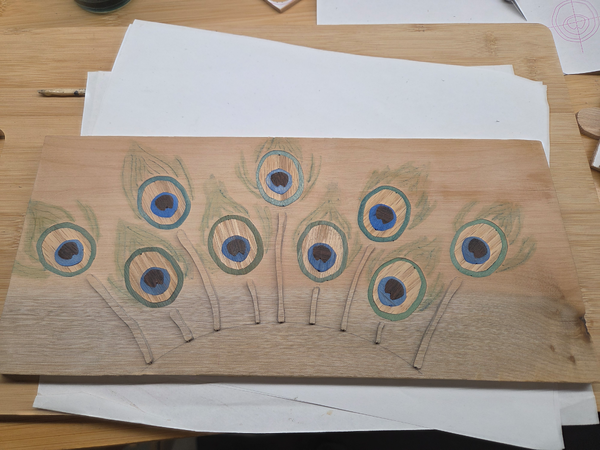
update... feathers are installed.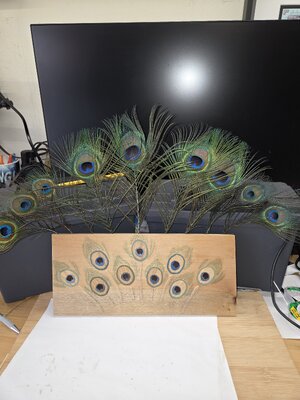
-
 preprius reacted to a post in a topic:
Grandfather clock
preprius reacted to a post in a topic:
Grandfather clock
-
danny reacted to a post in a topic:
cutting word in an 1 1/4" dowel
-
preprius reacted to a post in a topic:
A wedding present
-
meflick reacted to a post in a topic:
Projects FINALLY Finished
-
great intarsia work. great your scrolling and posting again.
-
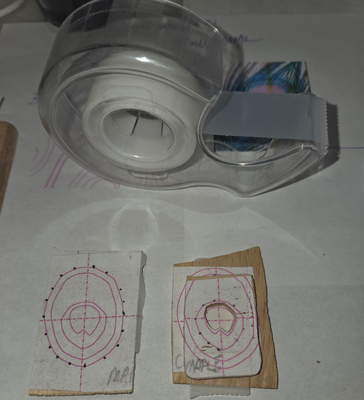
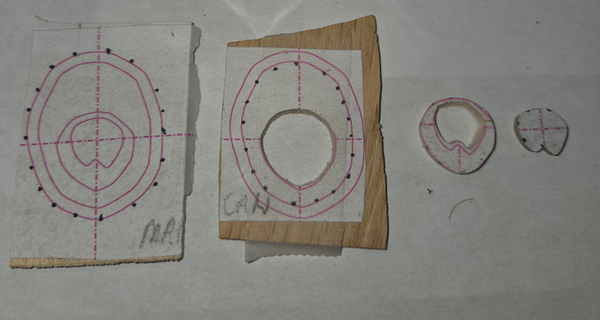
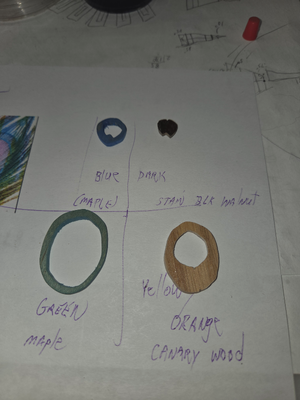
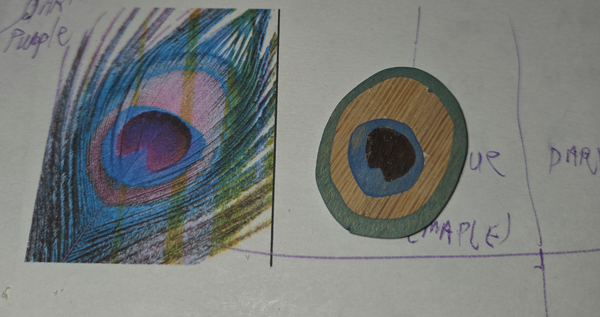
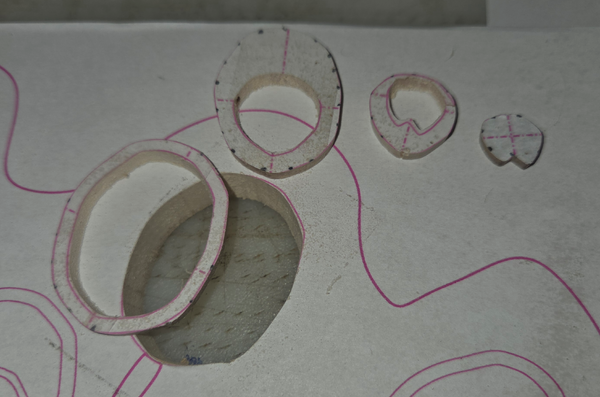
I wanted to get better at inlay using double bevel scroll saw technique. I wanted to perform inlay 4 different boards resulting in one board. Most info I found on youtube only shows 1 layer to be performed. After searching and reading many post and descriptions. It was apparent that there was not many pictures showing the alignment lines technique. Here is what I was doing. . . ( I did not create this procedure) I just grabbed some pictures during the process. Below picture shows smallest board on top of bigger board. Typical right, except that I don't have to align the board edges. The above pic shows the smallest (inside out) has already been cut and has fell down into bottom board. The board on the left is prepared for being the next bottom board. Note the black dots are to help me make sure I will be cutting the correct line. I found that normal tape on the bottom board helps remove top board while keeping the pattern from tearing up. All patterns are super77 spray glue directly to the wood. The cool thing is that once the inside is cut out and removed it creates the window for alignment lines through the middle. This allows a smaller pieces of wood to be used without aligning all the board edges. The following pic shows the separation of the above boards, and the scraps removed. in order to get the outer layer cut I had to super77 glue the largest inlay pattern/board to the base board. I could not glue all inlay pieces together immediately. I had to color (dye) the maple woods to match my project. let each piece dry and shrink so the can just easily fit together. Now just to repeat all those 4 inlays 8 more times. Perform some raised relief cuts and add some tiny scratches to be dyed green (top of feathers). Then we have a complete project. This base board will have holes on the top to hold real peacock feathers. I was not worried about the drill holes on this project. But a guy at the wood store gave me his trick. Put some matching sawdust and with what ever finish your going to use and put it in the hole. Don't use glue because glue will prevent the finish to penetrate into the wood near the hole. Must let it dry for a full day, before putting finish on whole project. With that trick I thought I could take and exacto blade create a splinter of the wood to fill the drill hole then use the finish. But I have not tried those techniques yet. All cuts are with #1 super skip Pegas blade. Only 1 blade was used. Base board is about 3/8" thick, all other boards are 1/8" thick. #68 drill was used at proper angle. Since I was inlay 1/8" into 3/8" final base board, the only board thickness that is important is the board being dropped down. So 1/8" for all cuts of 6.5 deg table angle. Yea I asked website to calculate that. Now that little #68 drill was just barely long enough to go through the 1/8" boards and the 3/8" base board. I did not have to go to a bigger drill size because of drill length. wood used: walnut stained dark, canarywood (plain), 2 cuts from maple (green and blue dyed), and base board is myrtle. Just sharing tips and tricks that I have read about. Me. Mark Eason
-
screw flat edge boards vertically on the side of the dowel.
-
my opinion is to use a #1 or #3 super skip. assumption us the big dowel is not pine and you are going to need sharp corner cuts in letters. Also clamp or screw dowel to a flat board. Mark
-
preprius reacted to a post in a topic:
Skull with Snake
-
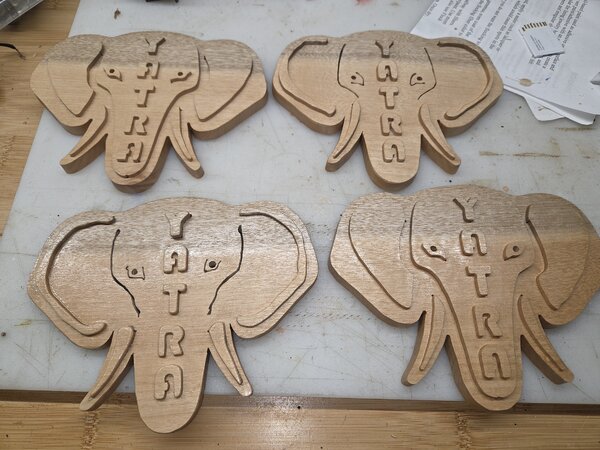
I made a baby shower gift , babies name is "Yatra" . I chose to practice relief cuts. The first version my wife said the elephants eye should be raised. So I did a 2nd version. The 2nd version has 3 heights of relief. I made 2 each. So they can share with all family and parents. The forums don't have a section for raised / segmentation. This is not intarsia. So I put the post into the general category.
-
I have another need to make a relief cut for a name. The relief needs an angled cut all around it. So a nice rounded font worked before. I have since changed my machine to a linux machine and the font I wanted is not available. So I went to the font 'I needed' website typed in the characters I needed. Then took a screen shot and pasted them into the inkscape program. I don't need to install the font, I just needed the outline of the 5 letters I needed. Now I can transfer that to the wood. Also another tip is don't get caught task of finding / installing the right font, just find one close and make cut notes. Last time I wasted 4 hours trying to find a perfect font. Me. Mark Eason
-
- 5
-
-
you should make a confortable wearable pirate hat.
-
The pattern is based on the owners head. "The how to" article shows a curve tool is the starting point as to countour bumps bulges of owners head. The idea is to make a confortable wearable wood piece.
-
Start right here on the village. then start asking questions on areas you need help on. Here is the link to the "how to"...
-
i replied with personal message.
-
I think wearable wooden cowboy hats might open a new niche for scroll saw woodworking and give our craft a little more visibility. I came up with an idea that might be interesting for guitarist. Have a nice presence on stage with a wearable wooden cowboy hat. Maybe the hat to match his/her guitar. My 'how-to' article is on this website so anyone can use it, refine it, improve it. I realized I am only self trained scroll saw guy. Not knowledgeable wood joint expert. But the guys that build acoustic guitars (luthiers) are experts with wood. Some have scrollsaws in their shops and some might not. I have reached out to a few luthier guys and sent them the link to the 'how-to" article to maybe expand their products to their customers. They would add a wooden cowboy hat to the possible product list. Now luthiers might or might not like building the hats, but they do have clients that might like one built. It has not been very long since I sent out emails. I don't expect replies. I also did not try to sell them my made hats, or order anything. I just told them that all the info is out there to use if they are interested. So my email did not even request a response. But did say for questions I will be available. A few follow up concepts. Does anyone here on scrollsaw village play acoustic guitars or know a guitarist , singer songwriter ? You could make a wearable wooden cowboy hat during your 'gigs' stage or front porch presence. Was the guitar bought from a 'boutique' maker? Maybe suggest to a local guitar maker about this idea. Would any of you consider making a hats (board-to-bowl technique) for customers of a local guitar maker or guitar player? Me. Mark Eason
-
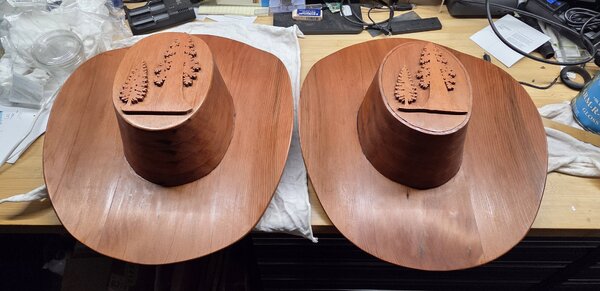
I was given some wood that is 1700 years old, to make for a Father and Son Wooden Cowboy hats. I lumber yard has obtained and was certified licensed to cut up fallen tress old growth Sequoia from Sierra mountains. He viewed me wearing my hat and wanted a set of 2 hats made using Old Growth Sequoia. This is the first time I ever played with such soft wood. Redwood ( i have not played with) is soft, but this old growth is slightly softer. Working with it has it's own issues to resolve. Every time I messed with it, I noticed new dents and scratches. I found that it was my finger nails. Constantly sanding out the scratches. At one point you have to just ignore the scratches and finish the project. The cowboy hats I have made in the past start out with 0.75 inch thick hard wood. This gives the stacked rings (board-to-bowl technique) about 0.12" thick glue surface. Since the very soft wood of Sequoia I wanted a slightly wider glue surface. So I started with 1.25" thick board , now that gave me 0.178" glue surface. When I start cutting the board into rings, I have the mindset of focus get in the zone of precision follow the lines that conform to the customer head. I only track time after I am done with each cut of the ring. All my previous hats each ring takes 40min to 1hr 10 minutes. Sequoia hats took 9 mins per ring. Like I said I don't worry about speed while cutting. I just go with the accuracy of line cutting. But wow, nice and fast. Because I started with 1.25" I only need 4 rings total for a 5 inch tall hat. Before 6 rings. 7 to 9 hours on previous hats just got to 40 minutes on Sequoia hats. I have a few more notes I took during this project if anyone is curious just reply and I can paste them. The top artwork was given to me to resize and cut, symbolizes father son Sequoia Trees. Me. Mark Eason
.thumb.jpg.105149825f259e0e431ea365a593c26b.jpg)
- 6 replies
-
- 11
-
-
-


.jpg.81b3b6edc9937b06f6044e7635c1be9d.jpg)