


FrankEV
-
Posts
2,397 -
Joined
-
Last visited
-
Days Won
78
.thumb.jpg.95d348aa76923344a5cab534cc1b3bc1.jpg)


FrankEV's Achievements

-
 MTCowpoke22 reacted to a post in a topic:
Chinese Dragon Plaque - Intarsia
MTCowpoke22 reacted to a post in a topic:
Chinese Dragon Plaque - Intarsia
-
 FrankEV reacted to a post in a topic:
Chinese Dragon Plaque - Intarsia
FrankEV reacted to a post in a topic:
Chinese Dragon Plaque - Intarsia
-
 artisanpirate reacted to a post in a topic:
Chinese Dragon Plaque - Intarsia
artisanpirate reacted to a post in a topic:
Chinese Dragon Plaque - Intarsia
-
meflick reacted to a post in a topic:
Chinese Dragon Plaque - Intarsia
-
FrankEV reacted to a post in a topic:
Chinese Dragon Plaque - Intarsia
-
FrankEV reacted to a post in a topic:
Chinese Dragon Plaque - Intarsia
-
Allen levine reacted to a post in a topic:
Chinese Dragon Plaque - Intarsia
-
Jim McDonald reacted to a post in a topic:
Chinese Dragon Plaque - Intarsia
-
TAIrving reacted to a post in a topic:
Chinese Dragon Plaque - Intarsia
-
barb.j.enders reacted to a post in a topic:
Chinese Dragon Plaque - Intarsia
-
FrankEV reacted to a post in a topic:
Chinese Dragon Plaque - Intarsia
-
FrankEV reacted to a post in a topic:
Chinese Dragon Plaque - Intarsia
-
Slightly. The Wenge was about 13/16" while the Bloodwod was just 3/4". Thw Wenge did not take on the strong black when the finish was applied like it has in other projects done in the past. Ebony might have worked better, but too expensive for me.
-
Horseshoe reacted to a post in a topic:
Chinese Dragon Plaque - Intarsia
-
ChelCass reacted to a post in a topic:
Chinese Dragon Plaque - Intarsia
-
FrankEV reacted to a post in a topic:
Chinese Dragon Plaque - Intarsia
-
FrankEV reacted to a post in a topic:
Chinese Dragon Plaque - Intarsia
-
FrankEV reacted to a post in a topic:
Chinese Dragon Plaque - Intarsia
-
FrankEV reacted to a post in a topic:
Chinese Dragon Plaque - Intarsia
-
FrankEV reacted to a post in a topic:
Chinese Dragon Plaque - Intarsia
-
I located this image online at least three years ago and saved it to my computer with the intention of adapting it for scroll saw artwork. My initial concept was to create a piece of fretwork art; however, the design was not particularly suitable for that technique, and the pattern remained undeveloped. More recently, while reviewing my files, I rediscovered the image and determined that it would be better suited to Intarsia. I then developed a 232-piece pattern for an 11 ½" x 17 ½" Chinese Dragon Plaque featuring an integral border and beveled frame. Although the original image used only red and black, I added yellow to define the dragon’s belly. Wood used: Bloodwood, Wenge, and Yellowheart. The completed assembly was finished with multiple coats of clear semi-gloss lacquer. Artist FYI: The red background is visually appealing; however, Bloodwood proved darker than ideal for this design. Its deep tone reduces the contrast with the black dragon, making some details less distinct. For stronger visual definition, a lighter red wood, such as Red Oak, may have been a better choice. Comments and Critiques allways welcome. The pattern is available in Pattern Exchange.
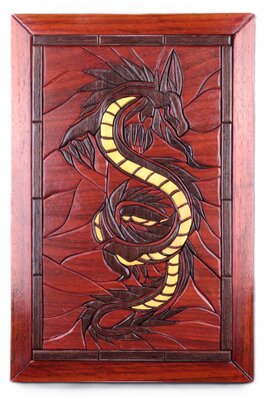
- 11 replies
-
- 10
-
-
-
Adding color is a good thing to do, but it needs to be done properly. Unfortunately your addition of color did not really work in this case. Sort of looks like a coloring book. To add color you need to think like an artist. Color needs to add details and realism, eg. Soft puffy clouds, grass, variation of fur color, etc. Use photos of a real lion in this pose and attempt to add color as seen in the photo. Takes a lot of practice.
-
This is a popular subject, and others have created similar projects many times over. However, for this 12 1/8”x15 5/8” Plaque style project I created a pattern based on a color image I found online. The pattern contains 174 pieces intended to show a lot of detail not usually found in similar patterns. Wood Used: Aspen, Osage Orange, Sapele, Roasted Birch, Walnut, Wenge, White Oak and Yellowheart. The assembly is mounted on a 1/4" thick BB Ply backer. The Aspen used for the White Head and Tail feathers was enhanced with Old Masters Pickling White stain. The plaque is finished with multiple coats of Clear Semi-gloss Lacquer. JFYI, the Yellow and Black of the eye was cut from individual pieces of wood. Critiques and comments are always welcome. My own, after-the-fact, comment is... I should have made this piece at least double in size. The pattern will be posted in Pattern Exchange.
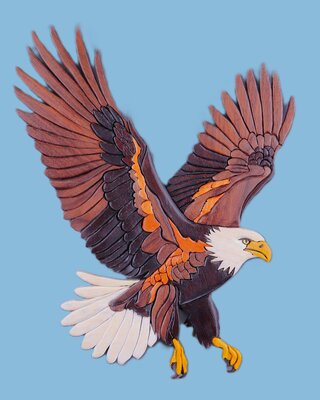
-
I have done both a number of times. In my mind, not debatable, just a choice. When I have/want to frame a piece, I will often enhance the piece with a colored backer. I use a air brush most of the time to spray Acrylic paints or water soluable dyes. This is especially true when the backer requires a blue or green color and/or when the extended backer is BB Ply. In other situations where i use a better wood for a backer, especially a plaque type backer, I prefer to choose a wood the does not need to be enhanced by paint or stain. As I said, just a choice!
-
My 7 5/8” x 15 1/2”, 67-piece, pattern was adapted from a pencil-line image that I found on-line by an unidentified artist. I did a lot of sculpturing on the pieces identified as the “Oral Arms”; to simulate the visual appearance I saw in photos of Jellyfish. Cutting the “Tentacles” was a challenge. Careful cutting resulted in a rather easy overall tight fitting assembly. I chose to mount the assembly on a 5/8” thick x10” wide x 17” tall plaque style backer. Wood used: Aspen, Beech, Bloodwood, Butternut, and Red Cedar for the Plaque. The completed piece was protected with multiple coats of a clear Semi-Gloss Lacquer Finish. Comments and critiques are always welcome. Edit: Pattern posted in Pattern Exchange PS: FYI, the Plaque was made three times. · First, I found a piece of ¼” thick Red Cedar that was big enough, but warped. I attempted to take out the warp by soaking, applying weight. Hoping to maintain a flat condition, I added a 1/4” thick BB Ply to the back side after it was dry. Unfortunately, this did not work well enough and during the cutting to size, clipping the corners and rounding the edges…let’s just say things did not go well. I wound up adding it to the burn pile. · Second, I purchased some Red Cedar from Lowes that was only 8” wide. I ran the rough sawn material through the planner, butt-jointed two pieces together, cut the panel to size, clipped the corners 2” x 2”, rounded over the edges on the router table and loosely placed the Jellyfish assembly on top to see how it looked. UGG! The bold vertical grain of the Red Cedar just looked horrible. Second piece to the burn pile. · Third was finally the charm. I was fortunate the remaining part of the piece of wood I had purchased was big enough to cut it up into three pieces that I, once again, butt-jointed together with the grain now horizontal. I used a lot of clamps and cross stiffeners to make sure it dried flat. Then, after the glue dried, I cut the panel to size, clipped the corners 2” x 2”, rounded over the edges on the router table, and did a lot of sanding with the Palm Sander to get a nice clean and smooth finish. The grain now gives the allusion of water…. IMHO, much better. Sometimes I must remind myself that I’m only human and if something can go wrong, it probably will!
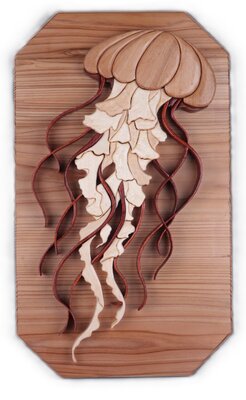
- 10 replies
-
- 11
-
-
Pretty much. I use anti-fungal shampoos on my hair and face to make sure the fungal infection doesn't return. I have the creams the dermatologist gave me just in case it falirs up again. So far so good. However, I have made some improvements to the air flow in my shop along with better dust collection. just to be sure it isn't the sawdust that was causing the problem.
-
This 11”x17” piece is my version of a scene that has been done by many in the past. The basis for the pattern was a free coloring book page that I adapted to create the two-level art panel. The Flower and the Bee are two separate patterns with only the Bee being affixed to the flower after all cutting and shaping is completed. The dimples in the flower center are highlighted with orange paint. The mitered frame rails are 3/4” wide. Wood Used: Aspen, Osage Orange, Poplar, Roasted Birch, Wenge, Ebonized Walnut for the Frame, and the extended Backer is painted 1/4" BB Ply. The completed assembly was protected with multiple coats of clear Semi-Gloss Lacquer. Comments and Critiques always welcome. As usual, I will Post the pattern in Pattern Exchange
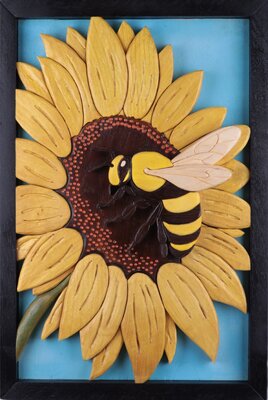
- 5 replies
-
- 11
-
-
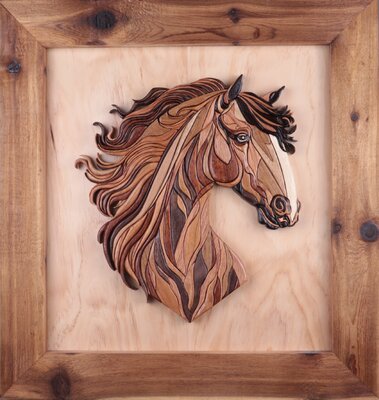
I developed a 12”x13” pattern from an AI Generated vector Illustration done in polygonal style, an Adobe Stock Image #623475669 titled ‘Head of Horse with Large Mane’. The Pattern contains 178 pieces, of which I have noted to ‘Omit’ piece #125. Just too small! I chose to mount the assembly on a 16” x 17” Solid wood Backer and added a 2 1/2” wide rail Frame. Wood Used: Aspen, Basswood, Beech, Butternut, Cherry, Red Oak, Roasted Birch, Sapele, Walnut, premium Pine backer, and rough sawn Cedar frame. The completed piece was protected with multiple coats of a clear Semi-Gloss Lacquer Finish. Here is the Adobe Stock Image Comments and critiques always welcome. For more details about this project visit Intarsia/Segmentation I wil post the pattern in Pattern Exchange

- 13 replies
-
- 17
-
-
-
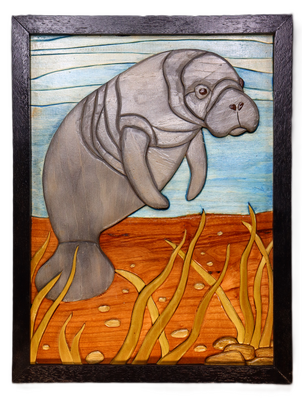
Wenge is just Eyes and nose. Quite hard but cuts fairly well. Doesnt really look black until a finish is applied. The dark lines in the manatee is just the edges of the individual pieces being shaped for deffinition. The Manatee is all just one color, but the photo lights create the darkening of the joints. Much more uniform in real life.
-
As a Florida resident I felt it would be appropriate to make an Intarsia piece of our well-known waterway residents, the Florida Manatee (Florida’s State Marine Mannal) that are often affectionally called Sea Cows. I developed the pattern for a 12”x 16” panel from a free Coloring Book page. I chose to add a 3/4” wide rail frame with mitered corners, fixed to the panel for an overall 13 1/2” x 17 1/2” size. Wood Used: Aspen, Blue Pine, Black Limba, Poplar, Wenge, and Ebonized Walnut for the Frame. The piece is protected with multiple coats of Clear Semi-gloss Lacquer. The color of both the Aspen representing the Sea water and the blue Pine used for the Manatee were enhanced with dyes. Comments and critiques are always welcome. I will post the pattern in Pattern Exchange
- 6 replies
-
- 15
-
-
The backer gets the air brush coloring. I attempt to set a scene with sky and ground colors. The reflection off the background colors and the shadows created by the 1/2" thick cutting play havoc on the photo. That image was the best of about a dozen shots.
-
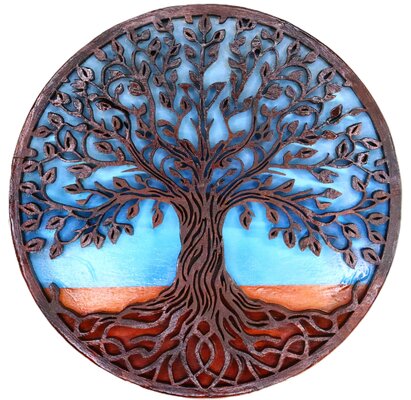
I suggest you read my post in Coffee House; “Where have I been”. I’ve noticed recent post of people cutting ‘Tree Of Life’ fretwork type projects. For my return to the work shop, I decided my first project would not be an Intarsia piece, so, I thought I might join the crowd and see if I could come up with a new, but somewhat different pattern, for a 12” diameter T.O.L fretwork project. This is what I developed. The pattern has 230+ holes. I used 1/2” thick Walnut that I cut with Pegas #3 mgt R blades. The suggested use of solid wood results in a very delicate, easily broken (which I can attest too), cutting that requires a backer. As an option, using my Air Brush and Acrylic paints, I chose to pre-paint the backer before affixing the cutting. The final assembly was protected with multiple coats of spray Lacquer. Photo lighting creates a lot of shadows of the 1/2" thick wood. Less noticable in real life. Comments and critiques always welcome. I will be posting the pattern in Pattern Exchange
- 12 replies
-
- 19
-
-
-
24" diameter.
-
Funny you should ask. We just returned from an 8 day Cruise to the Carribean and while on board, booked two more crusies, an 11 day Southern Carribean cruise next November and a 19 day Seattle to Miami cruise throut the Pannama Canal in September of '27. Optimistically hopefull I'll be around to take it. My sales do not pay for them or for the Diamond Necklass and Rubby Bracelet I bought for her on this past cruise. That was just spending my kids inheritance. The money I make on sales will never cover the material cost I have already expended on my art. It is just a wonderfull feeling when someone appreciates the art enought to purchase it and display it in their home.


