wdkits1
-
Posts
422 -
Joined
-
Last visited
-
Days Won
4
3 Followers


wdkits1's Achievements
")
Expert Scroller (4/10)
235
Reputation
-
 NC Scroller reacted to a post in a topic:
New Intarsia
NC Scroller reacted to a post in a topic:
New Intarsia
-
MarieC reacted to a post in a topic:
New Intarsia
-
MarieC reacted to a post in a topic:
New Intarsia
-
MarieC reacted to a post in a topic:
New Intarsia
-
 MarieC reacted to a post in a topic:
New Intarsia
MarieC reacted to a post in a topic:
New Intarsia
-
 wdkits1 reacted to a post in a topic:
New Intarsia
wdkits1 reacted to a post in a topic:
New Intarsia
-
Hawk reacted to a post in a topic:
New Intarsia
-
wdkits1 reacted to a post in a topic:
New Intarsia
-
WalkerD reacted to a post in a topic:
New Intarsia
-
Montserrat reacted to a post in a topic:
Paisley Rabbit and the Treehouse
-
Beautiful Job on this piece. Love the detailing, choice of woods and depth. Always enjoy seeing original art.
-
wdkits1 reacted to a post in a topic:
Paisley Rabbit and the Treehouse
-
wdkits1 reacted to a post in a topic:
Another Pacific Northwest Coast Native Indian Art
-
wdkits1 reacted to a post in a topic:
New Intarsia
-
wdkits1 reacted to a post in a topic:
New Intarsia
-
Scrappile reacted to a post in a topic:
New Intarsia
-
Liz Weir reacted to a post in a topic:
New Intarsia
-
wdkits1 reacted to a post in a topic:
New Intarsia
-
wdkits1 reacted to a post in a topic:
New Intarsia
-
wdkits1 reacted to a post in a topic:
New Intarsia
-
Thanks everyone for the comments. These were fun to create. I like a good challenge and the 'Wizards Domain" piece was a test of my intarsia skills and patience . I am about to embark on my next challenge piece titled-"Woodworker Needs a Shop". If anyone is interested I would like to do a WIP of this next project from start to finish. The Fun has just begun!!

-
wdkits1 reacted to a post in a topic:
A Fancy Welcome Sign
-
Thanks everyone! glad to be back. To Sycamore67-Ibought a couple of boards from Woodcraft. Not cheap but worth the price if used in small intarsia pieces.


-
Thanks everyone for the nice comments--To Dan-I use Lignum Vitae for the green trees. Although it is considered to be one of the densest woods. it is fairly easy to cut and shape and with exposure to sun will turn a vibrant green.
-
Hi there fellow scrollers Has been a while since I've any completed projects to show off. The first one is a plaque I did as a birthday gift for a good friend of mine done as an Intarsia rendition of the unit crest of the 1st Aviation Brigade, Bravo 3/17-Burning Stogies. 50 pieces from 7 woods. Frame-Fishtail Oak, Background-Red Oak, Sword handle-Bloodwood, Eagle and frame-Pernambuco, sword blade-Holly and Ebony, blue background- Blue Mahoe. Fun little project!! The second project is an original Intarsia rendition titled "The Wizards Domain". This is the second in the series I am creating for " The Aavegotchi Intarsia Collection, a gaming platform owned by one of my sons. The wizard is a character in the games. This hand drawn project consists of 442 pieces from 32 different natural colored woods. Lots and lots of small pieces , extensive detail carving and texturing bring this piece to life. Fun Stuff


- 20 replies
-
- 16
-
-
-
-
 wdkits1 changed their profile photo
 -
Thanks Dan--I do the edge banding just for decoration but enjoy the challenge of perfecting new techniques and building new jigs for my projects. Just fun stuff!!
-
The Frame-Part 6 "Part of the Art" With the edge banding done and the diamonds inlayed I went ahead and painted the backer board black to get ready to begin the new intarsia. After taking a few progress pictures I realized that although the frame is esthetically correct, it still needed something to give a more complete look. I decided to connect the diamonds with bookmatched bloodwood inlays which required making a new template for use with my new Roto-Zip Inlaying tool. After perfecting the template and doing a couple of test runs on scrap wood, I went ahead and routed the frame sections for the 1/8" thick x 5/16" wide inlays. So this is where the process gets tricky. All of the inlay grooves are exactly the same size because I used one template. In order to cut the 4 strips needed for the inlays I had to have 2 mirror image patterns to trace on label paper and apply to the pieces of 1/8" bloodwood, which have been bookmatch cut and temporarily glued together for scroll cutting. Remembering the test cuts I made earlier on scrap wood I used the last sample test and resawed the routed section off which gave me a new pattern I could use to trace onto the label paper. I cut the sections out on the scroll saw and sanded the edges of the inlays for proper fit. I think I have done what was needed to give this frame a unique hand crafted look and think it will become "A part of the art".


-
The Frame-Part 5 Edge Banding Got all of the grooving done for the edge band so the next step in the process is to cut the inlay to the proper width and thickness to fit in the groove. I'm using bloodwood for the inlays. Anyone that has ever worked with bloodwood knows how hard and brittle it can be especially thin 1/8" strips. To be able to bend the strips around the outside edge of the oval ( without breaking) I made a little jig that is used to heat the strips while applying slight pressure, and going back and forth about 2 "at a time. Takes a little patience but worth the effort. Made from a chunk of wood and an old soldering iron.


-
The Frame-Part 4 The Groovy Jig I got the diamonds inlayed into the frame so now I will do the banding around the edge. This procedure is easy enough to do on a rectangular frame but presents some challenges on an oval. For one, unless you have a router bit with an 1/8" cut it is difficult to maintain the correct depth all the way around the perimeter. I don't have the proper bit for this so had to improvise. Years ago I made this jig just for the purpose of doing this procedure. It allows me to cut a uniform 1/8" depth in both directions to center the groove on the edge. I'm using a 1/4" rabbeting bit with a 3/8" cut with the bearing seated into a larger dowel which is off-center .At this point I can adjust the amount of bit exposure by rotating the dowel and locking it in place. I clamp a small block of wood to the side which will keep the frame from rocking as I push it past the bit. Once I go all the way around the frame making the groove I just flip the frame over and repeat to get a centered groove. On to the Inlays.


-
Many moons ago I needed to make something for when I applied the finish to my jewelry and keepsake boxes. I needed something that was portable and easily moved around the shop and would allow me to rotate the box and spray on all sides and underneath and adjustable for different sized boxes. So this is the jig I came up with. Basically a turntable with adjustable sliding pins for the box to sit on. While this worked great for the boxes I recently needed to use the jig for applying the finish on my "Majestic Mountains Lake" intarsia frame .Was easily clamped to my work table and allows me to rotate the piece as the finish is applied. By the way-- I still have the final 1/8" coat of resin to apply to the intarsia.


- 1 reply
-
- 4
-
-
The Frame-Part 3 Let's do some inlays! I like the color and grain of the chechen wood but think it needs something to kind of distract the eye from where the grains meet at the bookmatches. I decided to play with placing some contrasting wood diamonds inlayed into the frame at each of the joints. i don't own a pin router but do have an old roto zip tool kicking around just waiting to be put to use. I had to fabricate an attachment for the roto zip that would allow me to follow a template to get exact cuts for the inlays. After a little trial and error I managed to perfect the template and techniques and got the inlays done. I also got the routing done to accept the backer board. More to come!


-
The Frame-Part 2 After getting the frame sections cut out and dry fit, I begin by using packing tape to hold all the pieces together in their proper position on the pattern sheet. To clean up the ends where pieces meet I clamp a section together and run a thin kerf pull saw through the joint a couple of times for each set of joints. Once all the joints look good its over to the router table to make the slots for the splines, I'm using a 1/4" rabbet bit set to cut 3/8" in the center of each end. I use a fence on the router table for stability when pushing past the bit. I made the cross grain splines 3/4"wide x1/4" thick x 2 1/4"long and sanded to fit each slot. After making a few more slight adjustments to the fit, it's time for the glue up. I used 5 minute epoxy with a couple of drops of dark walnut dye and spread it evenly in the slots for 2 sections. Stuff works pretty quick so only mix enough to be able to use in about 3 minutes. Set the glue ups on the pattern sheet making sure everything lines up and again using packing tape pull everything tight. Once the epoxy has set up I sand off any excess glue and do the final glue-up. Do my interior and exterior sanding to 100 grit and apply a tell-all poly coat (spray-on wipe off) that shows what needs to be done for the final sanding. I like the color and grain of the Chechen but am not too happy with the results of the bookmatching . Let's see what I can do about that. Stay Tuned


-
Hi Gonzo--I saw one for sale in a catalog years ago and thought I would make one.
-
Thanks 67-- Not the best bookmatch but will work for this project.
-
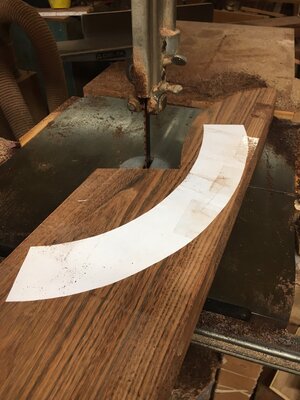
I really like the looks of the oval frame but this time I have to make the frame from scratch. I dug out my shop made oval jig and setting the arm to make a 12" x 18" oval got the inside drawn, then reset the arm to give me a 2" width for the frame sections. The frame will be made of 4 bookmatched sections with the pieces joined at the top , sides and bottom. I had a piece of 8/4 Chechen that's been hanging around the shop for years and figured I could re-saw to get my 3/4" bookmatched sections. Re-sawed, planed and ended up with my bookmatched 3/4" stock. At this point I taped the pieces back together and applied the traced pattern to the wood blanks. And the fun begins !!