


rljohn56
-
Posts
103 -
Joined
-
Last visited
Content Type
Store
Profiles
How-To & Articles
Scroll Saw Reviews
Clubs & Organizations
Clubs & Organizations International
Pattern Shop
Suppliers
Village University
Help Desk
Forums
Gallery
eBooks
Everything posted by rljohn56
-
ok, here is a project i just finished cutting. my question involves starting holes. how do i work around drilling holes when i'm just cutting a single kerf? there are no drill bits out there smaller than the width of any scroll saw blade. I corrected the issue and will show you that in my next post, but the question still is out there. Thanks again for all the wise tips and advice i always get from the family. ray johnson

-

rough looking wood after removing tape
rljohn56 replied to rljohn56's topic in General Scroll Sawing
a couple of responses to the advices, tips, etc. the main reason i went to using tape was i had read it helps in lubricating the blade while cutting. as for spraying the pattern directly on i never even thought about using mineral spirits to get it off afterwards (i'm still new to all this woodworking world). the other suggestion of using sanding sealer prior to cutting is something i've not done before either. will also try using a shellac prior to painting also. Thank you! thank you! thank you! one last question: if i start applying my pattern directly & then using ms to get the pattern off afterwards is there a waiting period before i can stain or paint since ms is a dissolvent? -
recently i've noticed that when i remove my tape & pattern from my scroll saw project it is pulling up tiny slivers of the wood. I use 3m blue painters tape. i sand the wood first before i do anything. I use mostly Baltic Birch for just about all my projects just because it's easy to work with. With this particular project i cut using a Pegas #1 SPR modified geometry blade. if you look close around the letters "E" & "W" and around the handle u can see the wood is rough. i sanded it as much as i could before i painted it, but still. so several questions: is this happening because i'm cutting detailed using a soft wood? the wrong type of blade? the wrong type of tape? not sanded enough before hand? Any and all critiquing. tips. advice is always welcome for this old guy.

-
not even close! they are 7/16" high & 1/16" thick. i can't cut something that small, but again, there is someone i know who has a laser cutter that can. I just don't know what type of wood veneer that is so i can match them up.
-


-
has anybody out there ever bought Studio Calico wood veneer letters, the 200 piece pack? the reason i'm asking is that i'm tired of having to buy a whole pack just for a few letter that they don't make enough of. according to the person i spoke to there they don't sell individual letters and that particular item is no longer sold. I now have a ton of letters like z, y, q, etc. and a few vowels which i need more of. I'm not knowledgeable on wood veneer so i don't know what kind of wood they used or the thickness. i have someone who can cut some, but i need to get him the wood.
-
thanks, everyone again for all your responses to this. i was laughing just the other day thinking, i sure could use one of those police sketch artists where you just describe the scene and they draw it up.
-
general tips for scroll sawing thicker wood
rljohn56 replied to rljohn56's topic in General Scroll Sawing
Thanks to all of you that responded. For someone who is still new to this it really means a lot! -
here's my question: I have all these ideas for certain pattern themes, but don't necessarily have the actual artistic ability to put them on paper in order to make a pattern. I know there are people out there that do patterns, but my question is are there other ways to approach this dilemma? i've thought about finding someone that is good at sketching and working with them about these ideas. what do some of you do in order to put your ideas onto paper.
-
general tips for scroll sawing thicker wood
rljohn56 replied to rljohn56's topic in General Scroll Sawing
ok, here is my finished project. this is 3/4" baltic birch. I used mainly a #5, #3 and for the tiny stuff #1. my question is for much of this even though it turned out fine is that some of the cuts i.e. the minuscule deer eyes etc. were so small that even a #1 was too big so how do you handle cuts like that?
-
i just finished a very detailed piece that was done on 3/4 thick wood. my question is this: on the pattern it suggested using a #7 or #9 blade to cut it, but there are some places that there is no way in hell you could do that! take for instance eyes the size of pin holes. so those of you that are masters out there how do you do that then? I won't post the actual picture( i got in trouble for doing that once before), but the pattern is of a gun stock with deer, trees, etc. on it. I finished it and it looks great, but still i had to go to much smaller blades just to try and get the details down. is there some technique that i'm missing? thanks, again for all the replies.
-
Thanks again gang for the many tips and advice.
-
I'm not very good at the high gloss finish that i see many people do on here and was looking for advice.....especially when you are dealing with smaller pieces! example the vid i enclosed. how in the world would you sand and finish something like this to a high gloss look? VID_20170616_160004170.mp4
-
does anyone in the community use this software and if so how do you rate it? also are there other similar ones out there that might be better. I do a lot of portraits and use Photoshop Elements 15 which i like, but this products claims to make the process easier & faster. Just curious. thanks, Ray
-
i've started getting into compound cutting and already into my 2nd project i noticed that one end of the pieces come out tapered. this only seems to be happening with letters and not any images. my work piece is flat & i'm not aware of me forcing the piece. my blade is level to the table so i'm not sure what i'm doing wrong. could the tension be too slack? thanks for the help. Ray


-
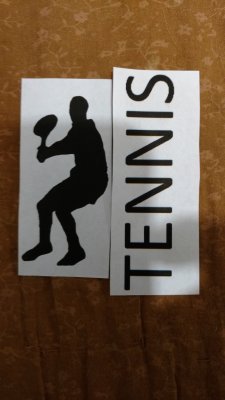
I'm brand new to this compound cutting aspect of scroll sawing but am totally fascinated with it!! I certainly don't understand how it works. here is my idea for one but didn't know before hand if this would work. does both images have to match as far as height and width? and will it make a difference if the images are one way or the other(upside down) from the other side?(i hope i'm making sense). thanks for any help, Ray
-

Hi Ray,
The way they are facing is only important if that's the way you want to see them. The way they are in the picture is fine. They should be the same height or you will have bits of wood where you really don't want them. Also, the images need to be the size of the wood you are going to use, so the tennis player would need to be the height and width of the face and the Tennis words would need to be the length and width of the side. So the wording would need to match the picture in size exactly. The starting point of the cross stroke on the T would need to line up with the bottom of the foot and the outer edges of the S will need to line up with the top of the head. The biggest problem you'll face with the text, however, is that it is not connected. The whole thing will fall apart . Try using a different font. Just remember, you are cutting a 3D piece out of timber. You will only get the black parts after you have cut, all of the white is wasted.
I hope this helps.
-
-
I did these in honor of the show Longmire.

-
Hands down the hardest thing i have done to date with my scroll sawing. I really like doing portraits

-
Actually i was using a #7 reverse. i was very nervous about straying too far off line during the cuts because i wasn't sure how it would affect the overall finished product since i was also cutting from another side as well. call me a dummy, but i'm still not sure how this type of cutting produces such an effect. the whole time i'm cutting the second side i'm thinking i have got to be cross cutting into the 1st side and thus screwing the whole thing up and yet when done.... I have found my projects for this year's Christmas presents to my family!!!
-
i don't think the video came thru so here is pictures of the final product.


-
several questions to those out there that r experts in this form of scroll sawing. the pattern is from "Big Book of Scroll Saw Woodworking" there wasn't an after picture so i wasn't sure if this was how it was suppose to look first of all. pretty cool even if it isn't, at least to me. It mentioned using the biggest blade possible so i went with a #7, but there is no way i can make all those intricate cuts for the corral side. Can you use a thinner blade even though the wood is basically 2" thick? also is it normal for the block to get hot near the ends? and my last question is in regards to the block jumping a lot during the cutting process. i didn't think i was cutting that fast but i'm assuming it was because of that? any tips for the future would help. I really like this type of cutting! very fascinating to see the end results. thanks again gang for any and all inputs. ray VID_20170607_134025124.mp4

-
never done compound scroll sawing before but i want to give it a go just for the fun of it. My 1st question is about the wood. I know you do this type of projects with blocks of wood, but for a 1st timer, when ordering wood from online somewhere am i looking for term "turning blanks" or "carving stock"? anything that says "blocks" i can understand, but i'm not familiar with the others. Thanks, for the replies in advance. ray
-
thanks for removing the pattern i posted. i'm still new to all this and didn't know about what patterns i could post or not. a lesson learned. thanks again
-
here is my next project for my niece, thanks, Sue May, for the pattern. my question is about pilot holes in general. the smallest drill bit i have is 1/16 which for some of these cuts is pretty big. i know i can kinda of work around the hole itself, but i'm never sure where to start, i.e. start of a run, middle, etc. i have ordered smaller bits, but there has to come a time when your bit hole will be smaller than the blade can go thru. Lines like the deer legs i know i can use a blade with a wide enough kerf so that it shows thru when i put the backing on. again i appreciate any and all input. This is my first real challenge at cutting because it is detailed(at least for me it is). thanks, again, gang!!! Ray
-
Thanks everyone for the tips and advice. I learn something new for everyone each time i get on here.


