


yamatetsu
-
Posts
129 -
Joined
-
Last visited
-
Days Won
10
Content Type
Store
Profiles
How-To & Articles
Scroll Saw Reviews
Clubs & Organizations
Clubs & Organizations International
Pattern Shop
Suppliers
Village University
Help Desk
Forums
Gallery
eBooks
Everything posted by yamatetsu
-
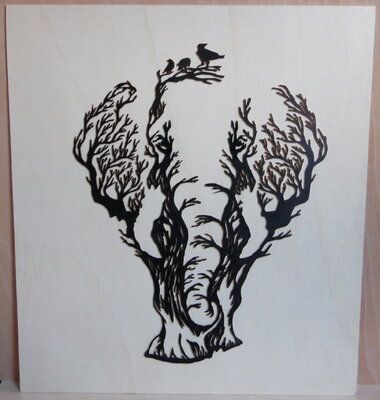
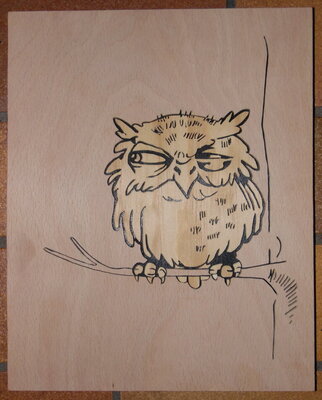
'Treephant' 48 x 54cm, backer board 4mm, Treephant 4mm, 'cheap' DIY store ply, done with a hand held fretsaw with a #1 blade.
- 8 replies
-
- 16
-

-

-

-
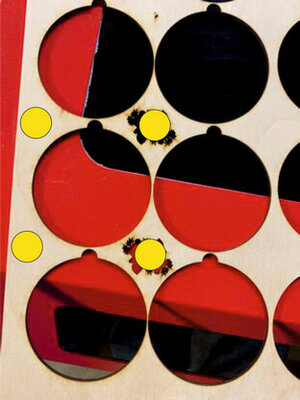
It's because of the stack cut. On the top of the top board (maple), the saw blade basically starts at 0 degrees and cuts diagonally down, ending at 2 degrees at the bottom of the top board. This means that the maple tooth's surface area of the top is slighly smaller than that of the bottom. Since you did a stack cut, the saw blade starts at 2 degrees on the top of the bottom board (walnut) and then cuts diagonally down to 4 degrees at the bottom. This means that the top surface area of the walnut tooth is already as big as the bottom surface area of the maple tooth and the surface area of the botton gets even bigger. So the maple tooth is a bit smaller than the walnut tooth. It's not much because it was just a two degree cut. Likewise, the hole in the walnut is a bit smaller than that in the maple. By cutting you removed a little material the width of the saw blade. So now the holes are a bit larger than the teeth, the hole in the maple board being smaller than in the walnut board. Now you put the larger tooth (walnut) into the smaller hole (maple). This probably fits so well because by sheer luck the 2 degree cut made the walnut tooth that bit bigger that accounts for the material that was removed by the sawblade in the maple board. The hole in the walnut board is bigger because the tooth is bigger than the maple tooth and there was material removed by the sawblade. So when you put the smaller maple tooth in the bigger hole of the walnut board, there will be a gap.
-
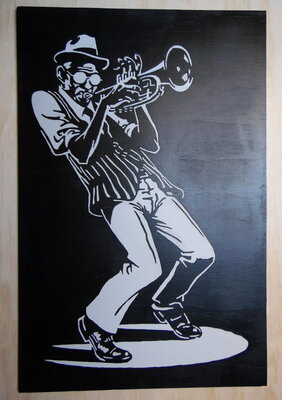
This is not a pattern. It's just a pic I found that has been sitting on my computer since december '22. I don't know where I have found it, nowadays I'd have to google 'displate jazz trumpet player silhouette', go to their website and use a screen capture program to get the image. To use it as a pattern, I just made a negative of it and then proceeded to cut out all of the black parts and painted them grey.
-
'Play it again' 30 x 46cm, backer board 4mm, top board 4mm, 'cheap' DIY store ply, done with a hand held fretsaw with a #1 blade. Another segmentation piece. Lots of very small cuts and some very large ones, too. The grey parts are cut out of the black board, painted, and then inserted back into the board. Since there are very small gaps around every single piece, I had to paint not only the surfaces but the sides too. This goes for every grey piece and all the cuts in the black board. Five hours of painting this time. Here's the back for some psychedelic vibes.
- 8 replies
-
- 17
-
-
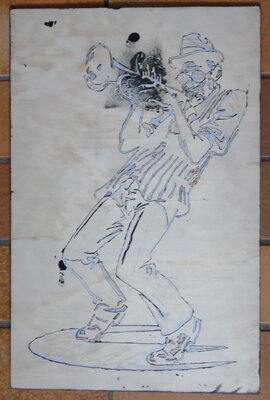
I made this from an image that I found online. So, it IS a pattern, but one I had to adjust a bit while cutting because some of the cuts were too close together for comfort.

-
I actually didn't want to do segmentation, I started with a yellow backer board and cut the pieces out of the black board. Alas, this didn't work for the tiny pieces, the yellow background just wasn't visible. So I had to start again, but this time I had to focus on cutting the pieces properly as I needed them later. Much more work, but it was worth it.
-
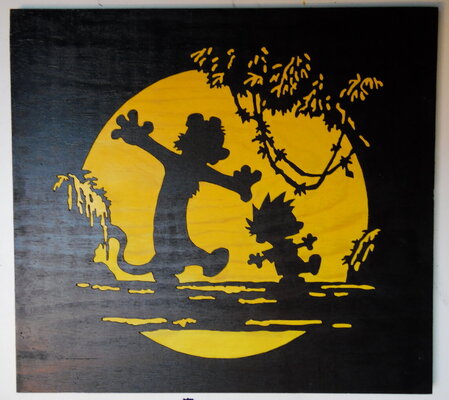
'Calvin & Hobbes' 30 x 33cm, backer board 6mm, Calvin & Hobbes 4mm, 'cheap' DIY store ply, done with a hand held fretsaw with a #1 blade. This is segmentation, so the yellow parts are cut out of the black board, painted, and then inserted back into the board. Since there are very small gaps around every single piece, I had to paint not only the surfaces but the sides too. This goes for every yellow piece and all the cuts in the black board. Took me about four hours just to paint it.
- 11 replies
-
- 19
-
-
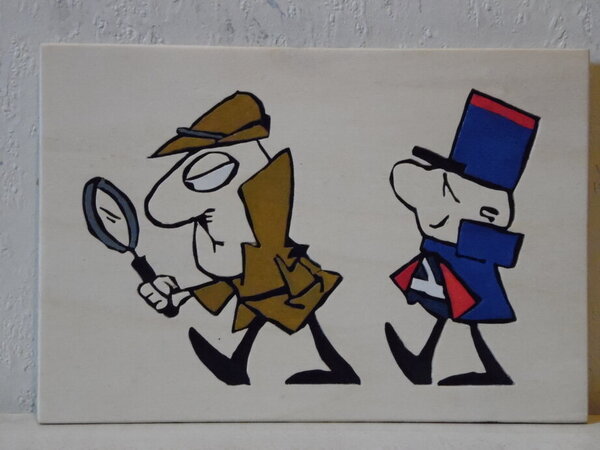
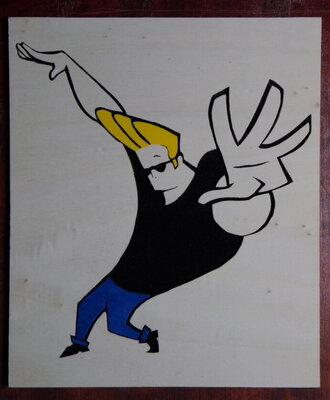
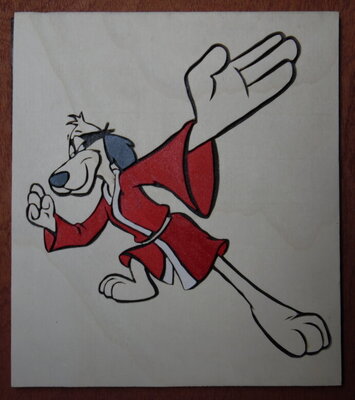
"Johnny Bravo" 20,5 x 24,5cm, backer board 4mm, Johnny 4mm, 'cheap' DIY store ply, done with a hand held fretsaw with a #1 blade. "Johnny Bravo" 21 x 24cm, backer board 4mm, Johnny 4mm, 'cheap' DIY store ply, done with a hand held fretsaw with a #1 blade. "Hong Kong Phooey" 21 x 24cm, backer board 4mm, Hong Kong Phooey 4mm, 'cheap' DIY store ply, done with a hand held fretsaw with a #1 blade. "The Inspector" 21 x 14,5cm, backer board 4mm, inspector 4mm, 'cheap' DIY store ply, done with a hand held fretsaw with a #1 blade.
- 7 replies
-
- 19
-
-
You could still use that as a kind of jig. - Cut a scrap board, cover it with painter's tape, this will be the backer board - put small strips of painter's tape at the yellow dots - put a dab of superglue on those strips - glue the two boards together - put the piece in and sand it - twist the two boards to separate them without breaking the template board
-
I would make a small jig for this. - cut two boards to identical size - cut one earring out of one board - use spray glue / double tape to glue the two boards together - plop the earring into the hole - sand it - pull the boards apart, remove the earring - tape / glue the boards together - plop the next earring into the hole - rinse and repeat
-
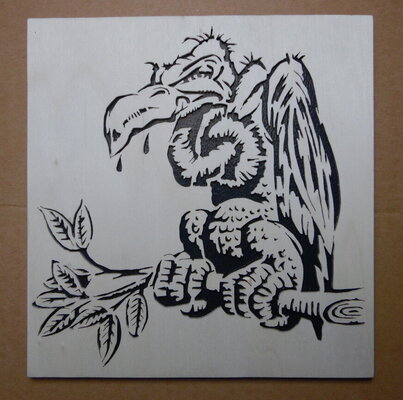
"Bon appetit" 21 x 21,9cm, backer board 6mm, vulture 4mm, 'cheap' DIY store ply, done with a hand held fretsaw with a #1 blade.
- 4 replies
-
- 16
-
-
"Rainy day" 29,5cm x 31cm, backer board 6mm, Snoopy & Woodstock 2 layers of 6mm each, 'cheap' DIY store ply, done with a hand held fretsaw with a #3 blade.

- 6 replies
-
- 19
-
-
Ummm, this is not my dog. I just made the patterns so that Sycamore67 might have an incentive to cut one.
-
Aww, come on. Take a look at your gallery, you have done trickier things than this.
-
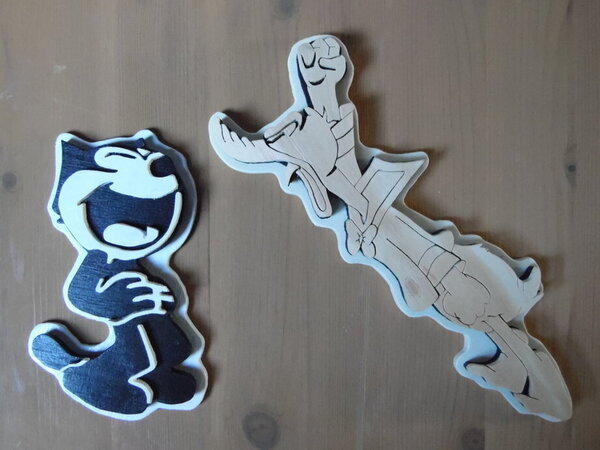
Two fun scrapwood projects. "Felix the cat" Roughly 8,5cm x 13,5cm, backer board 3mm, Felix layer 6mm, Felix parts 3mm, 'cheap' DIY store ply, done with a hand held fretsaw with a #3 blade. "Donald" Roughly 21,5cm x 7,5cm, backer board 6mm, Donald black layer 6mm, Donald 4mm, 'cheap' DIY store ply, done with a hand held fretsaw with a #3 blade. Donald meets Felix.

-
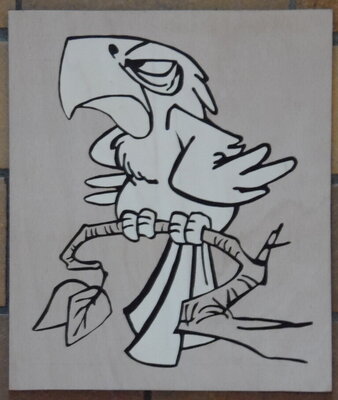
"suspicious" 30 x 24cm, backer board 4mm, bird 4mm, 'cheap' DIY store ply, done with a hand held fretsaw with a #1 blade. "angry" 27,5 x 23,5cm, backer board 6mm, bird 4mm, 'cheap' DIY store ply, done with a hand held fretsaw with a #1 blade.
- 4 replies
-
- 12
-
-
'Hagar the Horrible' 21 x 30cm, backer board 4mm, Hagar 4mm, 'cheap' DIY store ply, done with a hand held fretsaw with a #1 blade.
- 2 replies
-
- 12
-
-
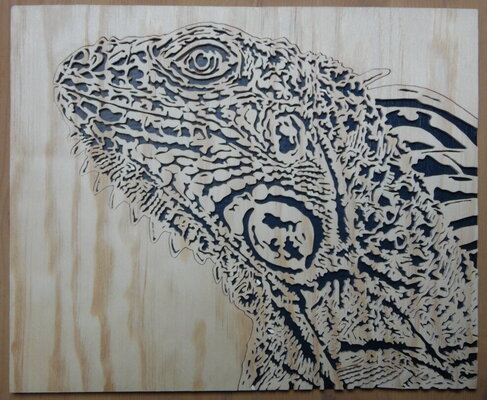
"Mr. Lizzardo" 23 x 28cm, backer board 4mm, Mr. Lizzardo 4mm, 'cheap' DIY store ply, done with a hand held fretsaw with a #1 blade. I wanted to do a more traditional pattern that gave me a challenge, and boy, did I get one. This thing is almost completely about very fine details, and lots upon lots of 'em. 25 - 30 hours of focused concentration, very careful sawing and even more careful sanding.
- 4 replies
-
- 12
-
-
-
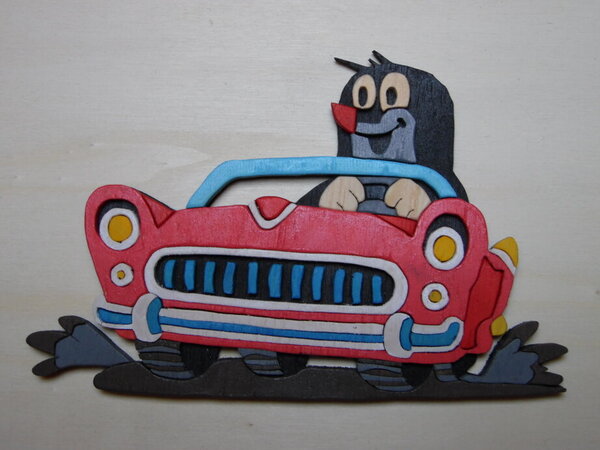
'The little mole' ca. 18 x 12cm, backer board 3mm, mole/car 3mm, 'cheap' DIY store ply, done with a hand held fretsaw with a #3 blade. This is a cartoon character, my mom loves him, so I made one for her.
- 5 replies
-
- 13
-
-
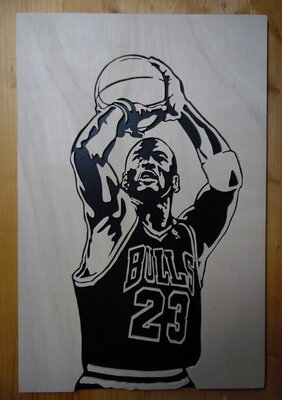
"23" 33 x 49,6cm, backer board 6mm, Michael 3mm, 'cheap' DIY store ply, done with a hand held fretsaw with a #3 blade.
- 4 replies
-
- 14
-
-
-
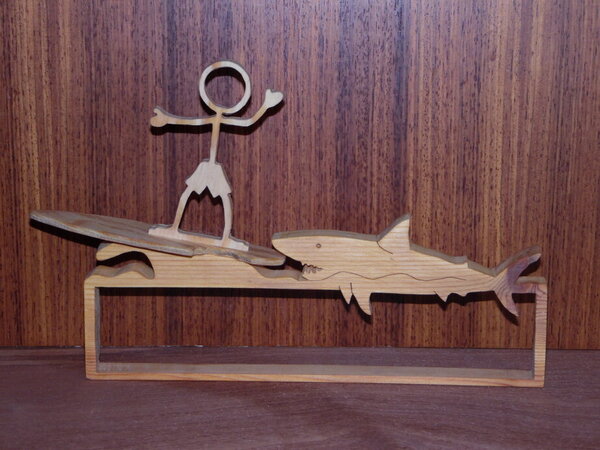
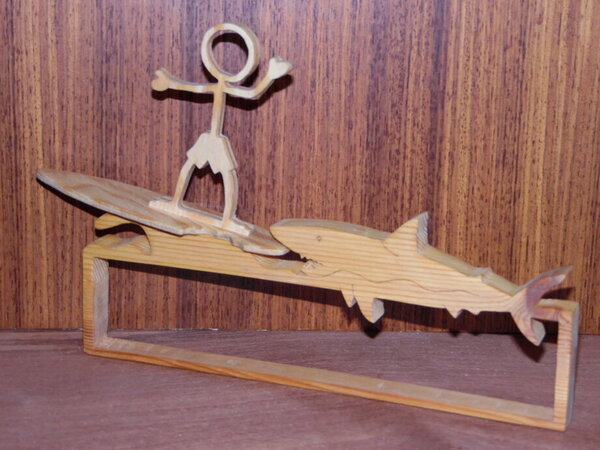
"Meeting Bruce" 27,5 x 17cm, Bruce/water 2cm, surfboard 3mm, surfer 8mm, done with a handheld fretsaw with a #3 blade. This is a Steve Good pattern. Cutting by hand through 2cm thick wood with a #3 blade was... exhausting.
-
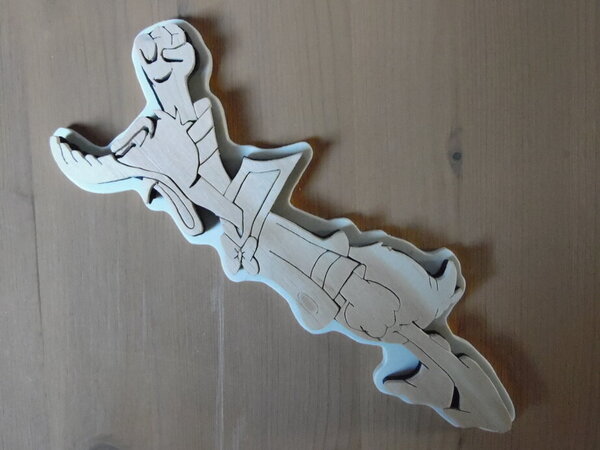
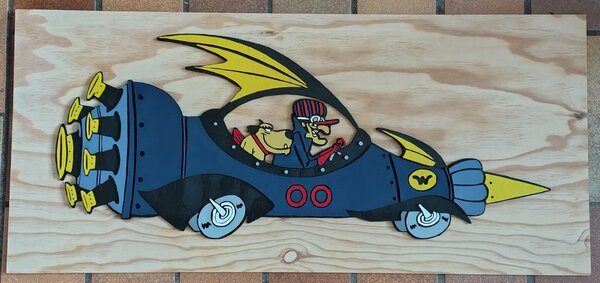
Fretsaw project: Wacky Races - The Mean Machine
yamatetsu replied to yamatetsu's topic in Bragging Rights
I think that if you are able to do something like that with a scroll saw, you know all techniques that are required for the cutting process, so the hard pard is already done. It would just be a process of learning how to control the blade properly when using a handheld fretsaw, i.e. which speed to use in various situations and how to move and rotate the board around with just one hand. Plus you can also turn the saw around a bit, which helps cutting corners and curves. I'd say that someone who is a good scroller would be able to use a handheld fretsaw. It would definitely take some time and much practising to get to the same level, but if someone who had zero woodworking experience (that's me!) can do it... -
Fretsaw project: Wacky Races - The Mean Machine
yamatetsu replied to yamatetsu's topic in Bragging Rights
I just loved the flow of the grain too much to paint it over. I did cut the shadow and put the car and the shadow on a plain background, but it just looked ... plain. As for the frame, it would of course be nice to have one, but making one is just too much hassle for me. I don't have any power tools except for a cheap grinder, so I have to do everything by hand. I am able to make a nice looking frame, but it would simply take too much work. -
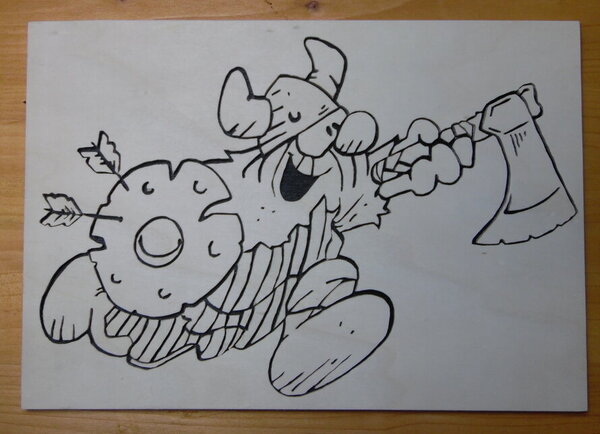
"Wacky Races: The Mean Machine" 65,5 x 30cm, backer board 4mm, Mean Machine 4mm, Mean Machine backer board 4mm, 'cheap' DIY store ply, done with a hand held fretsaw with a #1 blade. This one has many teensy small details, despite being pretty large. Check out the 'glass' in Dick Dastardly's sunglasses, the small one has the diameter of a toothpick. I wanted to go with a bland background and a black shadow underneath the car, but the grain on the board I used just fits perfectly, it looks like the car is driving on a dirt road or something. Nice.
- 11 replies
-
- 14
-
-


