
Search the Community
Showing results for tags 'box'.
-
She wanted another white jewelry box to match the one I had already made. I have got the making of the joint box sides and steaming of the curved top down. Making and fitting the draws takes more time. I scroll the front of the draws from the front of the box before I glue it together. I use lap joints to assemble them. She did her great painting of hydrangeas. On to the next project when it gets a little cooler in the shop.


- 10 replies
-
- 19
-

-

-
I cut a fret work box a few years ago that I really liked. It was made out of Bubinga wood and had a great looking redish color. I have used up most of my Bubinga and come to find out it has become very hard to get. I had some 1/4" Mahongany left over from another project and decided to give a try. The pieces I had were not as wide as the original project, so I had to go a little smaller. Lots of repetitive cuts and I liked adding the funiture style feet. I dadoed the edges 1/8" on all side but the top for a stronger fit and glued in place with CA glue including the bottom. I recessed the hinges 1/8" on the base and flush on the top and used my 2 sided tape technique for positioning the hinges. Waxed and pretaped the screws and then ground down the screws for the top so they would not pass through the the 1/4" material. Finish is Shellac and Gloss lacquer.


- 14 replies
-
- 24
-
-
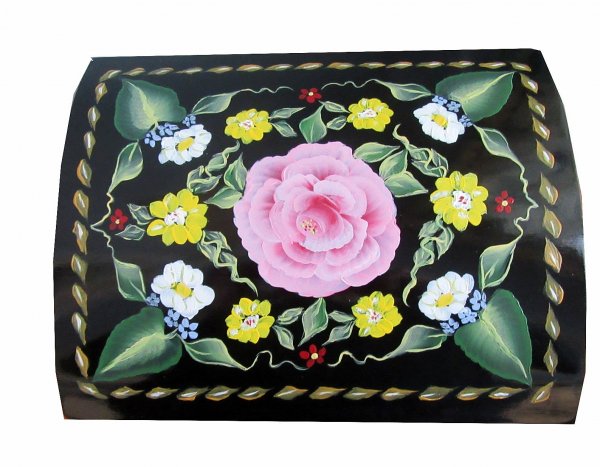
Got another request from my wife to make another Box Joint Box she could paint. She wanted it to have a high gloss black lacquer finish (almost piano like) I got the joint box and dome pretty well down pat. She also wanted a drawer. (first for me) It's 8x10 1/2" poplar. There are at least 10 coats of black lacquer and I wet sanded with 320 grit most of the coats. It's amazing how fast lacquer dries! It took me a few days to get the box ready and just a day (with drying ) to have her amazing painting done. I'm loving that high gloss look and the flowers!


- 15 replies
-
- 14
-
-
A puzzle box with a twist; there's a magnet in the bottom of the hole for the pin, with panel nails in the pin to hold against the magnet. And you need a magic wand to open it. The pin was originally a standard heart, I flattened the heart so I could cut the pin in the shape of a key. Wood: 1 1/2 X 1 1/2 inch oak Blades: FD Polar #1 for the pin and sliding dovetail, Polar #5 for the inside void, the outside of the heart shape and to rip the 1/8" bottom. The only tricky part of the puzzle box is the order of cutting must be followed. 1. rip the bottom piece, 2. cut the pin, etc...


-
First puzzle box. Followed the directions from the latest issue of the Scrollsaw magazine, mostly. It was a block of basswood from KJP woods. Didn't add the 1/4" layer because I knew I was painting it. Finished with beeswax butter (beeswax mixed with mineral oil) 20230612_185413.mp4
-
I made a lidded box to enter into a contest at our club. It is made from walnut. It is around 6” tall. I finished it with walnut oil. I finished the inside with black flock. I used steel color model paint for the bands. Not happy with the bands. Not going to enter it. I made a different box that I like better. My wife likes it better too. The last picture is with the box I am going to enter but I haven’t put the finish on yet. It is pecan bottom with quarter sawn sycamore top and spindle.


-
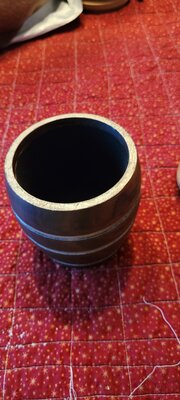
My wife loves lidded boxes to put things in. I wanted to make a larger one so I thought I would make a whiskey barrel. It is 7.5” in diameter and 11” tall. I hate doing felt so I flocked the inside.


-
My wife wanted me to make a lidded box for her bosses birthday. I glued up some leftover cherry and walnut from a cutting board project. Just have to put the finish on now. I brought it in to ask her if it was ok and now she is going to keep it and give her boss a bowl I made.


-
My wife wanted me to make another tissue box. I found a nice fret pattern for the sides. Made from 1/4" oak and fits the standard size Kleenex Tissue Box 8.2 x 8.4 inch / 20.8 x 21.3 CM. It has a 1/4" gap on the bottom for easier lifting. Finish is shellac/ gloss Lacquer.


- 21 replies
-
- 17
-
-
My wife convinced me to make another domed box so she could paint it. I used the same dimensions I had used on a previous box. 1/2" poplar. She wanted a high gloss finish, so I did 14 coats of gloss spray lacquer and started wet sanding with 500 grit sandpaper after coat number 5. I got close to a piano finish. She used a special enamel paint that takes a few weeks to totally cure and I will wax/polish after that.


-
I had looked at Pedro's finescrollsaw.com several times and wanted to try one of his patterns. Purchased one of his patterns called the Wiseman Coffer. (9 euro) It was great working with Pedro and he did give suggestion that I either use European "A3" paper or have it converted but retain the original size. My local UPS store made it happen with 2 sets of 17 x 12 prints. I decided to kick it up a notch by going with Bubinga wood $$$. It requires both 1/8" and 1/4" wood. I had some of the 1/8" but I needed 2 pieces of 8" wide and the 2 sq foot packs were only 5.5" wide. I contacted Richard at Richards Craft wood in Clemmons NC. www.richardscraftwood.com. He was able to mill up the pieces I needed and had them in a few days. Lots of cutting and lots of broken blades (Bubinga is hard !) It took about 3 weeks to finish. I used a Lacquer finish and it really brings out the color of the wood. I did used a temporary light wood backer on the inside to accent the fretwork for the picture but removed it afterwards.


- 24 replies
-
- 24
-
-

-
Yesterday I finished my first 'box' of any kind. It's from a 1928 pattern of an Egyptian Biscuit Box offered by Hobbies at that time. For those of you who remember, my wife loves ancient Egyptian artifacts and art. So. I decided to try my hand at making something Egyptian for her birthday. It's made mainly fro 1/2 inch birch plywood with oak corner pillars and trim. The cartouche I copied from a bracelet my wife got from Egypt and is her name in hieroglyphics. The cartouche is the front and the winged scarabs are on the other three sides. The darker stain is English Chestnut from Minwax and the lighter woods are just clear satin finish. The main box is 7 inches square and the overall height is 10 inches.


-
Several years ago I made 4 compass roses from various woods. I used one for a table top and one for another box. The other two had been laying around for a while and after finishing the previous black lacquer round box, it was time to find a home for these two Compasses. I wanted to try something different. I had several pieces of exotic woods, (Purpleheart, Bubinga, Brazilian Rosewood and oak) and wanted to do the 16 sided box again. I cut long strips 1.5" wide. First pass on the table saw was off by a degree on each side but second pass got me to the 11.25 degrees (78.75 deg. on table saw) to make a correct circle. I cut strips into 1.5" segments and laid them on blue tape for gluing. For the bottom, I double sided taped a long strip of wood to the lower segments and Routered a 1/4x1/4" groove and cut a matching disc for the base and glued the segments with titebond glue. I used 2 hose clamps screw together to form a circle to hold the 1st level in place. Glued up the other 2 layers with the blue tape to hold together along with the clamps. On the top I cut a dado rather than a groove for the compass to rest on. Glued all the layers together and double side taped to the top to the base so I could sand them all together on occillating sander. I cut 3 very thin strips on the table saw to form the insert lip for the top and glued together and sanded to fit in the base of the top. I cut 1/8" disks for the top and bottom and attached the felt and dropped them in place. Finish was several coats of clear gloss lacquer. Need to find another scrolling projects and give the boxes a rest.


- 16 replies
-
- 19
-
-
Recent rainy weather held me off from assorted outdoor projects so I decided to cut a project I had in my pattern library for quite a while. It's a narrow fret box made from Bubinga 10 x 4.5". Original pattern had straight sides and I decided to add furniture style feet. A little tricky cutting these small parts but I got it done.


- 20 replies
-
- 20
-
-
-
I got it done. What a struggle for me. Took longer to put it together than it did to scroll.... well almost. It is made of 3/16" Maple, the interior is lined with what I think is Cherry Veneer. Measures 11" x 11" x 3". I used the largest leaf from the pattern, redrew it a little and made the feet on the bottom. The plans do not call for the feet. This a Finescrollsaw.com pattern. I am making a second one out of 1/4" BB. Got it almost cut out. I use a piece of 1/4" BB as a backer when I cut out the lid, because I didn't want to just cut 3/16" Maple, thought I'd have better control with thicker wood. The scrap backer turned out so good, I decided to just do another box. Gluten for punishment.... Sorry for so many pictures, I was trying out my new photo tent and having fun. Not the wrinkles in the blue clothe Hope they can be ironed out, other wise I will just have to toss them and get something else.


- 19 replies
-
- 17
-
-
-
- box
- finescrollsaw
- (and 1 more)
-
I finally finished the Renaissance Keepsake Box from the Creating Wooden Boxes book. I had actually done this box a few years ago when I still had my old Craftsman Scroll saw. That had taken me a month and I used Padauk wood. Bottom feeding with this fine pattern and using hex nuts to tighten the blades was a pain. Love my EX. I found some nice 1/4" board Bubinga at the Klingspor expo last month and wanted to use a wood that didn't darken like the Padauk. I really like the deep color and luster of the Bubinga. It was a lot easier top feeding with my EX-16 but it still took a while to cut over 600 holes and broke a whole lot of .02 blades. One of the included pictures is the darker Padauk box.


- 21 replies
-
- 23
-
-
-
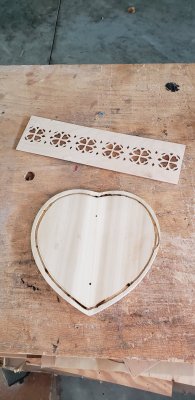
I wanted to try something with my steam box again. I found a Heart picture and cut out the the top and bottom and routered a 1/8" groove around the edge. I cut 2 side panels and soaked them in hot water and put in my steam box for bending. The slight curve was OK but at the hard radius it too much and the wood starting cracking. Oh well, on to plan "B". I cut several 3/4" heart patterns and stacked and glued them. I left the bottom off so I could sand the inside with my oscillating sander and then glued the bottom and double sided taped the top to even out the outside. I glued a matching heart shape to the inside of top. Lots of finish sanding and then 2 coats of shellac (and more sanding) and several coats of black lacquer. My wife finished it off with her fine painting. Lesson learned about how far wood will bend.


-
My latest; a small heart box. the lid has a sliding dovetail joint holding it to the box and a heart shaped pin keeping the lid from sliding by itself.


- 16 replies
-
- 16
-
-
-
- heart shaped
- box
- (and 1 more)
-
Jumping back from Scroll saw projects to boxes again. Made a joint box (7" sq.) from poplar so my wife could paint it. I thought I had a system for cutting the top but still had to do some finagling to get it to work properly. My wife had a free hand in picking and painting the design. She was definitely faster painting that I was making the top work. Almost done with a scroll project (airplane again) I'll post once the lacquer dries.


-
Another domed box again. 1/2" poplar and 1/8" BBPW top covered by my wife's wonderful painting. Clear Gloss lacquer finish.


-
G'day all, Well finished the box for my Sister's birthday. It's late but better late than never Radiata Pine, Jarrah inlay, blue felt lining with blue flocking in the tray. 3 coats of lacquer, cut back with 320g between coats.


- 37 replies
-
- 21
-
-
-
I've made several box joint boxes with with my I-box and thought I'd try something different, a pyramid top with inlay and alternate colored wood. The box frame was not too bad but the top was more complicated. Initially I did 45 degree cuts and then did a 10 degree angle on the sides. Nothing lined up because the pitch changed the angle and I had to taper trim off about 1/8" at the bottom end to the top of each side of the triangle to make everything fit up. I was going to do an inlay on the top but glued it up too soon. No room for the trim router to work. I have a brass inlay kit and used a 1/8" bit. I made a template cut with my scroll saw and 2 sided taped it in place as a guide. Templates are the way to go for these patterns and I have to make the inside slightly wider to compensate for the thickness of the guide. I thin cut the inlay strips on my table saw, glued and inserted the strips, and sanded flush. The rest is glue up, mount the stop hinge and apply the lacquer finish. On to the next project.


-
Having a lot of fun making boxes lately. The pattern for this one comes from Craftsmanspace The fretwork is plywood, backed with purple card and 3mm MDF. The same card is used to line the box interior. 24 x 21 x 9cm or 10 x 8 x 3.5 inches approx made from an old drawer box. Thanks for looking. Rob


-
G'day all, 2 more tissue boxes, I don't think I've shown this pattern before. The Rose is backed with green and red felt, the Cowboy black felt. I like backing him with black felt and glitter, looks like the stars at night, but i'd run out so a starless night is.


- 18 replies
-
- 10
-
-


.thumb.jpg.95d348aa76923344a5cab534cc1b3bc1.jpg)


