Frank Pellow
-
Posts
1,731 -
Joined
-
Last visited
-
Days Won
12
6 Followers


About Frank Pellow

- Birthday 03/26/1942
Recent Profile Visitors
1,794 profile views

.thumb.jpg.95d348aa76923344a5cab534cc1b3bc1.jpg)


.thumb.jpg.a8cb2db9c98f402a34caa562781588dc.jpg)

Frank Pellow's Achievements
")
Obsessed Scroller (7/10)
2.8k
Reputation
-
 red river reacted to a post in a topic:
For the Birds - Scroll Saw Challenge
red river reacted to a post in a topic:
For the Birds - Scroll Saw Challenge
-
red river reacted to a post in a topic:
For the Birds - Scroll Saw Challenge
-
danny reacted to a post in a topic:
I'm cutting a plaque that has a lot of small letters using a spiral blade
-
danny reacted to a post in a topic:
I'm cutting a plaque that has a lot of small letters using a spiral blade
-
danny reacted to a post in a topic:
I'm cutting a plaque that has a lot of small letters using a spiral blade
-
danny reacted to a post in a topic:
I'm cutting a plaque that has a lot of small letters using a spiral blade
-
danny reacted to a post in a topic:
Annual End-of-year Card for 2024
-
JTTHECLOCKMAN reacted to a post in a topic:
Three Charles Dearing 'Optical Illusion' patterns
-
 OCtoolguy reacted to a post in a topic:
Three Charles Dearing 'Optical Illusion' patterns
OCtoolguy reacted to a post in a topic:
Three Charles Dearing 'Optical Illusion' patterns
-
barb.j.enders reacted to a post in a topic:
Three Charles Dearing 'Optical Illusion' patterns
-
 I've now completed and framed these: Note that I used light blue rather than mauve as the third colour this time. I prefer the mauve but the other three people I asked all prefer the light blue. I think that I like the very distressed treatment that I gave the frames -but I'm not certain. I'm going to be a weekend guest during the next two weekends and I will take these along as "hostest gifts". I expect to be cutting several more 'Wire Frame Rings' in the near future.

-
FURTHER EXPERIMENTS I've almost finished sawing the two stacked-cut 'Wire Framed Rings' panels mentioned above and I got to thinking about how these might look when backed with glass. Here is a photo of portion of the panel placed in front of a square of coloured glass. I LIKE IT! The delicate framework shows up much more than it does with a wood backing. But I do think that the three-dimensional illusion is lessened. The two panels that I am working with right now are destined to be backed much like the first one, but I will make at least two more and back them with glass.

-
Frank Pellow reacted to a post in a topic:
Sailing Downwind
-
 Frank Pellow reacted to a post in a topic:
Three Optical Illusions
Frank Pellow reacted to a post in a topic:
Three Optical Illusions
-
Glass Backed Recessed Cuts of Fiona’s Designs
Frank Pellow replied to Old Joe's topic in Bragging Rights
Hi Joe. The stained glass items that you depict are excellent! You appar to be every bit as good with stained glass art as you are with scrollsaw art. I'm better wit scroll sawing. Cheers, Frank -
Frank Pellow reacted to a post in a topic:
Three Optical Illusions
-
Frank Pellow reacted to a post in a topic:
Christmas Lamps - Christmas tree ornament set
-
Frank Pellow reacted to a post in a topic:
Three Optical Illusions
-
Frank Pellow reacted to a post in a topic:
Alex Fox Basket C261 Stained
-
Frank Pellow reacted to a post in a topic:
2x4 Challenge - Scarecrow
-
Frank Pellow reacted to a post in a topic:
2x4 Challenge - Jewellery Box
-
Ingenious. I love both the design and the implementation of the design.
-
Frank Pellow reacted to a post in a topic:
Three Optical Illusions
-
Frank Pellow reacted to a post in a topic:
Three Optical Illusions
-
I utilized a set of patterns created by Charles Dearing to create the three framed panels shown in this photo: They were cut from cut it in 6mm thick Baltic Birch plywood using #1 Flying Dutchman Ultra-Reverse blades and backed with 3mm thick plywood panels painted with acrylic paint. The Rosseter-Pellow frames are made from very old and straight Pine and stained to match the colours in the panels. I've recorded this project in another Scrollsaw Village thread. Here is a link: Three Charles Dearing 'Illusion' patterns - COMPLETED - Works In Progress & Tutorials - Scroll Saw Village

- 5 replies
-
- 10
-
-
I've shown the 'Wire Frame Rings' illusion to several people and everyone seems to be quite intrigued by it. The other two pieces get little attention. I've noted more interest in 'Wire Frame Rings' than just about any scroll-saw work that I have ever done (and I've done a LOT). It's popular enough that I decided to make at least two more. The original was done using 6mm thick Baltic Birch plywood. This time, I'm using 3mm thick plywood and stack-cutting them.
-
Annual End-of-year Card for 2024
Frank Pellow replied to Frank Pellow's topic in Works In Progress & Tutorials
My timing on this project was very bad. No sooner did I have about 35 of these ready to mail, than the Canadian Postal Workers went out on strike. I'm visiting the USA in a couple of weeks and I can mail about 10 of the "cards" from there (those with European and USA addresses). I can hand deliver about 10, but that sitll leaves me about 15 "cards" that need to be mailed. -
Thanks. As to Imperial vs Metric, although I can work with fractions, I prefer not to. It's much easier when I'm drafting plans to use Metric and, thus, avoid calculations with fractions.
-
Thanks. I printed the patterns as 26 centimetres by 26 centlimetres (or a little more than 10 inches by 10 inches for those of you who prefer Imperial measurements).
-
COMPLETED The project has now been completed. Here is a photo of 'Sphere', 'Wire Framed Rings' and 'Illusion": I enjoyed working on this and I like the outcome so much that I'm going to keep these and hang them in my bedroom.

-
I've made a set of Rosseter-Pellow frames for these panels. I've shown several scroll-saw projects here at Scrollsaw Village where I have made simple (non 45-degree angle) frames - a style used by my grandfather, Frank Rosseter, at least 100 years ago and one that he taught me about 70 years ago. I call those frames 'Rosseter-Pellow' frames. I made the frames out of a very old and straight Pine plank that has been lying around for years waiting to be used on project such as this. The wonderful grain of the pine shows through on the stain that I applied to the frames. I made to stain by mixing Americana Staining Antiquing medium half and half with the same acrylic paint that I used on the backer-boards.


-
Annual End-of-year Card for 2024
Frank Pellow replied to Frank Pellow's topic in Works In Progress & Tutorials
Steve Good's 'Multi Level Christmas Dome' pattern suggests four 6mm thick layers which is close to one inch thick. I need to mail most of these and several to other countries. Therefore, I reduced the width to be half of what Steve suggested. With Steve's design, a base to hold the dome upright could be optional. My thinner dome, could easily topple over without a base. I designed my "cards' so that each card has two 6mm thick tennons and designed a base with both a groove to hold the dome upright plus two mortices to capture the tennons. This is depicted in the dome and base on the left-hand side in the photo below: I made 4 domes and 4 matching bases. The dome and the base need to be mailed, unassembled, in a flat envelope: Having tested the prototype, I carried on and made 24 additional domes with notches. Next, I started in on the bases. Making bases with mortices in exactly the right spot proved to be quite time-consuming. I decided that the notches, altough they provide a firmer assembly, could be eliminated. The groove in the base is good enough. That is what is shown on the right-hand side of the first photo. I've now made 12 domes without tennons and am about to cut the (labouriously made) tennos off 24 domes.

-
To my surprise. 'Illusion' is harder and more time-consuming to cut than was 'Wire Frame Rings'. I've now spent about the same amount of time on the former than I did on the latter and, as you can see, a lot of cutting remains to be done: 'Illusion' contains a deceptive number of very small bits to be cut out,

-
Except for the frame, I've now completed the 'Sphere' companion piece. It was quite easy to cut and the 3D effect is not nearly as good as with 'Wire Frame Rings' but, still, I quite like it. Here is a photo of the two completed illusions:

-
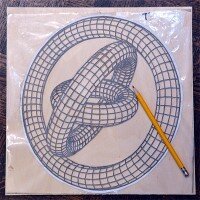
I've now attached 'Wire Frame Rings' to a painted backer-board: It looks somewhat 3-dimensional in the photo. The real thing is even better. I'm amazed at just how good Charles' design is! And, I have no idea how he managed, first to envision the design and, second to capture it. Getting the backer paint colours to align properly can be a bit tricky. Before attaching the pattern to the panel that I was cutting, I attached clear shelf liner to the panel. This meant that once the cutting had been completed, I could easily peal off the pattern in one piece. I then placed the pattern on the backer-board and traced faint outlines of the rings with a pencil: