


GregBennett
-
Posts
43 -
Joined
-
Last visited
-
Days Won
1
Content Type
Store
Profiles
How-To & Articles
Scroll Saw Reviews
Clubs & Organizations
Clubs & Organizations International
Pattern Shop
Suppliers
Village University
Help Desk
Forums
Gallery
eBooks
Everything posted by GregBennett
-
I see that you replaced the Bauer scroll saw chucks with the Pegas. I replaced the top chuck with a Pegas almost right away, but not the bottom. Today I was having problems with the bottom chuck so I removed the nuts and bolts along with the chuck bolt and the thumbscrew. I couldn't get the bottom chuck off by pulling on it. I gave it a couple of wacks with chisel and a hammer but it didn't move. I didn't want to hit it too hard in fear of knocking the arm out of alignment. Did you have any problem removing the lower Bauer chuck?
After putting the bolts back It turned out that the blade bolt on the right side had loosened and after I tightened it I had no issues.
-

-
-
Your advice on the sleeves was right. I installed the Pegas bottom clamp on the bottom arm and had nothing but headaches. I bent blades in the bottom chuck more than once, and every blade bent at the tip. It appeared to me that the Pegas clamp didn't extend out far enough so the blades were going in at an angle. I took the bottom clamp out, put the Bauer back in and everything's hunky dory. I don't like that the Bauer clamps have stops at the top and bottom so you really have get the blade in just right, but I'll settle for it after my failed experiment with using the Pegas clamps on the bottom.
-
-
I've hooked up a Scrollnado to my Bauer scroll saw. I'm using a Hoover portable canister vac, but if I hook up the top and bottom hoses, I get almost no vacuum power. It's putting out about 79 cfm. I've either got something hooked up wrong, or need a more powerful vacuum. You posted on this item a while back and I'm wondering what kind of vacuum you're using or if there are any special tricks to get it to pull better.
-
-
The sawdust has been piling up everywhere in my shop. I've been using a fan when it's hot out and a blow dryer when it's cold since my shop is unheated. I have a fish tank pump connected to the regular hose on my Bauer scroll saw. I started wearing a mask which is a bit comfortable and still get some dust infiltration due to the nose piece adjustment so my glasses don't fog up. I have a mask with the vent, but it's not a great solution. Some time ago Steve Good did a video of the Scrollnado which seemed to be a low cost solution for dust collection, but they've been out of business for a while. I got on the internet and looked at various systems and did a search and found that Amazon had 5 in stock and bought one. It was a surprise to me that there will still any scrollnados around, and I bought one. Hopefully it'll have all of its parts. https://www.amazon.com/Universal-Scrollnado-Mininado-dust-separator/dp/B08XMTYWQC/ref=sr_1_1?crid=19L95XJETHYYO&dib=eyJ2IjoiMSJ9.rni_xLgFQEIhnz7sFcZ4ZA.t0huIV1FR_-xH3O1mb2IPRv0cLexO3QYclXvJYnoSrI&dib_tag=se&keywords=scrollnado&qid=1761391088&sprefix=scrollnado%2Caps%2C122&sr=8-1
-
Using copilot to help with pattern making
GregBennett replied to GregBennett's topic in General Scroll Sawing
Dacota52 When I made the pattern I opened it in Gimp and then adjusted the brightness to the max twice which rendered the black into a very light grey. Like you, I had a hard time seeing the blade when using a black and white pattern. I've messed around a little with trying to outline things, but haven't had much luck. I just opened my old man pattern in Gimp and went to edit, stroke/stroke selection but it was greyed out. Overall, I don't have much trouble with seeing the blade when the pattern is in grey and white. -
Using copilot to help with pattern making
GregBennett replied to GregBennett's topic in General Scroll Sawing
Wichman-When I got my first scroll saw I used it solely for making whirligigs. After a while I started making my own patterns from photos of birds and other animals. They were simple outlines of the body. The front roof of my shop had 6-7 bird whirligigs and I had four on stakes in the ground. I did a lot of experimenting with wing shapes and methods to cut the hub. At first I used 1/4' poplar, and then went to plexiglass. I used pine for the hubs and invariably they'd deteriorate one way or the other. I started using a 1/4" brass tubing around the screws, but the wood eventually gave way. In answer to your question, I haven't not tried AI for whirligig patterns, but it's an interesting idea. -
Using copilot to help with pattern making
GregBennett replied to GregBennett's topic in General Scroll Sawing
Wichman-When I got my first scroll saw I used it solely for making whirligigs. After a while I started making my own patterns from photos of birds and other animals. They were simple outlines of the body. The front roof of my shop had 6-7 bird whirligigs and I had four on stakes in the ground. I did a lot of experimenting with wing shapes and methods to cut the hub. At first I used 1/4' poplar, and then went to plexiglass. I used pine for the hubs and invariably they'd deteriorate one way or the other. I started using a 1/4" brass tubing around the screws, but the wood eventually gave way. In answer to your question, I haven't not tried AI for whirligig patterns, but it's an interesting idea.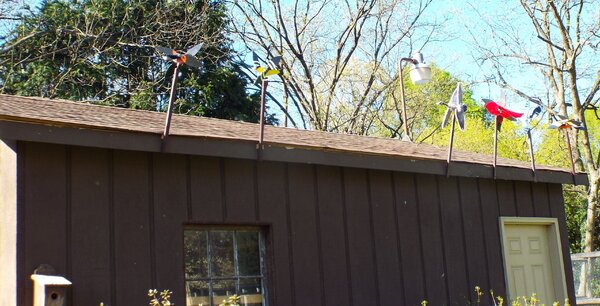
-
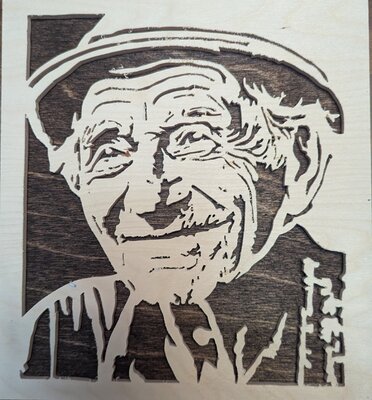
I found an image to use in making a pattern. I sent it to Microsoft Copilot and asked that it make a black and white pattern. The pattern wouldn't have worked at all because major features would simply fall out. I went through it area by area and found where those areas that needed to be changed and then changed them in Procreate, although I could have just as easily made the changes in Inkscape or Gimp. I don't have great drawing skills, so I'm still learning to draw, but I want to be able to make my own patterns. I've attached the finished scroll saw piece.
-
Great work Dick with very fine detail! I had never heard of Kris Martinson and I'm always looking for new patterns. I was able to find his Facebook page and view some of his work even though I'm not on Facebook. Does he sell patterns?
-
Do anyone use an IPad to make patterns?
GregBennett replied to AkJim's topic in General Scroll Sawing
I bought an iPad a little over a week ago. I've tried making patterns with Inkscape and Gimp but I couldn't seem to figure out how to make regular patterns. I've used Gimp for portraits with a lot of success due to online videos. I've also used Gimp to change patterns without cut lines from black and white and grey and white. I've been a Windows guy since 1990, so there was a learning curve with the iPad which is still ongoing. I bought the drawing software app, Procreate and I'm learning as I go. I've made a couple of simple patterns so far, but I have to say it's been a game changer. I never had any luck with layers, but this has made drawing stuff or tracing pictures simple. There's a feature that lets you draw perfectly straight lines and one that smooths out shaky lines. I don't have a drop of artistic drawing ability, but I'm learning. -
I've used them for years and have been very happy with their products.
-
I spend more time than I should searching for patterns that fit my skill level which seems to be on a very long curve. I see the work that appears on this site and see that I have a long way to go even after 10 years. I like cutting more than I like spending money, so inexpensive patterns that are somewhat useful are right up my alley. I cut this one on my Bauer scroll saw on a box store 1x8. It cost $2.76 Here's the link
- 3 replies
-
- 12
-

-

-
I saw various contraptions on Amazon that are used to squeeze the last drop of toothpaste from the tube and thought that it would make an interesting scroll saw project. This design is about as simple as you can get. I will often paste patterns into Word so that I can resize them to specific dimensions. Under the Layout option, I set all margins to .17" and View Ruler. This is my toothpaste tube roller with the size set to fit the tube. I used 1/4" x 3" poplar. Toothpaste Roller.docx
-
Thanks to al of you for your guidance. My DeWalt didn't have an adjustment knob at the back, so this was new to me. Using the back knob on the Bauer, I set the height in inches so that the bottom front of the arm was the same height from the table as the rear. The blade fit from extreme tip to tip. I lowered the front 1/16" lower than the back to give myself more leeway. Hopefully this won't alter the saw far from how it was designed. I still find I have to depress the top arm to get the blade to reach the clamp screw. Thanks for all your help!
-
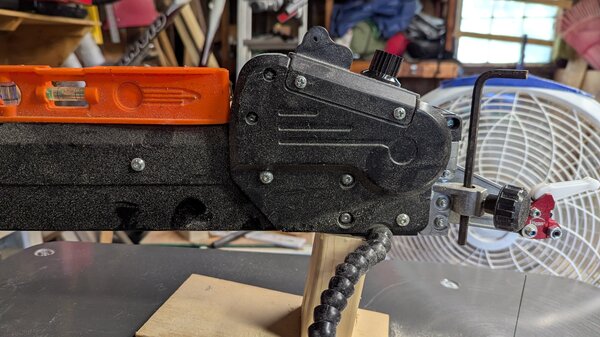
Ray- Most everything I read says that the knob is used to adjust the arm height so that it's parallel to the table as you suggest. But as you can see in the picture when the upper arm is level with the table the blade does not extend nearly enough to reach the upper clamp. Some of what I've read in this forum suggests that the knob can also be used for blade tension and the manual says that it's used to adjust the height of the arm. I must be missing something. Greg
-
I bought the Bauer saw a few weeks ago. It has much less vibration than my DeWalt and I like that the arm raises higher than the DeWalt when I'm working on larger pieces since I feed from the bottom. I use a block of wood to hold up the arm for the most part, but when I want it all the way up I use a dowel rod to pull the ring in the back to release the arm. I've replaced the chucks with Pegas. The ones that came with it are fine but if the top arm is set too low it doesn't fit since the chuck slots are closed at the top and bottom. I find blade tensioning problematic which is my biggest gripe with the saw so far. I don't know if it's a flaw with my particular saw or if it's the same with all of them. There are times when the tension is too weak when the lever is flipped. This can be remedied by pushing down the upper arm before tightening the blade, but that technique can result in too much tension and a broken blade. There's a tension knob on top of the saw in the back, but it's not possible to adjust when seated because it's too far to reach. For the price, it's hard to beat and I prefer it to my DeWalt DW788.
-
I bought the Bauer saw a week ago. I've been using a DeWalt for 10 years. I think the Bauer is a better saw. Time will tell how durable it is. There are only a handful of replacement parts available on the Harbor Freight site. There are markedly less vibrations than the DeWalt. I measured the height of the upper arm while locked at the top, cut a block of wood slightly shorter for propping up the arm. Initially I was disappointed with the blade clamps, but I've fiddled with the arm height adjustment and now find it a breeze to get the tension just right. I mounted it on a bench I made for a saw I had years ago and angled it so that it was slanted like the DeWalt on it's stand. When I bought it during Harbor Freight's Memorial Weekend sale. The cashier had me subscribe to their Inside Tracks Club for $30 a year, but with the 20% discount of $56 the net before tax was $223.99. I've never used the high end saws, but I can't say enough about this one.
-
It's not necessary to clamp the blade in the vice grip at any particular angle. For me it's a way to hold and align it that's better than trying to insert the blade with my less than nimble fingers.

-
I admit to being ham handed so many of you won't need this tip. I have had difficulties placing the blade in the chuck so that it's perpendicular to the table. I've often spent quite a while trying to get the top blade holder to hold the blade and more difficulty with the bottom. It's the thin blades that give me fits-2/0 and 1's. I have tried removing the oily finish at the top and bottom of the blade using a palm sander, and switch my blade chuck from the DeWalt to the Pegas. The Pegas was easier, but far from foolproof. The other day I set up a needle nose vice grip (had to tape one side so that it would close enough to hold the blade). I clamped down on a #1 and made sure that it was perpendicular to the table. It worked like a charm. In addition it was a snap to clamp the lower part of the blade now that it was properly seated.
-
Kudos to Sue Mey Scroll Saw Artist
GregBennett replied to Mike Crosa's topic in General Scroll Sawing
I'm another old guy who forgets things too often. I ordered a pattern from Sue only to find out I bought the same pattern last year. I sent her a note asking if I could get a discount on my next one and she offered to send me a replacement pattern of my choice at no charge. I've bought many of her patterns over the years and she's been helpful but does get busy. I prefer patterns with lines rather than blacked out areas which are more the norm. With those patterns, I can't see the cut very well if the blade is in the black. My eyes aren't what they used to be. -
looking for retailers of Pegas and Olsen blades
GregBennett replied to Puzzleguy's topic in General Scroll Sawing
Almost month ago, I ordered Pegas blades from Lesley's Patterns through PayPal. They sent me a confirmation of the order, so I know they got it. Usually I get blades from them within a week, but I haven't received them yet. I wrote to them several times asking for a tracking number and confirmation that they shipped, but have not received any response. I've bought blades from them for years and never had a problem. It's a small order, but it's puzzling that they haven't responded. Has anyone had the same experience? Order.bmp

.thumb.jpg.95d348aa76923344a5cab534cc1b3bc1.jpg)


