


FrankEV
-
Posts
2,397 -
Joined
-
Last visited
-
Days Won
78
Content Type
Store
Profiles
How-To & Articles
Scroll Saw Reviews
Clubs & Organizations
Clubs & Organizations International
Pattern Shop
Suppliers
Village University
Help Desk
Forums
Gallery
eBooks
Everything posted by FrankEV
-
If you really wanted it to be a more "true" Intarsia piece, you could have cut it up more and made all the pieces you stained from diferent color wood and even the windows could have been wood inlays. I can envision a piece, as I described above, with the Space Shuttle mounted on a stand-off from a black backer that had some gliiter to represent stars, and the assembly set into a shadow box type frame. Not in my skill set, but there are those who could make it happen. BTW very nice work and very unique display.
-
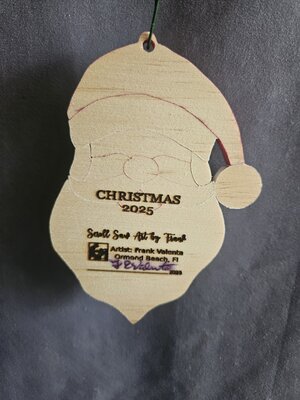
No backer. Back sanded smooth. Laser engraved with date and logo. Both front and back finished with clear Gloss Acrylic Finish. The spray always makes the pen ink bleed.
-
My lady Robin and I host a cookie exchange party with a few of our neighbors the week before Christmas. For the last few years, I have been making a Dated fretwork type Scroll Saw Christmas Ornaments to attach to the cookie platter. This Year I wanted to do an Intarsia Ornament, so I developed a pattern for this 3”x 4 5/8” Santa Face ornament. However, needing 6 ornaments and knowing the problems I have keeping Aspen white, the wood I would use for the White pieces, I decided to do a simple painted segmentation piece instead. Wood used was a nominal ¼” thick piece of Beech that I stack cut three at a time, using a Pegas # 1 MGT R blade. After sanding and shaping, I used my Air Brush to apply Air Brush Acrylic paint to color the pieces. To Date the Ornaments, I sanded the back to smooth finish and used my Laser Engraver to add the year (Christmas 2025) and my Logo. After adding my signature, each Ornament was protected with multiple coats of Clear Gloss Acrylic Finish spray. For this project cutting was simple, but keeping all the pieces organized during the sanding, shaping, assembly (a very tedious glue up), and finishing was a bit of a challenge. Comments and Critiques always welcome. I'll post the pattern in Pattern Exchange.

- 11 replies
-
- 12
-

-
Yes
-
I adapted a free downloadable Stained-Glass pattern into a nominal 10”x16” pattern for Intarsia. Wood used: Aspen, Padauk, Poplar, Purpleheart, and Osage Orange. The Aspen was enhanced with pickling-white stain, and the Poplar was enhanced using a dilute green dye. Finish is multiple coats of Clear Semi-gloss Lacquer. After cutting and shaping, fit-up was good, but glue-up assembly was difficult to maintain proper positioning. I'll be posting the pattern in Pattern Exchange for the those who like a challenge. Comments and critiques always welcome.

-
Shaping the three main pieces of the tree trunk is the hardest part of the project. Good luck.
-
Barb found them.
-
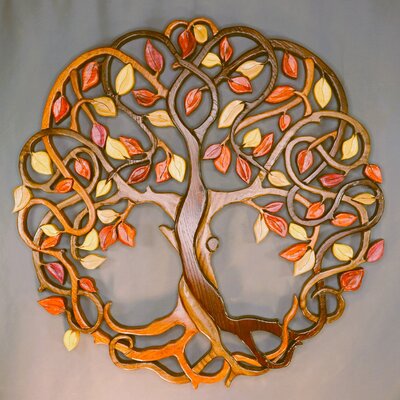
After making Jon Rigsby III’s 24” dia. 'Tree of Life' pattern a while ago, I thought it would be a good idea to make another large Tree of Life piece, but this time without a backer. However, I did not want to repeat the same work, so I decided to create my own pattern with some help from the many varied free Tree of Life renditions available. The piece, as designed, is also 24” diameter, has 120 pieces, and hopefully, is somewhat unique. Because this piece does not have a backer, it was important to design the pattern with very strong joints. This approach minimizes the risk of breakage by avoiding very small or narrow connection points. Wood used: Brown Birch, Canarywood, Osage Orange, Padauk, Poplar, Purpleheart, Sepele, Walnut and two very tiny pieces of Wenge. The finish is multiple coats of Semi-gloss Lacquer. Comments and critiques always welcome. I'll be posting the pattern in Pattern Exchange. UPDATE EDIT 02/18/26: I hung this piece in the Gallery, where I display my work, just before last Christmas. Gallery Price, which includes their 35% commission, was $900. I have just been informed it was sold. You would not guess that I'm very pleased !!!! That is a total of 7 pieces in about 6 months...not too bad, I'd say.
- 17 replies
-
- 13
-
-

-
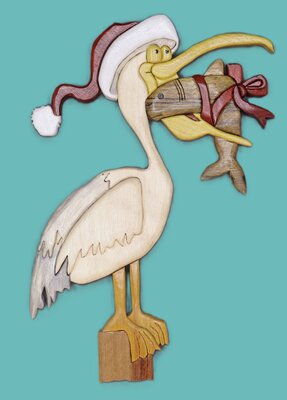
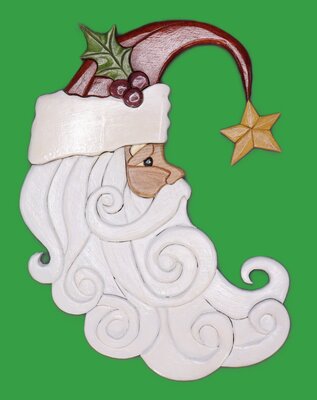
Although I have been busy on some projects that has kept me out of the shop a lot the past three weeks, I was able to sneek in a few hours to create the following two Christmas pieces: Cresent Santa – I made this 11” x 15” piece, consisting of 50 individual pieces, from a pattern I adapted for Intarsia from a SVG file designed by AlishaLynchStudios that I purchased on Etsy. The on-line artwork associated with the pattern showed Santa’s beard in shades of light grey, that I attempted to duplicate using an ebonizing solution without success. This forced me to paint the beard a slightly grey tinted white using an Air Brush applied acrylic paint to hide the mess I had made. Wood used: Aspen, Blooodwood, Cherry, Poplar (enhanced with green dye), Purpleheart, Yellowheart, and Wenge. Christmas Pelican - I made this 10”x14” piece from an Intarsia pattern I created from an image found on a Christmas Card. Only 33 pieces make up this fun piece. Wood used; Aspen, Black Limba, Bloodwood, Canarywood, Osage Orange, Padauk, Sepele and Wenge. A little weathering solution was use to add some grey tone to the Back and Tail feathers. The fur of the hat and tassel was enhanced with Old Masters White Pickling Stain. Commentss and critiques always welcome. I post the patterns in Patten Eexchange.
- 6 replies
-
- 13
-
-
-
Nicely done. The Bamboo cutting board was a good choice.
-
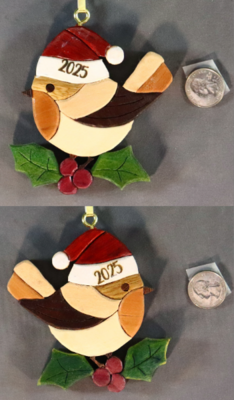
My 4” x4” pattern was adapted from a purchased Stained-Glass pattern. Wood used: Aspen, Aromatic Cedar, Bloodwood, Butternut, Poplar, Padauk, Roasted Birch, Sepele, and Wenge. Date added with a Laser Engraver and ,yes, it is misaligned. It will be hanging on my Christmas Tree. Comments and critiques always welcome. EDIT: I have posted the pattern in Pattern Exchange. This pattern can be cut from one piece of nominal 1/4" or 3/8" thick board, painted, and reassembled by edge gluing as a segmentation.
- 5 replies
-
- 13
-
-
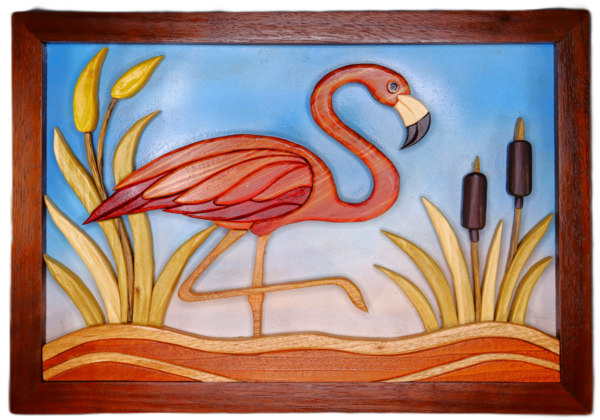
The Idea was to do something Pink for the exibition. Flamingos are pink. The Aromatic Cedar is quite pink, but unfortunately tones down when finish is applied. The photo also makes it look less pink then when viewed live.
-
Wonderful work. Just wondering, are you sharing or selling your patterns. There is a market for such quality patterns.
-
The Gallery, where I exhibit some of my work, will be presenting “50 Shades of Pink: October Legacy”, a month-long exhibition in tribute to Breast Cancer Awareness Month. While thinking Pink, I recalled previously creating an Intarsia pattern based on a coloring book page that featured a Pink Flamingo standing on one leg among reeds and cattails. Hopefully, my 12x18 inch scene, mounted fixed within in a 1” wide x 1” high rail shadow box frame of a “Pink” Flamingo will be accepted for display in the exhibition. Wood used: Aspen, Aromatic Cedar, Black Limba, Bloodwood, Mango, Poplar, Rosted Flame Birch, Sepele, Wenge, Yellowheart, and Peruvian Walnut for the Frame. The extended backer is 1/4” thick Birch Ply that was painted with an Air Brush. The piece was protected with a Clear Gloss Acrylic Finish. Comments and critiques always welcome.
- 9 replies
-
- 13
-
-
-
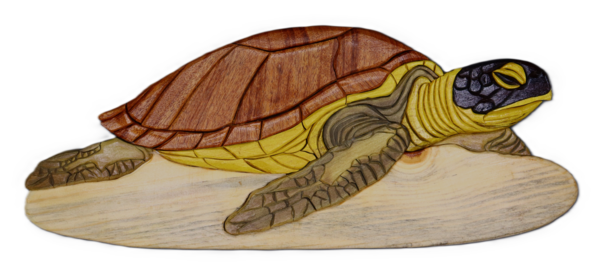
I note on the pattern the flippers, 'each to be cut from one piece of wood, shape, sand, glue and reassemble' in order to treat like one piece. The small pieces went back together reasonably easy. BTW I did did not count the pieces in the Flippers. There are a total 78 pieces including the 3 flippers in this piece.
- 7 replies
-
- 1
-
-
- intasia
- sea turtle
- (and 1 more)
-
My 16” x 6 ½” pattern. Wood used: Blue Pine, Bubinka, Poplar, Yellowheart, and Wenge. Weathering solution used to darken areas on the flippers. Clear Gloss Acrylic Finish. The knot in the Blue Pine Board is not quite as noticable when viewed hung on the wall as seen in the picture. The board was just a bit too narrow. Comments and critiques allway welcome.
- 7 replies
-
- 10
-
-
-
- intasia
- sea turtle
- (and 1 more)
-

Kinda of an odd question for layered projects.
FrankEV replied to Hawk's topic in General Scroll Sawing
I would go with your gut. You can buy nice quality thin boards in varying species (giving you different colors if desired) from Ocooch Hardwoods. It may be a simple layered project, but if you treat it like Intarsia, using the natural wood colors, a good sanding job, and finishing with a good clear coat of Lacquer or Polycrylic, the project will look much nicer than using plywood and stain. Just my two pennies worth. -
Replying to TAIrving 9 x12 inches. Yes Osage Orange will darken if left uncoated. The board I used for the pieces in the Fox were already darker then I wanted. However, the color of OO can be sabilized with a protective coat of a hard durable finish like the multiple coats of Clear Acrylic (polycrylic) spray I use. I just learned the hard way I can store OO for very long.
-
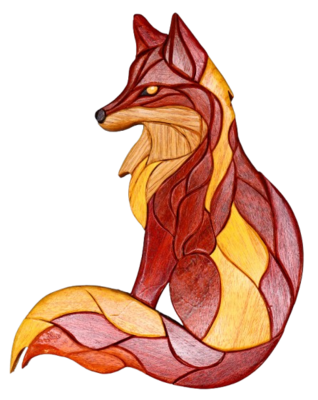
I converted an Image of a Stained Glass Fox into an Intarsia pattern and attempted to use the SG colors as close as possible in my piece. Wood use: Bloodwood, Canarywood, Osage Orange, White Oak, and Wenge. Comments and critiques allways welcome. Edit: Replaced the Photo
-
I'll PM you.
-
This 24-inch diameter Tree Of Life was made from Jon Rigsby III’s 24-inch diameter Pattern. Although the cut pieces came together rather well, the Roasted Flame Birch selected for the darker sections of the tree proved to be a poor choice, as its breaking strength along the grain is relatively weak. This caused me to remake pieces that immediately broke when attaching leaves. It was also the major reason I decided to mount the tree on a plaque backer to prevent further breakage. Wood used: Bloodwood, Canarywood, Poplar, Roasted Flame Birch, Sepele, Yellowheart, and a premade round premium Pine backer that was enhanced with water-based color dyes. The entire piece is protected with multiple coats of clear semi-gloss Lacquer. Comments and critiques allways welcome.

- 15 replies
-
- 22
-
-
-
aw, you're no fun!!
-
Looks Great, but what are you going to bury in it (read your post!).
-
I actually like them both equally. However, I have switched to the polycrylic almost exclusively because it is very compatible with Acylic paints I often use. Also, I can obtain clear acrylic spray from Hobby Lobby much less costly than lacquer. Also, no significant vapor odor from acrylics.
-
I'm jumping into this discussion very late, but I do not know why anyone would mount their Scroll Saw wood art under glass/plexiglass. Like original oil or acrylic paintings on canvas are not framed under glass, it has been my understanding, since I started this hobby, properly protected wood does not need to be protected in a sealed under glass dust proof frame. Not withstanding, dust proof framing is also a rather expensive process. On the contrary, wood art, like quality furniture, is a medium that is both visual and somewhat tactile. And, like quailty furniture, requires a durable protective finish like varnish, lacquer, urethane, polycrylic, etc. to resist fading, discoloring, warping, cracking, etc. Yes, exposed wood art will collect dust, but also like furniture, is easily dusted. The frame and glass used to protect wood art will collect dust and will also need to be dusted regularly. And yes, if left in an unprotected state, an oil finish will collect dust that is not easily removed, so it can be argued, the need for a sealed frame for an oil only finish. But why?, when hard durable protective finshes are available. Although there are many who will disagree, IMHO any kind of oil finish alone is not appropriate for wood art of any kind. All oil finishes require a degree of maintenance as the oil will eventually dry to a point where it is no longer protecting the wood. Admittedly I have not been in this hobby as long as others, but I have many pieces, that I have made, hung or displayed in my home, some since 2018, when I first started scrolling. None are under sealed glass. None have dicolored, faded, warped, cracked, or in any other way become damaged because they were not sealed underglass. All have been protected by multiple coats of either lacquer or polycrylic. And, they do not colect dust any more than other art and furnishing in my home. I will say that I do not allow any of my wood art or wood furniture to be exposed to direct sunlight as, no matter what finish is used, the UV from direct sunlight will have a damaging affect on any wood. This is just my opinion and my two-cents worth on the subject.


