


rafairchild2
-
Posts
593 -
Joined
-
Last visited
-
Days Won
27
Content Type
Store
Profiles
How-To & Articles
Scroll Saw Reviews
Clubs & Organizations
Clubs & Organizations International
Pattern Shop
Suppliers
Village University
Help Desk
Forums
Gallery
eBooks
Everything posted by rafairchild2
-
 This is today's blog post on my site. I wrote it starting at 4:30 AM as I reflected on a gift(s) I received Friday from my cousin... I got a little emotional. BEGIN>>>> Recently, my cousin surprised me with a collection of carving knives and gouges, belonging to Uncle Ronny, my late mother's brother. My cousin, after sharing images of some of my woodworking creations with him during a recent visit with her dad, he expressed his deep joy in witnessing a family tradition endure. At 90 years old, struggling with declining eyesight and unable to continue his own carving, he graciously offered to pass on his cherished tools to me. I will honor these tools, and continue the tradition. Every family has its traditions, its unique way of passing down wisdom, and cherished memories through the generations. In our family, that tradition will be built from love and the hands of a grandfather known as "Poppy." Taking on the moniker of my grandfather... "Poppy"... I reflect on my life, and I realize that one of my most cherished legacies is the creation of art, that of woodworking, which I'm eagerly preparing to pass on to my beloved grandson. Being a "Poppy" to my grandson is a role I hold close to my heart. It's a name that fills me with warmth and pride, as well as, warm memories of my own "Poppy", and the time we spent side-by-side, fishing, drawing, painting, carving, riding the NYC subway, and more. For it represents not only the bond between us but also the promise of continuing a tradition that has deep roots in our family. It is a name I strive to live up to as a grandfather. The smell of sawdust, the hum of a scroll saw, and the feel of a well-worn chisel in my hands are now the constants in my life. Scroll sawing and carving is more than just a hobby; it's a passion that has been a part of me for fifty years when I first entered the wood shop in seventh grade. As the years pass, I spend more hours in my workshop, crafting toys, puzzles, clocks, and art pieces, each piece bearing the mark of my heart and soul, a labor of love that I hope will bring joy to my family (and others) for generations to come. But, in my heart, I always knew that the true value of these creations lay not just in their beauty, but in the connection they would foster between me and my grandson. It brings me immeasurable joy to imagine the day when my grandson, with his wide eyes full of wonder, stands beside me in my workshop. I will teach him to respect the tools, honor the wood, to wield the tools of our hobby with care and precision. Together, we'll craft his first wooden toy, a simple yet magical creation that will be infused with love and guidance. These moments are not just about teaching woodworking skills. They are about forging a bond between us that will withstand the test of time. I want to share the stories of his great-great-grandparents, our triumphs, and our cherished memories as My Poppy and I worked side-by-side painting. For me... through these moments, I hope to pass down not just the craft of woodworking, but also the values of patience, perseverance, and creativity. The true gift, though, will come when the day arrives for my grandson to inherit his "Poppy's" tools. As he takes possession of these well-worn, but meticulously maintained, instruments of creation, he'll also inherit the responsibility of continuing our family's creative traditions. These tools, which have seen the birth of countless treasures and the formation of lasting memories, will now become his companions on a journey of self-discovery and artistic expression. In the passing of these tools, I'm passing down more than just instruments of woodwork. I'm passing down the love that has been poured into each piece I've crafted, the pride that comes with honing a skill over a lifetime, and the knowledge that, as "Poppy," I'll always be with him in spirit, guiding his hands as he shapes wood into something beautiful. I hope as I watch my grandson embrace the art of scroll sawing and carving, I'm filled with hope for the future. I know that, through our shared love of wood and creation, we are connecting the past with the present, and building a bridge to the future. The legacy of "Poppy" lives on, not just in the toys and art we create but in the bond between us that transcends time and generations. In the end, it's not the tangible items I leave behind that matter most, but the intangible lessons, values, and love that I pass on. As I look forward to the day my grandson takes the reins in the workshop, I'm filled with gratitude for the opportunity to be "Poppy" and for the legacy I have the privilege of leaving him. Image: Two of my Uncle Ronny's unfinished carvings, and a carving knife he made. 2nd Image, I found a couple photos of his carvings and a "self-portrait" carving.


- 7 replies
-
- 15
-

-

-
I tried many different ways to create a top vac the way I like. (I think I saw someone else with this setup).For the longest time, I was using a 1/4" ID Loc-Line with a computer brush on the end. It worked okay-ish but for oily, or heavy wood, it would not work well at all. Also, small cut-offs would clog it. So I tried multiple design iterations. Had many "human factors" considerations too. Don't get in the way of my light/magnifying glass, away from my hands, stay put, don't bounce/vibrate, not get hit by the chuck, but be close to it, generate enough suction, etc. Finally went to 3/4" ID Loc-Line and it works really well. One of the things I like is when I am going to a new hole for my pierce cuts and I lift the arm, then put it back down the top-vac is in the exact same place. No fiddling around to get it back into position. I am able to position it out of my hand area, close to the blade, and not be visually distracting. (Though I might paint the tip black to make it disappear more). It might even generate a strong enough air current around the blade I might not even need to use my "puffer". I have a blast gate on the line to the bottom and top vac lines, and a blast gate on the bottom vac so I can "throttle" the flow to that when wood blocks all of the holes and I need less suction. This will increase the upper flow too. Now that I am satisfied with my dust collection piping, I am duct-taping the joints. Of course, the PowerTec products are friction, and work well, but I want extra holding and sealing power. I got colored duct tape, so my Scroll Saw piping is the Orange Line, my hand-held hose for area clean up is the blue line, and the main is the Purple line, which goes to the cyclone and vacuum. I still have to tape my red and green lines. Sure it loses the clean look of clear pipe, but that is the trade-off I had to decide on with aesthetics. I have the Loc-Line secured with zip-ties, and foam at the moment. I will be getting some self-adhering hose clamps shortly to replace them.


-
CLAMPS!!!! You got CLAMPS!!!
-
THe first photos show the car after I installed a chin spoiler. I have done a lot of resto-mods. 2006 S197 model. Windveil Blue


-
That is probably my one big complaint... That table crank is SLOPPY as all get out!
-
Here you go!

-
Try thicker wood, you might find the added thickness helps with control. You could always stack thin wood too.
-
When I installed the chuck in my WEN DP last week, I made sure the chuck jaws were open all the way. I used a rubber mallet to drive the chuck arbor (shaft) up into the drive, but you could also seat the chuck with the table. Just raise the table and push the chuck in to lock it in. use a piece of wood on the table though to the chuck.
-
Thanks. Forgot to mention it is Red Oak, one of my preferred hardwoods to work with. Actually, I prefer any Fruit or nut tree wood to cut.
-
I started a new feature on my personal blog site, and actually recorded a video to go along with the photos. "What's on my Workbench". Usually, I have a few projects going on at the same time, I also have a few that are already set with the patterns glued on. Lots of patterns are already printed and sitting on a shelf. Kind of A.D.D. if you ask me! I have another post here tracking my Flag, Eagle, and Lady Liberty project, but this is another one that I am plugging away at currently. This is a 1937 design from Germany (Saxony), it will hold 5 tea candles when done. This pattern was given to me by someone in Germany and the plan is to give it as a gift to a German Officer I work with at NATO HQ. I kind of wish that I had done this 4 years ago when my Branch Head "Colonel Paul" was my boss, He was from the Saxony area. It would have made a great going away/ retirement gift for him. He was one of the best bosses I have had. Lots of detail work!

-
Making a few adjustments to the base layer of this piece. I had resized the eagle, and need to account for the change. One I am satisfied with what I penciled in, I will red pen it for these old eyes

-
Okay, here's day two. The eagle has landed! As I was arranging the elements of this, I decided to put Lady Liberty on a riser, rather than having her at the same level as the eagle. Aesthetically, I believe it looks better with three levels. Oh and the score... 1 broken crown point broken and repaired. 1 broken eagle tail feather repaired. Now I have a dilemma on how I will finish this. I was going to do a rattle can finish, Of course, Red and blue for the flag, and if I add an accent backer that would be white. The eagle was going to be gold, and for Lady Liberty, I was going to do a mix of 3 rattle colors and simulate copper, her original finish. I have included a photo of one of my multi-rattle can finishes. As you can see it comes out well. The thing is, in order to get the desired effects, I have to lay multiple, THICK, coats of paint. I am afraid that those will clog the small line veining in Liberty and the Eagle. This would mean going in by hand and clearing them all out. Because of how many and how fragile the pieces are, I am having second thoughts. I do not want plain wood or stain. I am thinking of bringing out my airbrush, as that is thin paint, but the effect will not be the same as I had planned. Any thoughts on that for finishing?


-
A few months ago a French Officer I work with at NATO SACT HQ* asked if I could make a US Flag for him out of wood. I thought I could come up with something better, and told him so, but I said it would be a while. Well, I am slowly working on it getting done and the first piece was cut out this morning. I using 1/4" and 1/2" Basswood for this piece as I will be painting it. I am using a couple of patterns from Steve Good combining Lady Liberty from another of his patterns. Of course, since the French gave us Liberty as a gift, adding her to this piece is a bit more meaningful in my mind. So here is where I am at today, and will post updates as this piece progresses. *North American Treaty Organization Supreme Allied Command Transformation Head Quarters in Norfolk VA.

- 8 replies
-
- 11
-
-
Excellent Frank, I am sure you will like it. To bad we were not closer (I am in VA Beach), I'd help you put it together and on the bench. The 4212 is probably the one I should have gotten too, but as you saw in our PMs, I got the 4214 for only a $7 difference. As I was driving home from work yesterday, I had an epiphany. My workbenches not only roll, but they are adjustable in height. So as soon as I got home, got out of my office clothes, I proceeded to lower the work bench the new 4214T sits on by 5 inches. I could have done 6 inches, but I would lose one bolt securing it then. (Two is one, one is none.) I had to move the "monster" off the workbench, I slid it over to my other bench. Lowered each bench leg, flipped it back over and then slid the monster back into place. Of course, the 6-inch difference in height made it a little tricky to move then, so I advise all... don't be dumb like me... .trying to heft a 4214T by yourself. Combined with me adjusting the chuck movement, I can stay seated in my stool at the same height as I scroll at. It's only when I carve, I will have to lower it some. No big deal.
-
It's a Sue Mey. She sells them on her personal site and Etsy.
-
I am with you on the spirals. I just can't seem to get the hang of them. Plus, they give me a lot rougher cut than my FD Ultra reverse blades. I am moving into doing more fretwork style pieces and have had success with #1 and #3 FD ultra-Reverse blades, but I know I could do bigger pieces if I master spirals. Sigh...
-
I could, but that is something I do not want to do as I lose a lot of potential in the larger DP. I am just going to get a lower table/stand for it. BTW, cutting it down would be a bear as that tube is THICK!
-
Here's the monster. And yup, assembled it and hoisted the head in place all by myself. I already had the press table so I figured I would install it on my new press. But as you can see it is way high now. I used to be able to spin from my saw to the drill press in my stool. Now I have to stand and the drill is at eye level, which messes up my workflow a little. But I am with Kevin. I raise and lower the table to adjust the depth, use a 3/4" scrap wood for the drill through. Never liked the screwing thingie.


-
Yours works for me too! I might have to look at Inkscape as well. I do like when the waste area is grey. These old eyes just aint the same no more...
-
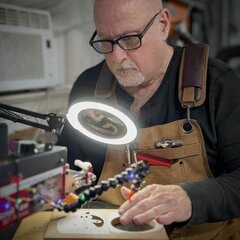
Funny you say that. I generally keep my lines at 1 point thickness, this way I can see any drifting early on and micro adjust my cut. Usually I will go no more than 2 points thick. Many times, the other thing I do is bring my patterns into photoshop and do a "color overlay" (lighten option), so my lines are magenta instead of black. This way I can see them better. Below is a 2-pt. sample.

-
When I was doing combat handgun training, we always taught... Slow is smooth, and smooth is fast... I do the same thing with scrolling.
-
I just got the 4214T Sunday. It is a monster compared to the WEN 10" drill press, pretty heavy. I actually assembled it and got it on the work-table by myself. I actually assembled on the table. Just lifting the head into place was a little challenging. I think it is too high right now as the drill bit is at eye level. I like it a little lower, so I will purchase a stand for it that is lower. I will get photos of it today after work.
-
Yes, I have been quite satisfied with WEN tools. I have their air filtration system, large and small belt/disc sanders, and the bench grinder converted to a flex sander on one side. I just purchased their 4214T drill press with light and laser, I will give my small 10" to my son in law. it has been a work horse for me. I just wanted cranks and laser. My rotary tool is a WEN also. I actually started with the WEN scroll saw, but outgrew that in about 3 months and went to the 21" Excalibur.
-
Also, try and cut as much as possible with the "waste" area to the right of my blade. I use Flying Dutchman and noticed that it favors the right side, and that's where it will drift to. I find I have the best control and best lines using this rule. Plus, if I screw up, most of the time it will be in the waste area and not the "live" area. Seems I am repeating this tip a bit today.
-
Welcome aboard!! Here's a tip for you that I gave recently, that you might find helpful as you learn the craft.


