
Leaderboard


.thumb.jpg.95d348aa76923344a5cab534cc1b3bc1.jpg)

Popular Content
Showing content with the highest reputation on 02/08/2025 in all areas
-
I just finished cutting this today. I am excited because it is the third most difficult cutting I have made in all my scrolling years. It is a @Jim Blume pattern, (thanks Jim), and I copied the way I cut from a person named Elke Sachs Kohon Wiks. If I got that wrong, I apologize. It is not finished, it will have a flat-black backer and Deft semi-gloss lacquer. I cannot finish it in my house, the fumes are really bad for my wife. Have to wait for warmer weather to finish outside. It was a challenge, I used Pegas #1 Skip, Pegas #1 Modified Geometry, 3/0 FD New Spiral, blades. Reason why it is nice to have two scroll saws if you can. I was rolling back and forth between my two saws.
 14 points
 -
I guess this is as good a place as anywhere to share some Information related to Intarsia assembly. I assume this is not a new help trick to others, but I had not heard it mentioned until my son, who is an avid model car maker, and who uses CA glue a lot, suggested it. For Intarsia makers who choose to assemble projects by edge gluing using CA glue before attaching a backer, it is common to encounter the issue of accidentally gluing the assembly to the workbench. Putting pieces together quickly and accurately, while making sure the back side is flat, is very tricky. In doing so, I often put too much CA on the piece to be attached and it runs down the joint allowing the assembly to attach itself to the bench as I attempt to make the backside flat. I have heard use wax paper, but that stuck just as badly and just made a bigger mess. The solution to this problem is Glass. I obtained a piece of 12” wide by 18” long by 3/8” thick tempered glass, that has polished edges, from a Habitat ReStore for very little cost. This kind of glass is the kind used for display shelving or often used for glass tabletops. I’m able to lay the glass on top of a copy of the pattern and do my edge gluing on the very flat glass. The pattern under the glass helps me line pieces up properly. If the assembly sticks to the glass, a sharp tap with a mallet will pop-it-off easily. CA glue squeeze-out that gets onto the glass, and it will, is easily removed with a razor blade scraper returning the nice flat glass surface. I hope this tip is of value to some.4 points
-
Kevin, sorry my only suggestion would be to build your own, this way you can customize it any way you want, RJ4 points
-
I have Amish cabinet maker shop about a half mile from here.. They actually want me to do their CNC custom cabinet door designs etc for them.. I never even gave that much thought but I'm sure they'd build something too..3 points
-

3 layer wine art Steve good download
Scrappile and 2 others reacted to Allen levine for a topic
Finished just have to tack in a few strips in back to hold it down in place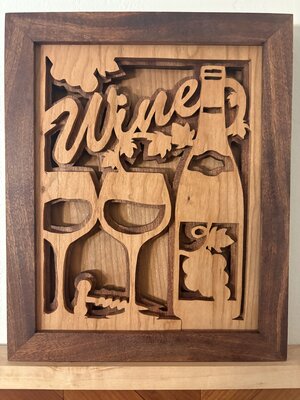 3 points
 -
Many of you know I bought a new laser a couple months back. I'm wanting to get a workbench to set it on but having a bit of trouble finding one that the laser will actually fit on. The dimensions of the laser are 48.8W x 34.3D x 26.4H and most benches I find are not but 24 inch deep, while the laser could overhang the edges some as the feet are not all the way out to the edge of it. I'd have to measure but I'm guessing a 30" Deep might work. Next issue is how tall the table is as the machine is already 26" tall so a 30" tall table would make loading and unloading the work a bit on the tall side.. but as it is only 26.4 tall leaving it on the ground as is I have to almost be on my hands and knees to load and unload it which is partly why I want to table. A 30" tall table would do better than leaving this on the ground though so I could probably live with that. I'm wondering if anyone knows of any nice larger benches that can hold this 300lb machine and have some room on either side to place the laptop and other things to run it.. Hoping to be able to put the chiller red thing off to the side in the picture underneath the table. Looking at the photos maybe 30" wouldn't be too bad after all because the laser table is half way down into the machine once the door is open.. I just gotta be able to reach and see the control panel on the right side of it.. I am 5.6Ft so that might work. I know someone gonna say build a bench.. I'd rather buy one.. but worst case I might settle for building one but I'm not much of a builder unless there is some real good blueprints.. I'm not great at just winging it like many of you guys are.. I've asked on the laser sites I'm on and 90% just deal with it on the ground.. a couple folks built a bench out of the parts from the shipping crate it ships in but the crate is exactly the size of the laser and I need a space for my laptop etc.. and those homemade ones looked pretty sketchy to me for a 300lb machine that probably would shake that whole table when the machine is running, LOL Anyway, anyone know of a site with many different workbench options? IF I have to build my own it's going to be a while as my truck doesn't get out in the snow and salt.. so like to buy so I can get this up and running. Thoughts and Suggestions? Maybe you guys will be more help than the laser groups.. most those folks are only into laser talk and show off of projects rather than shops and workbenches, LOL


 2 points
 -
Here's a couple more...

 2 points
 -
Wordle 1,330 3/62 points
-
Wordle 1,330 6/62 points
-
.thumb.jpg.95d348aa76923344a5cab534cc1b3bc1.jpg)
Glass Work Surface
Roberta Moreton and one other reacted to barb.j.enders for a topic
I have a piece of acrylic that I put the pattern under. Most of my finished pieces fit on an old placemat. I tape the master copy to that and then cover with the acrylic.2 points -
Workbench / Table
OCtoolguy and one other reacted to barb.j.enders for a topic
The only thing I will add to this conversation is a place to get plans. I can't wing it on my own either. I got the plans for my flip cart from here. https://www.youtube.com/c/Fixthisbuildthat2 points -
Wordle 1330
JackJones and one other reacted to barb.j.enders for a topic
Wordle 1,330 3/62 points -
Wordle 1,330 5/62 points
-
Hi Kev: Is that crate cardboard and wood? You have the dimensions from the crate Is that a thin sheet of plywood on top just add a thicker piece of plywood as mentioned above and add 2x4 legs to it. then get a small separate table for your laptop, and other things you need a table for Fab42 points
-

Workbench / Table
OCtoolguy and one other reacted to JTTHECLOCKMAN for a topic
Well what size bench are you looking for. You know you are going to spend good money on it. Look at HF and see what they have and adapt something. Cheapest place.2 points -
Workbench / Table
OCtoolguy and one other reacted to JTTHECLOCKMAN for a topic
If you find a bench then just add a 3/4" piece of plywood any size you want. Make it so you can store tools and things on it. The 24" should not deter you. The height maybe. What height would you like? Maybe find a bench and cut the legs down. Or it is so easy to build a basic bench. I made one just to hold my TV last year while I work on my rooms. I will replace with cabinet at later date when done. Had some 3/4" plywood laying around and bought a couple 2X4's. Very easy. Not even a day to build. Come on you do not plans to build a bench. Frame with 4 legs and put a top and shelf to stabilize the lower half.2 points -

Wordle 1329
Dan and one other reacted to jerry walters for a topic
Wordle 1,329 5/62 points -
Been out of it and just recently rebuilt my work area. This is what I've done. I'm going to trim the minute hands on one of the clocks for sure


 1 point
 -
Workbench / Table
OCtoolguy reacted to JTTHECLOCKMAN for a topic
A workbench has to be one of the easiest things in the shop to build. Yes you can get fancy and start with drop down leafs and drawers and things like that but it basically a couple boxes and 4 legs and a top. Now the frame can be supported with cross members depending how much weight and how large you build it. When I made my main work bench I was able to get a couple old office oak doors from a job i was on and that made the top easy but man is that freakin heavy. They are filled with some kind of sheetrock or something but again so easy to do.
 1 point
 -

Not Totally Finished, But Have to Wait for Spring
Scrappile reacted to Roberta Moreton for a topic
Beautifully done!1 point -

Not Totally Finished, But Have to Wait for Spring
Scrappile reacted to Hudson River Rick for a topic
@Scrappile Hey Paul, you did an outstanding job on that very difficult pattern. Spring is right around the corner and you willbe able to finish you piece outdoors. Thanks for sharing. Rick1 point -
Kevin, If I was closer I come and build you a bench, just a few too many miles, but I agree the Amish may be the best answer, RJ1 point
-
I adapted a winter scene photo of a Chickadee to create a 10” x 10” Intarsia pattern. This pattern requires very accurate cutting to get a good fit-up. Wood used: Aspen, Basswood, Costa Rica Mahogany, Mahogony, and Wenge. Dye was applied to Aspen for the Light Grey areas. I used a 5/8” thick Premium Pine Project panel from Lowes for the free form plaque type backer. The backer perimeter edge was cut at a 4-degree bevel and then a router was used to round-over the top edge using a 1/8” round-over bit. The completed assembly was protected with multiple coats of a Clear Gloss Acrylic Finish. Comments and critiques welcome. I will post the pattern in Pattern Exchange.
 1 point
 -
Did you buy it? If so, what's the length and width of the base? I'm considering getting that too. Thanks1 point
-
I adapted original Stained Glass Art by Jillian Sawyer to create a 99 piece, 10” x 15” pattern. Wood used: Aspen, Cedar, Orange Osage, Padauk, Poplar, Roasted Birch, Sapele, Yellowheart, and Wenge. Wood used for leaves and stems was enhanced with Green Dye and the Butterfly wing veins were highlighted with a black sharpie. Assembly is mounted on a 1/8” thick BB Ply backer and finished with multiple coats of Clear Gloss Spray Acrylic Finish. The Poppy was intended to be dark and light Red, much like how Blue was use in the original art. My choice to use Cedar wood for the light Red was poor with the color being more Brown than Red. This was not apparent to me until I brought the Butterfly assembly against the flower assembly. Although this should not have been necessary, but since assembly was too far complete, I found it necessary to improve the Cedar with Red Dye. Comments and critiques allways welcome.
 1 point
 -
I would love to give it a try Sir.. unless somebody makes a pattern before I do. I am an old member here . Thanks Mahendra1 point
-
Another great job Paul. That will look awesome with a black backer/1 point
-

Not Totally Finished, But Have to Wait for Spring
Scrappile reacted to scrollerpete for a topic
You have more patience than me, great work 3 thumbs up1 point -
Not Totally Finished, But Have to Wait for Spring
Scrappile reacted to jerry walters for a topic
Very nice Paul. I would never tackle anything like this. Jerry1 point -
Wordle 1,330 3/61 point
-
The crate is wood.. I think it's probably 3/8" plywood.. I think this might be a temporary and possible permanent (since most of my temporary ends up being permanent) solution.. I think I'll glue and nail both top and bottom pieces together and then frame it build some legs from 2x4's.. I also forget than this laser will run via thumb drive or even wifi etc.. so it really doesn't need the computer connected.1 point
-
terrific job1 point
-
Do you have Amish close by? Maybe you could talk to them and see what they would charge to build you your table. Or maybe a handyman in your area (think Marketplace or Facebook). Also I'm thinking someone who builds those work sheds would be able to do a side job and built you a bench. Just a couple of things to consider. If you were closer I could lend you my hubby, he can build anything.1 point
-

Not Totally Finished, But Have to Wait for Spring
heppnerguy reacted to Wichman for a topic
Very nice cutting. Here's my setup for blades for the Hegner. When I found that I needed the small blade holder, I ordered an extra set of standard holders, 2 sets of small, and 1 set of larger holders. Since I use the quick clamp, this let's me have 4 small blades, 4 medium, and 2 large ready to go. And any mix of those sizes. I have a small dry erase board with the sizes written on it for organizing the blades. This makes quick work of changing blades when they dull or changing types when necessary. 1 point
 -
Yeah, I found one that is close to the size and might work.. but it's close to $400 too.. I'm rethinking this now.. I might just have to go at it really slow and build what I need.. so long as no snow or rain I guess I could work in the driveway in the cold to make some cuts on my table saw and miter saw.. table saw is hooked to dust collector and not much comes off it.. don't have any step down connectors for the miter saw but might be able to do all of it on the table saw anyway.1 point
-
That is awesome Paul. Congratulations on a fine job. I too go between my 2 saws if I am using more than one type of blade. Marg1 point
-
Welcome to the village. Keep us posted on the band saw maybe a review would be good, RJ1 point
-
I'd build my own too. There are many videos on bench building. It would just be a matter of plugging in your own numbers.1 point
-
I cover a copy of the pattern with clear shelf liner, then glue the parts together with yellow glue. The glue will pop off the liner quite easily. The glue gives me a little time to adjust the fit of the pieces, since my shaky hands are terrible at lining up things the first time. I often make more than one of a pattern to give out as gifts, so the laminated pattern will get several uses. Tom1 point
-
Very smart, I have heard of using wax paper on top of the pattern, like this idea better, RJ1 point
-
Paul, you have done an excellent job on cutting, a true craftsman, RJ1 point
-
Wordle 1,329 2/61 point
-
Wordle 1329
JackJones reacted to barb.j.enders for a topic
Wordle 1,329 4/61 point -
Wordle 1,329 3/61 point
-
Here in the village1 point
-
I knew this would be the response and deep down I also know this is really what I need to do to really make it the way I want.. I may end up building a huge bench down one whole side of the shop so I can place my other two lasers on it as well.. then plumb the exhaust into one big manifold to exit out in one spot. Then I won't need to cut several holes in my wall to install the smoke stack, LOL. The bigger reason I don't really want to build it is I'm not really supposed to be doing any sawing of wood.. I think I could get away with it outside in the spring / summer.. just hoping to set things up before then.. and building my own is not a best option currently due to my doctor's orders..0 points


