


planeur
-
Posts
262 -
Joined
-
Last visited
-
Days Won
1
Content Type
Store
Profiles
How-To & Articles
Scroll Saw Reviews
Clubs & Organizations
Clubs & Organizations International
Pattern Shop
Suppliers
Village University
Help Desk
Forums
Gallery
eBooks
Everything posted by planeur
-
Merci encore ! I just found others intarsia patterns and ideas on the Pinterest site ! Ex: https://ca.pinterest.com/ Wow a lot also ! Have a good day! planeur
-
Merci Barb ! I just found some owl model on the site here : https://www.facebook.com/groups/431246807013861/search/?q=owl&locale=fr_CA You probably saw it... That site is incredibule , with a lot of PROS in intarsia! Have a good day planeur
-
Thanks to all ! Wow a lot of answers ! Barb, I try looking for those 2-3 patterns as you said, but nothing at this address : https://www.facebook.com/groups/431246807013861?locale=fr_CA Is it the good one ? I am a member now of the "Just Intarsia "site . I had found the FB group yesterday. Thanks again and have a good day every ones planeur
-
Bonjour intarsia pros ! I had a request from my syster- in -law for an owl like those one , I want to do it in intarsia as this one. I made some research for a plan with details... nothing so far , so do you have one or know somebody how have one, or on the web. I looked at the pinterest site , but nothing yet. She posted to me the one with an heart in his eye. And a best for this projet would be with the chouette facing us as this one and that one Thanks a lot in advance planeur


-
Thanks Hawk, it is marquetry sheets , as those one , https://www.leevalley.com/en-ca/shop/tools/supplies/inlay-and-veneering/58780-sequence-matched-dyed-veneer-assortments Very usefull ! planeur
-
Bonjour ! For my daughter-in-law in Vancouver, who regularly sends us beautiful photos of the sunny daytime and evening skies with the bay in the background! And also in return for one of her gifts... From this drawing/photo, and after several tries ... I put her in the woman's place.... and put on her hat her first name ''Mel'' . Carved in intarsia/marquetry, I placed her in front of a window with this view of bright sunshine against a backdrop of Vancouver Bay. Woods used ebony ( hair, hat ) , padouk ( the sun ) , black walnut, and various inlays for the water , Mel's back, the hat. The back of the 10'' X 7'' frame is made of ½" MDF and cut slightly recessed (30°). Finished with Tried&True Danish oil, and Saman mahogany stain + Saman water-based varnish for the sides and back. Very happy with the result, thanks to M. Blodgett for the drawing. planeur


- 5 replies
-
- 10
-

-
Nice couple....! And superb job! planeur
-
Thanks Barb A store specialist in finishing products recommend this one when we glue small pieces . Have a good day ! planeur titebond-instant-bond-medium_GNfVk6T.f2b8ac.webp

-
Bonsoir ! Do you use that kind of glue https://www.leevalley.com/en-ca/shop/tools/supplies/adhesives/glue/20019-high-tack-fish-glue?item=56K6000&utm_source=free_google_shopping&utm_medium=organic&utm_campaign=shopping_feed&utm_campaign=CAN-EN|PLA|PMax|Tools|LowPriceTier&gad_source=1&gclid=CjwKCAiAi6uvBhADEiwAWiyRdgtZAmjtrb0C9-sekA2hK-hC9Sp20QEFxTVrsv2U5dG39LwlGrR8DRoC-RUQAvD_BwE It is suppose to be good for marquetry. I have an old tube of the one show and did a test with marquetry on MDF , and even if my glue is quite old ( I would say almost 10 years ) the result was very good! This glue is quite liquid. Thanks and have a good night.... planeur
-
Bravo Barb très beau! Kind of piece I like, because I love a lot piano pieces.... Will remember it for a futur piece! "The music was antiqued by soaking in coffee and then dried in the oven " : first time I read that kind of work, and what kind of coffee do you use.... ? Do you play piano ? As I see the back paper is an Oscar Peterson piece, artist I liked a lot! Have a good day! planeur
-
Well .... after comparing the marquetry and the wood, I decided to cut the wood ! Had to cut two examples to have the good one! So here is the result, and on its final location....a hat! which is a part of my project... À suivre.... planeur


-
Hello marquetries masters I want to put a name ( MEL or Mel ) on a marquetry allready glue on a MDF, it would be 3/4" long and 3/8" high, and I want the name Black color. Cutting the name on black marquetry ( quite difficult with that size... ), with a pencil with black ink... It could cut the name as intarsia... , some of that project are in intarsia. I will put oil for finishing . What would be your way to do it ? Thanks a lot À suivre..... planeur
-
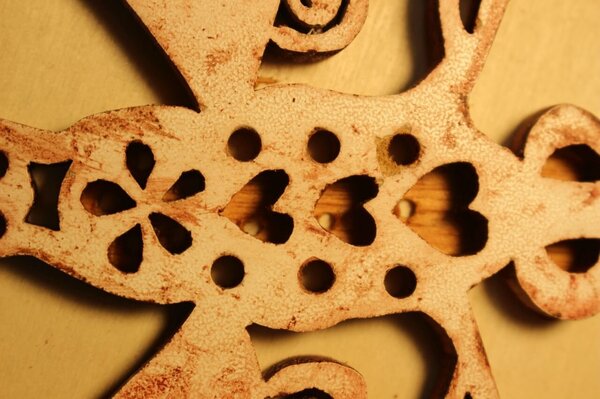
Bonjour As a gift for one of Nicole's aunts, who loves dragonflies, I made her one in cherry wood + 1/8" MDF base, based on a photo I found on the Web. The size is 9 " X 9" As you may know, and see... they are 34 holes on the main stem, 40 for the 2 upper wings, and 32 for the lower wings, faque ... a lot of patience as I often say, when cutting ! The model glue on my wood, with the holes for cutting... As you know It takes a lot of precision and care when cutting! Once the pattern partialy finish , and I varied the pattern a little as you can see once completed Then sanded the edges with great care and delicacy... Then the aunt's name is also cut out of cherry wood , "Gilberte" The dragonfly being rather fragile, I decided to put it on a frame, which will be in the shape of a flower. The flower made with russian cherry ( here it is call "merisier russe " )multi layer of plywood, and I made it with not to much flower details because I want to leave the attention to the dragonflies. Finished with mahogany wax as the dragonflies will be. After thinking of putting some colors at the back I decided to put only few one! So here is the take-off of my projet with the flower ( 12" in dia ) and her aunt , before I put some few colors Hope she like it as me, and especially see it completly , because she have a vision problem! Thanks as usual for your support , as technique, advises and shoowing your projets ! À suivre for the finish..... planeur


- 4 replies
-
- 13
-
-

-
Yes ...... I had forgot that trick! And it is a good one for that kind of thickness. Thanks ! My post is coming..... Planeur
-
What I had to cut is from the back of my piece , because the only place to see the pattern to cut. Back side top side before cutting À suivre...

-
Thanks for your infos! Did not know that kind of blade! Have a good day planeur
-
Thanks Wichman, but what is a reserve blade ? If I understand it should have more than one theeh in the thickness of the piece we cut ! Right ? That make sense. And I do not use a tooth blade with that much teeths. I am using Pegas blades with 12 or 14 or 22 tpi ( # 5 #7 and #9 ) Nerver see saws with so much teeths. planeur
-
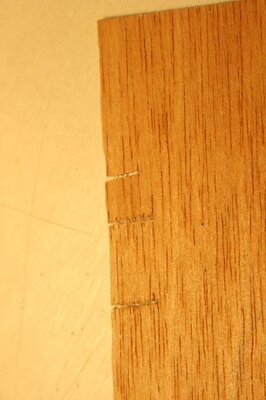
Hello blade experts , I have a question after a test I did with a blade. I was cutting a marquetry sheet with my scollsaw with the blade with the teeth facing down, as normal! But if you take a look at the photos, you will see that the cutting is better under the sheet when cutting and worse the other side ( the top side ) So my question is : do you cut sometime with the blade the teehs facing up? I had to cut a sheet on my projet which was already glued to the projet so I did cut it with that method and it worked as the testings. Will shoe you soon my projet... planeur

-
Bonjour Ray , I copied the entire work ( from scrollsaw wodworking )of my marquetry insertion! Bonne lecture! planeur Insertion of a marquetry pattern in a stained glass window 01-25-2023, 04:13 PM Hello everyone ! I would like that you give me your evaluation, advises, and suggestions of this projet, which is almost finish, but can be modify easily ! And do not be embarassed to give me your advises ! So here is the stained glass window made by my sister , which falled on the floor and partialy broke She had made it very ''transparent'' so that the outside light could enter well. The red line is the part to replace, where there the glass broke. Not doing this marquetry hobby rarely , I offered her to put a scene in marquetry and that will be in the style of the rest. A return to marquetry with a lot of trial and error to find the pattern. Nice challenge! Not easy! The stained glass measures 25'' X 14'' and the broken part is about 11'' X 13''! I used 1/8" MDF, the same thickness as the stained glass, cut the shape of the hole with an insertion in the frame on the right, which allowed me to give more solidity to the MDF once it was cut. The perimeter is glued to the metal with a glue in places for more rigidity. Then the pattern in the shape of a tree branch, , and a hummingbird feasting in a similar flower. The marquetry pattern is glued to the MDF on both sides of the stained glass window, as it will be hanging from a window again, as it was before it fell and broke. So I have to make the patterns in double which will be glued one behind the other, and in this way, identical on both sides....or almost...! But but after couple of tries, I had changed the fixation of both birds, beacause after looking at the bird with its wings open, it could not be fixed on a tree branch! Back to the sources for the size of the marquetry, and which requires a lot of ''tenderness'' during the cuts with an exacto. I still had a lot of different colored marquetry, some of which have such beautiful reflections in the light! So the drawing of the hummingbird and the flower,found on the web, in real size that I transferred on the marquetry. À suivre... soon ! The birds are coming...... After a lot of tries , I decided to put a full center instead of a small branch. And I had the idea to put them differents on each side This one is a field with a small part of ground soil and the other with .....water ! But as you see I had allready put on both a small opening for the branch supporting the bird. So I had to fill them later. Tadam...... the birds The blue bird over the small lake, and the green one on top of the field. Yes the birds like very much there new colors.... I also cut a flower as the one on the glass. Black marquetry behind the red one. I have also to cut some parts around the middle, so wood branchs around the green field, and black rock aroud the water. Lot of delicates cuts So here they are.....tadam..... I am very please with it but not sure that my sister will appreciate, because perhaps to much things in the middle. But had almost no choice , if I want to hold the birds as they were in flight. I appreciate yours comments , even if you desagree my work, but hope you have some good ideas, it is one of the reason that I am on the Forum with excellents artists. it is me again.... with an other try which I think is the good one. Lets compare : the original stained glass before it broke the same with broken glass my first work to fill the hole or and finally my last try , work with the logiciel Sketchbook, ( I am not very good working with it ) putting only a bird only ( not the good dimension ) . I would put also the flower at the bottom. As I said I would glue the bird on a plexiglass. Voilà, It is the one I prefer, because it leave much more place to the original and lest focus on my addition. À suivre for the final result. After a couple of ski rides , here it is finally. The original and the marquetry version of mine, which is the broken part that I worked on it. and the back Same birds and flowers used on my first 2 versions , and added 2 green leaves , glued on a plexyglass 1/8". And I varnished the plexyglass on both sides , with matte and gloss varnish, turning my brush while applying, to make it as much as the glass. But not anough for me, but it is OK! Happy with that change , the marquetry is more part of the rest of the stained glass window! Give her this week ! planeur


-
Ray if you talk about my first tries with water surronded by black and the bird, and at the back to back the other bird over a green field. Both side are back to back and the marquetry are glued on a MDF 1/4" the same size that the broken stained glass. And the plexiglass with the 2 birds and flowers are back to back also, and are the same that I used for my first try. If you look at my first two tries , the birds and flowers are back to back, so same process with my last try but on a plexiglass. It can be seen from the two sides in a window ( In the house and out side ) Hope I am more clear! planeur
-
Incredible work with so much details, the books seems so reals ! Lot of patience and hability. planeur
-
Little dog face For Lucie, who have and love dog, I made her this little intarsia dog, in cherry, ebony and sapele (ear and ''lips'' and around eyes ), from a photo in Pinterest from Tanya Mcelveen. It measures 6'' X 7'' and 3/8'' thick, assembled with wood glue and on a 1/8'' MDF base, but after sanding. Naturally cut with a scroll saw, with many pieces whose angles are quite sharp, so not easy to cut . What gave me a chance in the precision of the cherrywood cut, was the fact that once a piece was cut, its immediate neighbor was partly trimmed, so the fit was already very good, if well trimmed! So here's the finished cut of all the pieces, then the ebony and ..... pieces are copied onto the cherry originals. Once the 34 pieces have been cut as accurately as possible, sanding begins on each piece to round them out and give them a 3-D effect. I also raised some of the pieces for more than 3 D. Then the sanding! After several trials and recommendations ( thanks again every bodies ) I opted for this electric rounding sander with an aspiration tube near, which can go into almost every small corners. Naturally, I do a lot of hand sanding with all kinds of sandpaper that I fold or round, and as you probably know, this requires ........... patience! But a little bit every day help a lot! Rounding the upper parts , I also help him to see better with a white dot in his eyes ! Then Glueing my little friend , a little between each parts and finally at the back on a MDF 1/8'' Finished with oil Prato Verde . And here is my little dog saying thanks to this site with so much informations and advises and experts activities which help me a lot! planeur


- 6 replies
-
- 13
-
-
Beautiful Tj, j'aime beaucoup , specialy the water with a wood I did not know the existence ! Not sure we have it here. Very good reflection for the water. planeur
-

3d printed dust collection solution
planeur replied to James E. Welch's topic in General Scroll Sawing
Bonjour James I did something similar 3 years ago and I have almost the same near dust collecting on all my equipment! Thanks to my small shop....! Bravo good model ! planeur -
Need blue for water... what should I do?
planeur replied to rafairchild2's topic in Intarsia/Segmentation
It is me again, just want to show you the result using amarante for the water, in my post The Atlantic Puffin, in Feb 2021 Have a good day ! planeur


