


planeur
-
Posts
262 -
Joined
-
Last visited
-
Days Won
1
Content Type
Store
Profiles
How-To & Articles
Scroll Saw Reviews
Clubs & Organizations
Clubs & Organizations International
Pattern Shop
Suppliers
Village University
Help Desk
Forums
Gallery
eBooks
Everything posted by planeur
-
Forgot to tell you I will make another eye, more real ! This one was a test . planeur
-
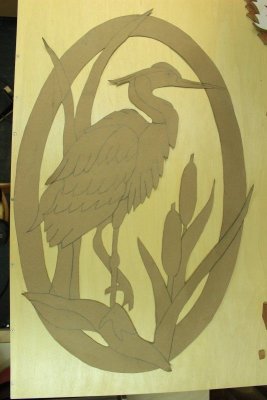
Well, here I am ! After a week of part time work, I had complete the adjustment of all the pieces together . Lot of small sanding, measurements . The 3D dimensionning of the Heron is the next phase of work, which will be very tough for me, and probably long! But till today I am OK with that work and I like it very much. So I will have to rounded or thin most of the parts , as ex. the 2 cattail of marsh ( quenouille in french ) at the right, or the heron's beak. So again if you have any advise that could help me, I am with the VILLAGE to learn and of what I had seen sor far, they are a lot of incredible talent , artists, and people seem to be very generous! planeur


-
Merci Richard for your support ! I am almost finishing to adjust each parts to the i's neighbour . Lot of precise job....! Photos will comme soon ! For the 3D effect , I Will ( I think .... ! ) sand some sections of most of the pieces, so a piece will be "rounded " gradually than its neighbourd until the limit of the 2 pieces. Naturally I will do it gradually , making some tests before ! It is my first one with so much 3D effet. If you have some advises good or bad , I will be glad to have them! planeur
-
OK Jim I figured it now ! The cut angle must be 3-4 degrees from the vertical. So the elephant will have to seat on the cut lid . I tought that your lid was not cut full thickness ! Merci Jim, I will remenber that technique planeur
-
Thanks Jim for your answer, and I have another question..... With what tools did you used to carve the space for the elephant , if it is not full thickness of the wood ? Hand chisel ? planeur
-
Brenda, plywood for me is a multi layer of wood. Is your piece has more than one layer. I would never have the idea of using such wood at the scroll saw. thank you planeur
-
Thanks Paul I have lot of "crust" like we say here, before arriving to your level ! WOW what beautiful works you had done planeur
-
I did that bike for my wife because of her love for biking ( as me ) This is the more delicate cuts I made so far, the wood is 3/16". planeur

- 16 replies
-
- 18
-

-
Beautiful Jim Nice combination of woods. Questions : - how did you do the box, and the 4 corners ? It look to me like a big piece of wood that you cut the interior ( do I guessed right.... ? ) - the elephants are full thickness of cover or like marquetery very thin ? planeur
-
WOW WOW ! Incredible ! Lot of delicate and precise work , and a lot of PATIENCE ! Questions : what type of wood, size, thickness ? And what is the size of your smallest drill you use before a cut ? I did some patterns like that but not as difficult. I nerver used spiral blades. Bravo Brenda ! planeur
-
Allo Rolf I have to do it that way because our photocopy store do 11" X 17" max. copy ! My 36" X 20" was to large for them. Then the transfer on cardboard was to have tought copy to see the result of my cuts. All the pieces are not at the same thickness but close. I will have to work on the thickness of them to make the 3D effect , soon ! Almost there....! This pattern was found on pinterest , while I was looking for other things. So much on Pinterest site ! Have a good day planeur
-
Glad you liked it Brenda, yours is beautiful to ! planeur
-
So let's begin this intarsia with you, and hoping most of you know what is an intarsia..... ! And as I said before your advises are welcome bad or good ! I had started that intarsia around April , and stop for summer time ( biking, gardenig, walking ,! ) And from 3 weeks ago, restart the bird . I’m having fun …. to make an intarsia that is the largest made to date, and includes 8 species of wood and 40 different pieces to be cut with my scroolsaw saw. The woods are Mexican ebony, mahogany, cherry, amaranth, sapelli, cedar, elm,. The choice of colors is not necessarily the choice of a great heron…. but we recognize it nevertheless … and those in nature will be jealous….! From a model taken on Pinterest, I had it copied on an 11X17" paper sheet. , then transferred and enlarged onto a cardboard with my pantograph to make about 36 ‘’ high by 20’. Then the cardboard cut with scissors and scalpel , to see the final result but on a cardboard….! Without telling my wife, I put the Heron in the bathroom without saying a word to her and … she almost had a cardiac arrest when she saw him….. but was very happy and encouraging! The cherry frame composed of 6 pieces cut to have the oval shape by sticking them. Then reinforced with a tite plate at the back on each joint. The joints on the front are hidden by parts of the Heron. Once I have selected the wood species for each part of the bird, I thinned them at +- 3/8 ‘’, in the right direction of the grain, then plane them to make them soft enough. Let’s copy each piece! With a carbon paper I copy the whole bird on a large white sheet from the cardboard model. Then I cut these pieces with scissors and scalpel, so normally they fit together very well …. Then I cut every parts of the bird, to be glued to the wood choosen I glue them to the corresponding wood, to finally cut them at the scrool saw as accurately as possible, with Pegas blades. Gradually I put them on the cardboard model, actual size, to see if everything is OK. ! Naturally there is always more or less correction between these parts so they adapt as best as possible between them! And that is where I am at this moment! WOW It begin to look like an Great Heron! So..... à bientôt ! planeur


-

Way to read the new posts or answers writtens ?
planeur replied to planeur's topic in SSV News, Help & Feedback
Thanks Scrapppile very easy ! I will do it as in my other forum Lamortaise. By the way , is "scrapplie" mean the same thing as in French.... planeur -
Bonjour Is there a manner or function so I can read first the last posts or answers written, and without looking at every sections ? I probably do not see it.... even if I looked carefully ! Thanks planeur
-
Bonsoir from Québec ! I will start a work in progress while doing my Great Heron in intarsia , as the photo, and found on Pinterest. So you can comment my way of doing it , and I hope you will notified or correct my faults ! I am doing it for your support and tricks you surely have ? I already in progress with with the Heron , all the parts are cut but not finally adjust. Next post will have photos.... and my way of doing it. planeur

-
Thanks Marg ! Is it possible that your galery site does not work? Have a good ....... evening...... ! planeur
-
Superbe and Beautifull Grandpa ! Question : did you try some other finish than this one, like oil or others ? I am asking that question for my future intasia ( working on it ! planeur
-
Thanks to all , Masonite and MDF seem to be OK ! planeur
-
Merci à tous, thanks to everyone , it seem to have a lot of quality scrollsaw's lover! From what I saw, I have a lor of work and practice to do before being a good one ! But I like it and my patience is quite good for that kind of work. planeur
-
Bonjour! What do you put as the backing for your intarsia ? Personnely I use MDF flat on both side. Better suggestions ! Thanks planeur
-
Yes I am from Québec area, in Canada I am joining your scrool saw forum, because I am doing more and more "intrasia" and other patterns with my scroll saw. Which is an Excalibur ! They are surely expert from which i will ask for advises. Hope you will understand my english To start I will show you a piece I gave to two of my sisters, found on the web, and done a couple of years ago. It is made with sapelli wood . Soon others pieces planeur


