


rafairchild2
-
Posts
593 -
Joined
-
Last visited
-
Days Won
27
Content Type
Store
Profiles
How-To & Articles
Scroll Saw Reviews
Clubs & Organizations
Clubs & Organizations International
Pattern Shop
Suppliers
Village University
Help Desk
Forums
Gallery
eBooks
Everything posted by rafairchild2
-
I am only doing 3 or 4 easter art projects this year. I already posted one of my original designs, this is the next one, design by Sue Mey. In hindsight I should have stack cut this so I could get at least 2 pieces. 1/2" walnut. I used a Flying Dutchman Ultra Reverse #1 for all inside cuts, and then switched to a #7 FD-UR for all the outside, straight, cuts. Finished with Danish Oil. My plan is to add a coat of beeswax and coconut oil wax for the final finish after it cures. My next piece is another door topper by Sue. It is a church surrounded by trees. The plan is to make it out of 1/2" black limba.
- 6 replies
-
- 14
-

-
Glad to see i am not the only one working on Easter project already. Great job.
-
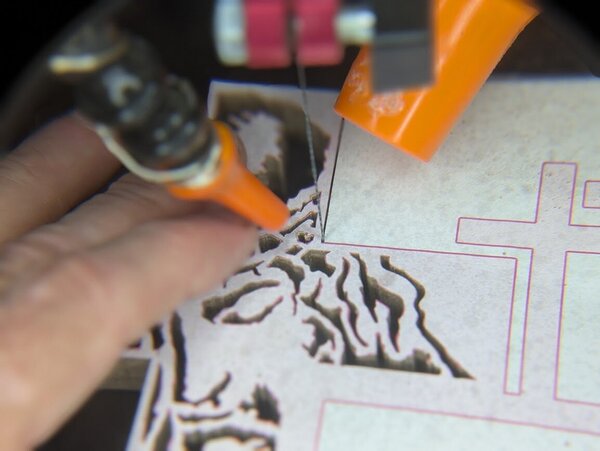
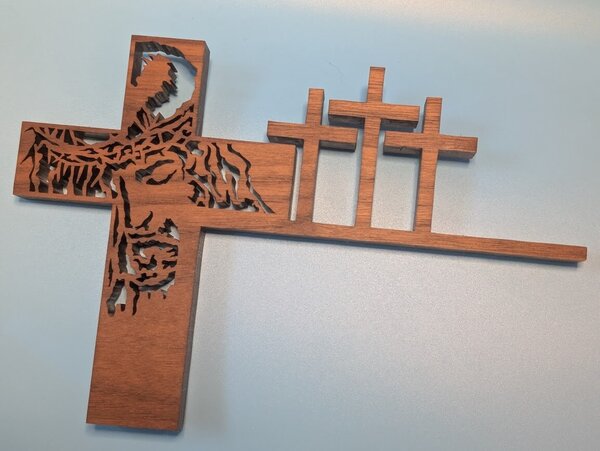
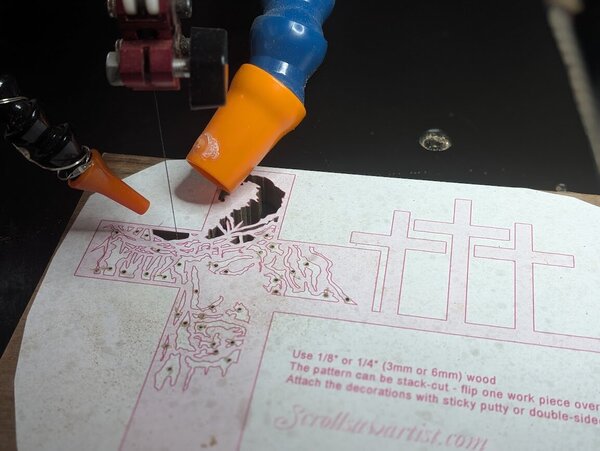
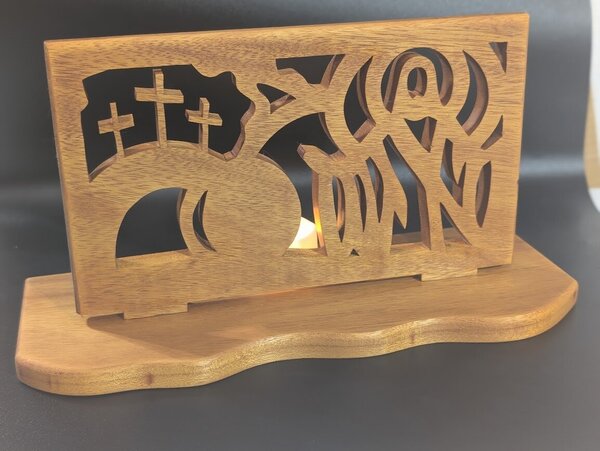
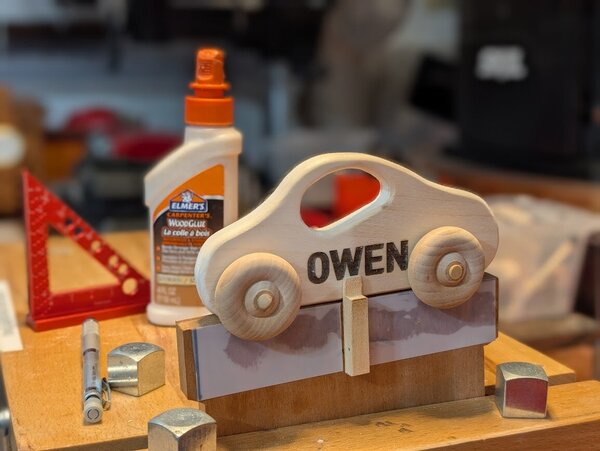
I am starting Easter stuff. Two Door border hangers, I forgot what they are called. And then an abstract design i did with a bit of the crucifixion /resurrection story as a tea light display. I will also add, I did my 8 month old, Grandsons first car too.

-
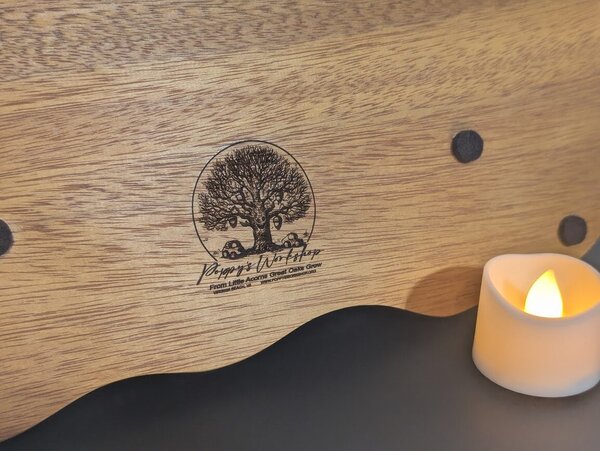
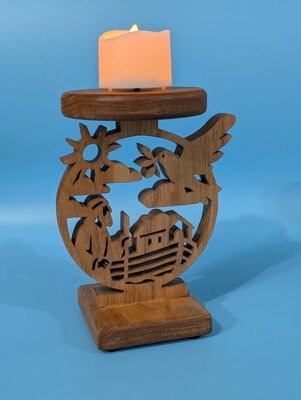
I just finished a new piece today and wanted to share it with the group. It’s a Noah’s Ark tea-light stand, an original design that includes the ark, Noah, the dove with the olive branch, and a simple sun-and-cloud backdrop. Cut on my Pegas 30" scroll saw, using cherry wood. I finished it with Danish oil, then added a final coat of my usual cutting-board wax blend (beeswax + coconut oil) for a soft sheen and a little extra protection. It was a fun cut with a good mix of tight turns and open spaces. Always appreciate feedback or suggestions.
- 8 replies
-
- 13
-
-
Under The Tree - Scroll Saw Challenge
rafairchild2 replied to Travis's topic in General Scroll Sawing
No big pieces for me this year. Just did a small run of ornaments. this is one I did for my grandsons tree made out of mahogany.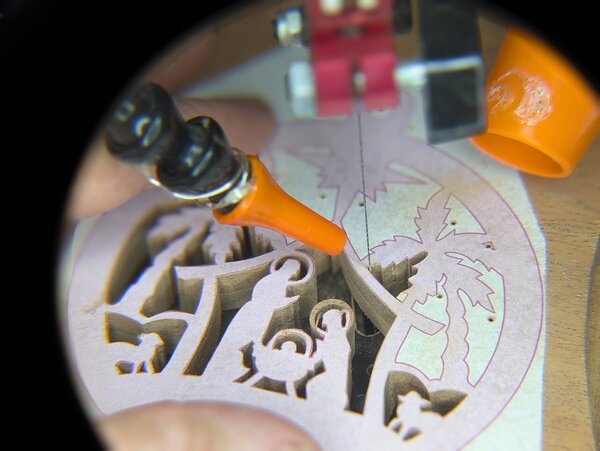
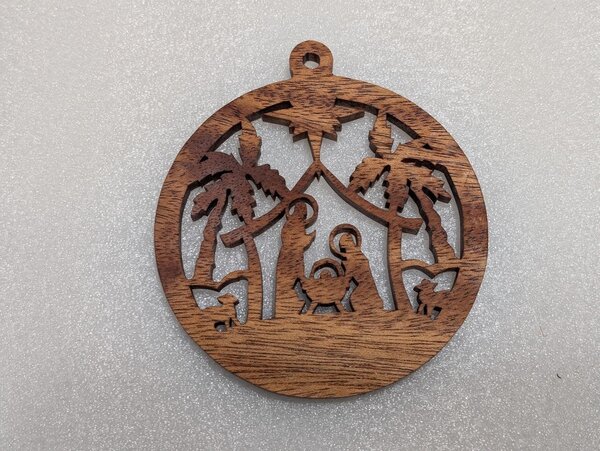
- 62 replies
-
- 13
-
-
- under the tree
- scroll saw challenge
- (and 2 more)
-
You might as well, make a few more at the same time! I know, I know... I'll see myself out.
-
Now this might not work well (Maybe it would) for your thicker stock as I generally cut 1.5x1.5" stock, but I made a spring tensioned jig, with tightening nuts. This way I do not have to tape after cutting the first side, pieces stay where they need to be, giving me greater accuracy.
.thumb.jpg.ca7b15c33ad6062d5ea71d05c5db12f7.jpg)
-
It almost looks like Charles Dearing's style. He has a lot of patterns, and I tried to look for a couple minutes, no joy. https://woodenvisions.com/?ywcas=1&post_type=product&lang=en_US&s=jesus
-
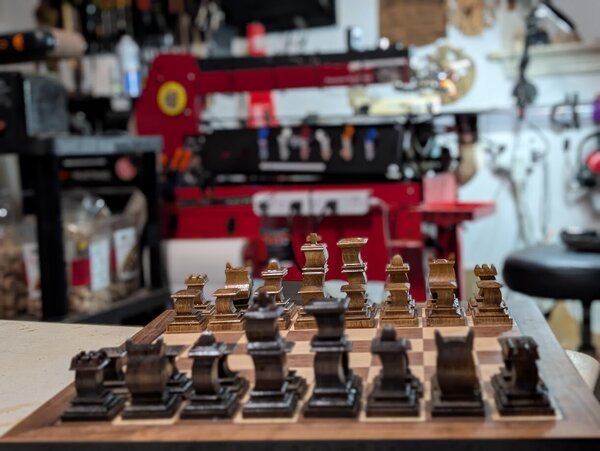
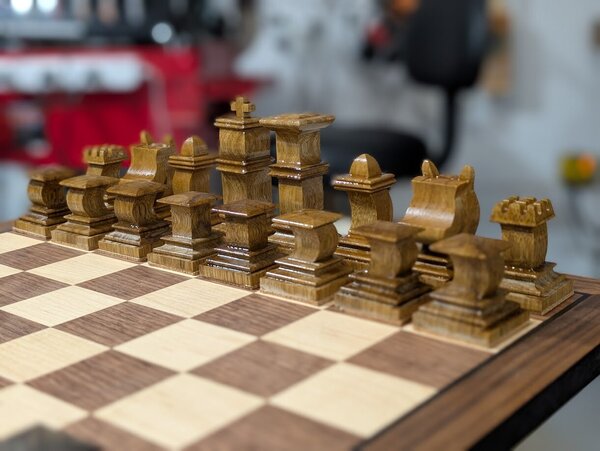
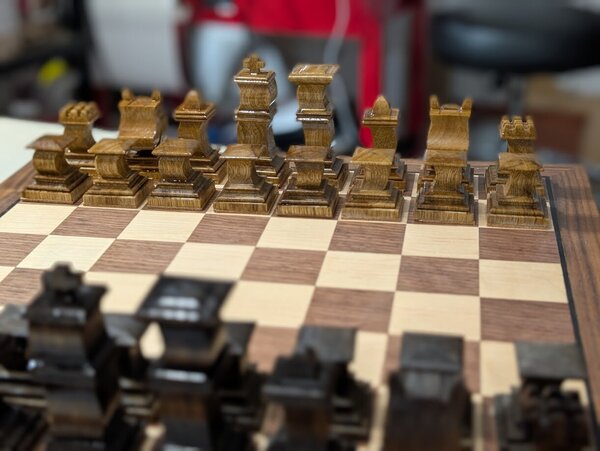
Completed primitive chess set. Lanier Graham type chess set
rafairchild2 replied to rafairchild2's topic in Bragging Rights
Lanier Graham type chess set is displayed at the Museum of Modern Art in NYC. Makes me want to design a set of my own and see if i can get it into a MOMA by me.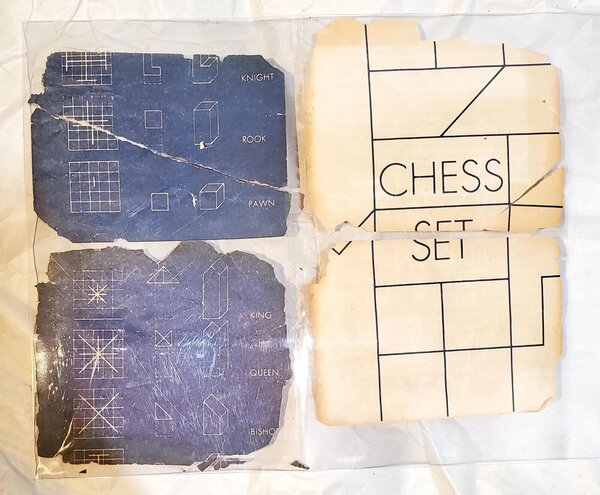
-
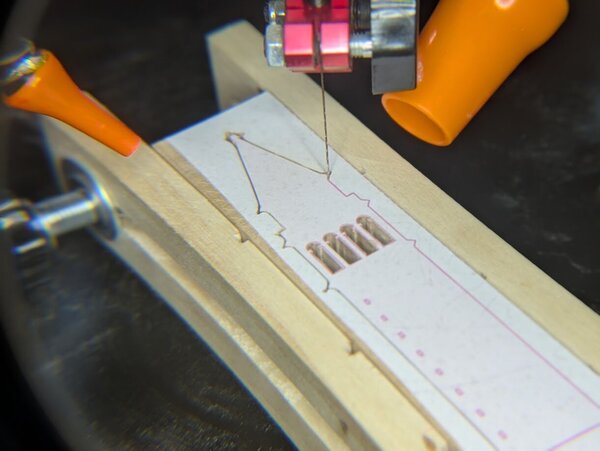
Lanier Graham type chess sets are my favorite "modernist"/"minimalist" design. This set is more for outside use, on larger squares. I am still figuring out what I want to use as a board. The one displayed is for the smaller, more formal pieces I make. The pieces all fit together into a rectangle so I can make a box for all pieces to make it portable. Now the technical part. The dark pieces came out much better. I could mess with the light, but this is supposed to be primitive, not perfect. I tried a new/different wood supplier for my 1.5^2 x 12", stock for my compound cutting. Needless to say, the wood quality, consistency of cut and uniformity of wood, were less than desired in comparison to Ocooch hardwoods products, my usual go-to source. Less expensive is not always better... Because of that, I could not use this stock for my regular projects. I saw an idea for a "Primitive" cut chess set and decided, I could use this stuff and get something that might look cool, and can be my grandsons first chess set. Basically, this is just a fancy set of blocks, they can take a beating and will look better as they age and get dings and dents. I used Canary Wood for the light pieces and Walnut for the dark. Cut with a Pegas #10 skip tooth blade since all the lines were straight. I usually use a #3 or #5, when doing lots of turns and detail work. Of course, it is a free hand cut on my 30" Pegas scroll saw. Side note: After laying things out, I realized I can create a pattern that cuts one side of the board pieces from a single piece of wood for light, then one for dark. Now, the above set is 1.5^2 for the base, so they are chunky. As you can see on my traditional board, they fill the squares tight. If I use a 3/4 thick piece of wood, I can cut from a 4x6" slab. Smaller pieces, portable and will fit more paying boards. I need to do some tweaking on a couple canary pieces, but overall, for having crappy wood to start this came out looking pretty good. The total time was about 6 hours. This is measuring and scribing the lines with my mechanical pencil, vs doing a glued-on pattern, cutting, sanding on the belt sander and finishing with Danish Oil. Your thoughts? Something you would like to have as a portable set, that can take a beating? EDIT TO ADD: For you chess purists out there. This is my shop board. I use it to visualize and take photos. I am still deciding what type of board I am going to do for these. I am not totally happy with this set, in particular the canary wood. So, I might just use a silicone roll up board for this one (outside use and young kids). It will have 2x2 squares, so that gets the 75% fill.
.thumb.jpg.fd4ad1da122e4f6114c9968f89a2a10e.jpg)
.thumb.jpg.fd5c0426cfe62aced24fa2197285169a.jpg)
.thumb.jpg.48fb837a355f30a1444fc28a3e43a545.jpg)
.thumb.jpg.ed9ce62d6b4e7dfece76c7dcbd3bca40.jpg)
.thumb.jpg.5ef6b2144946fe227de13d49b3c2d185.jpg)
-
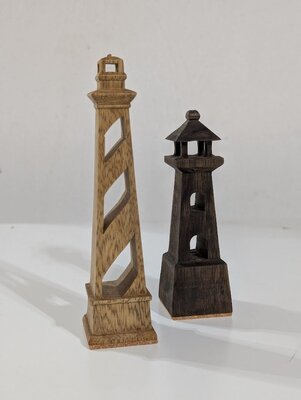
No it is more of a satin finish, than gloss. This is why I screwed up and did not use it, but tried poly. But when looking over the lighthouses I just completed, it is so much better with D.O. Black and White Limba, finished in Danish Oil natural.
-
I used FD UR and #5 is my go-to for 1/2-3/4, though depending on the Janka and if the lines are smooth and not detailed sometimes I go #7 The heart is 1/2 blood wood, really hard, I used #5 and #7 on it.
.thumb.jpg.ca87e5fe3547963e89a430763d6fce82.jpg)
-
Thanks Jerry... Not quite 100% but getting there. I went for 6 weeks to bi-week occupational therapy. I've been back to work at NATO f/t too. My wife is on her feet and active, FYI: I am kicking her out of the house at the end of the month! Disney Cruise for her and a church friend I'll be home with my cats and scroll saw and little green houses. I am sure I can get into trouble while she is gone.
-
I used WATCO, but the natural, thus it was clear, not a stain.
-
It's been a while. A tough summer. My surgery went well, but it was over a month of healing, and the nerves that were moved, were slow to recover. Then my wife had emergency surgery, summer heat, and then trying to get yard work caught up and then I got nailed with medicine induced hives 4 weeks ago neck to knees, front and back! I had started this back in May, hoping I would complete it before I went under the knife, but got 1/2 done. Finally spent last week and through the weekend in the workshop for the first time, and just kept working. My one regret is using the minwax poly. I think it looks too thick, I was going for high shine. I will go back to Danish Oil. The board is a cheap store bought, I keep in the shop.
- 12 replies
-
- 19
-
-

-
Struggling with compound chess set.
rafairchild2 replied to rafairchild2's topic in General Scroll Sawing
Rather than trying to do a sharp turn, do "nibbles" to make the sharp edges. If you look carefully at the attached image, you can see how I nibble the wood to create the 90 degrees.
-
Struggling with compound chess set.
rafairchild2 replied to rafairchild2's topic in General Scroll Sawing
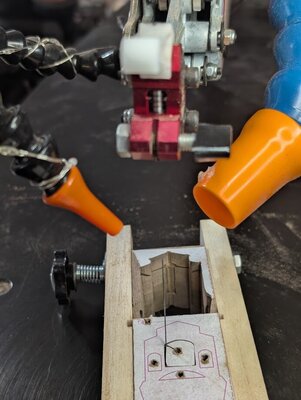
I think I posted this already, but this is the jig I made for cutting my chess pieces. I placed 200 grit sandpaper in a couple of places inside and added springs between the thumb nut and the jig. I get very even pressure as I cut, no slipping. 2nd image is a close-up including the spring.
-
Struggling with compound chess set.
rafairchild2 replied to rafairchild2's topic in General Scroll Sawing
Thanks! Right now I am doing the Neo-Classical. I am using black and white Limba. It cuts perfectly, as it is 670 Janka. I am using #5 FD UR blades for most, and also Pegas Skip #10 skip tooth. For cutting the bottoms Here are the black Limba pieces, I am now doing the white, 4 pawns are done. You can see by the off-cuts, that I put a finish on, how they darken up. I am planning on selling this one. What would be a good price? I do add 2mm cork on the bottom of each piece too. I go into surgery for my arm tomorrow, 3+ hours under full anesthesia with ventilation. I am looking at 3 months of recovery. Hope to get light use back in 3 to 4 weeks. I will be on Short-term disability for a month from work. I will be doing some writing, I'll share in another post.


-
Struggling with compound chess set.
rafairchild2 replied to rafairchild2's topic in General Scroll Sawing
Just wanted to post the Venice-inspired finished chess set. The only other thing I did was add 2mm thick trimmed cork to the bottom of the pieces. FYI, I just started a neo-classical chess set using black limba for the dark, and white limba for the light pieces. Looking at the two cut-away wood, you can see what the BL will look like when finished. I have to admit, I love the look 'dry', as the contrast is fantastic. PS: That is my 30" Pegas scroll saw in the background. I love it!

-
Struggling with compound chess set.
rafairchild2 replied to rafairchild2's topic in General Scroll Sawing
Actually I am not, but will do as suggested as it makes perfect sense. Thanks. But I am getting there. Only 3 more to go before I start sanding. Ignore the wrong placement of the king and queen.
-
Struggling with compound chess set.
rafairchild2 replied to rafairchild2's topic in General Scroll Sawing
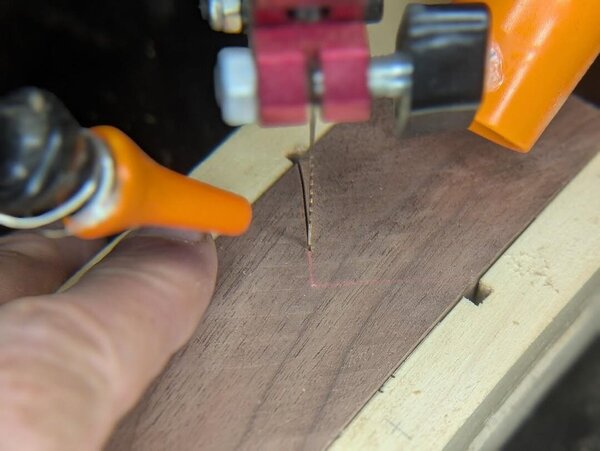
Arrrggg... My first blown piece! What a let down when I "crack the egg" revealing what's inside and to see this. All that wasted time. My issue I am struggling with is drill bit deflection. I have to use smaller bits as the inside cuts are rather small. I try to drill in a little, then back out, drill in some more, back out, etc... I even use surf board wax to minimize friction and heat, but in this case to no avail. With the deflection it also means the scroll blade starts in a wonky place. After threading the blade I felt the weirdness and knew something was not right. At least I can say, I have completed 27 good pieces before getting my first bad one. Yippee! So I am open to suggestions on drill bit deflection prevention, and what you do. I thought I did everything to prevent it. I have double checked everything to make sure my bit is 90 degrees to the table. But I do believe it is because of how hard the wood is, and some of the harder grain is causing the issue on the small bit. The drill image is the bit that I have to use. And yes, it is fairly fresh bit.

-
I keep my air compressor hose by me when I am sawing. A few puffs top and bottom once in a while keeps everything dust free. Then 1x/month or so depending on how much saw time I have I use a spray ceramic coating (automotive) on the cutting deck. Spray, wait 30 seconds or so, then wipe off with a paper towel, let it dry for another 5 minutes before using. Everything slides nice, nothing sticks. Once a week, I open the big garage door and bring in my leaf blower. I blow the floor clean.
-
Struggling with compound chess set.
rafairchild2 replied to rafairchild2's topic in General Scroll Sawing
I got the patterns from the book "Making Wooden Chess Sets" a Fox Chapel book. I am actually looking for a civil war pattern, anyone know of one? And you are right about about only doing a few pieces in a session. I find the amount of concentration, making sure that I am making identical pieces to be physically and mentally draining, thus I goal myself one or two a day, sometimes three. Granted, I do fit in other projects, such as yesterday I also finished a few toys intended as gifts to one of my bosses at NATO, who announced he will be a first time grandfather. He was speaking to me at a branch going away party Friday. We are losing 6 officers this year. Turkish, Spanish, Italian, British, Hungarian and French. They come to NATO HQ in Norfolk for a 3-year rotation. -
Struggling with compound chess set.
rafairchild2 replied to rafairchild2's topic in General Scroll Sawing
Thanks for the tips on using the Super skip. I forgot I had bought 4 or 5 dozen of the #10s, knowing I would use them sometime. I got them when they were on an overbuy clearance for cheap. After adjusting to how the blade tracks and travels I think I got a good handle on dealing with the ash a little better. Finished the King this AM. Only 5 more Pawns to go! Then comes sanding. I do love the weight of the ash for sure, as well as the walnut. PS: One trick I learned a while back, when cutting the perimeter, do not cut across the bottom on the first side. Only do it on the 2nd compound side, this way the piece stays anchored in the body, and does not bounce. It also gives you the most accurate and flat bottom minimizing putting it on the belt sander to flatten the bottom.

-
Struggling with compound chess set.
rafairchild2 replied to rafairchild2's topic in General Scroll Sawing
I just did a piece with the #10 Super Skip. Yes, easier to cut on the straights, but I found it lacking when I wanted to 'nibble', as this is the technique I use on sharp turns/edges. I am trying to adjust how I cut to accommodate this. I also find that sometimes my piece will jump really hard, as I set up for the angle. I noticed a few 'dings' where I got some jumping. I'll stick with my FD UR for the inside cuts since they are small, and use the SS on the perimeter cuts.


.jpg.8b4771b9f1691ba4a7e2bcc890580317.jpg)


.jpg.3d101d08d115f34afbe4f5e40045501f.jpg)
.jpg.4a801f9611c0610c5438d782f93bbe3f.jpg)
.jpg.057ea6f9a6b809155a3505a544d33556.jpg)
.jpg.6f7a3b8f5a43294678c0ccb4777cd65d.jpg)
.jpg.dcdc375fe20ac47ce9e1352ea9f739c2.jpg)


.jpg.d7ce480c53270b7bcc79d4f54253499f.jpg)


