


garryatpa
-
Posts
18 -
Joined
-
Last visited
garryatpa's Achievements

Newbie Scroller (2/11)
32
Reputation
-
Some additional notes after seeing the picture. Sorry I don't have have a picture to show just hope you may be able to understand my directions. In order to cut out the lettering the dowel will have to be supported so it will not turn both when drilling the starting holes to insert the blade and when sawing the lettering. to do this cut a couple of pieces of scrap 3/8 inch wood a little longer than the dowel and 1 1/4 inch wide. lay the dowel between the two pieces of wood on edge. The lettering should be placed so that the sawn letters will be 90 degrees to saw table . To hold the wood strips and dowel in place used a couple of mini clamps placed at each end of the wood strips so they will lie flat on the saw table and clamp together. You may want to add a dab of hot melt glue at each end to ensure dowel will not turn. When drilling starting holes use an awl to make a small depression for the bit to start. Note: if you want to leave the centre of the "O" you will have to leave a narrow bridge in one or two places , two spots would be best, between the outside of the O and the inner part to be left in. Leave one bridge at the tip of centre piece on right to outside part and another bridge on left side of centre piece to outer edge so you will have two starting holes drilled to saw the "O". The bridges will then support the triangular piece in the centre. Ensure that the drill and the blade are adjusted so the starting holes and blade when sawing are at 90 degrees to the table. All the best with your project. Garry
-
The blade you use must be sharp. Depending on the wood being sawn, the detail (sharp turns, etc) a blade may last a few minutes to an hour or more before it needs changing. The size of the blade used will also depend on the size of the lettering being sawn so you can make the sharp turns. Clear packing tape wrapped around the dowel may help the sawing as the tape has a lubricating affect on the blade and will also prevent burning. A picture of how the lettering will be sawn on the dowel would help. Is the lettering going to be horizontal along the dowel or vertical? Will the dowel be mounted on a base like a name plate on a desk? Are the letters going to be removed from the dowel or is the outside part around the letters going to be removed? In either case you need to be able to clamp or attach the dowel to a base or between two pieces of wood so it will not turn as you saw out the lettering. Sounds like an interesting project. Post a picture when you are finished. Garry
-
Hegner saws are quite simple in that there is only one pivot point on the upper and lower arms which are bushings so no bearings there and on the lower arm is a short connecting link made of bakelite type plastic to connect to the motor. These bearings can wear and create a "knock" or the plastic can crack and cause the bearing to come out. The only maintenance really is to put a couple of drops of oil (3 in 1) on the bushings between the orange frame and the arm after each 10 hours of operation. I have done this on a regular basis and never had a problem with the bushings in over 30 years on my saw. When lifting the saw NEVER, NEVER lift by the blue arms. Use the table at the front and the orange frame at the back of the saw. In looking at your pictures I note that the upper arm looks to be okay as the space between the arm and frame is about the same along the arm. The lower arm on the other hand looks to be closer to the frame at the back. Not sure if this is caused by the angle that the photo is taken or not. Check to see if the arm may be bent and need replacement of arm and bushing and bolt. The arms should not be able to be moved side to side at the front of the arms. If there is excessive movement side to side the bushing and bolt securing it may be worn and need replacing. To check this install a blade and set tension. Run saw and when standing in front the blade should look like a solid black line.. If blurry and wide indicates the blade is moving side to side. Also another indication of bent arm or worn bushings. As has been noted by another contributor the table should be checked with a small machinist square, do not go by the degree markings on the adjustment. There is a circler rubber bumper that goes on the back of the frame under the upper arm that is missing and should be replaced. Most likely cause of your problem in my opinion is a bent lower arm if I am interpreting the photo correctly. Garry
-
 OCtoolguy reacted to a post in a topic:
New to the forum
OCtoolguy reacted to a post in a topic:
New to the forum
-
Welcome to the Village Joe from northern Saskatchewan , Canada. You don't mention if you are using pin end blades or pinless blades. If you do any fretwork or other pieces that need to have smaller openings sawn out you need a saw that takes pinless blades. I started with a Delta saw that ran at about 1700 rpm (direct drive) which was too fast for my liking. I moved the motor to the back of a 3/4 plywood platform and mounted a shaft on pillow blocks with a 3 inch pulley and the motor had a 1 or 1 1/2 inch pulley which slowed the speed down to about 900 spm, if I remember correctly. I was much more comfortable with this setup. As far as using a speed control on your saw check to see if your motor will accept it or you may be liable to burn out your motor. Garry
-
barb.j.enders reacted to a post in a topic:
Attaching Sawtooth Hangers
-
Fab4 reacted to a post in a topic:
Attaching Sawtooth Hangers
-
 kmmcrafts reacted to a post in a topic:
Attaching Sawtooth Hangers
kmmcrafts reacted to a post in a topic:
Attaching Sawtooth Hangers
-
Wichman reacted to a post in a topic:
Attaching Sawtooth Hangers
-
When I have had wall hangings made of 1/8 or 1/4 inch wood and screws or small nails were not suitable I always used hot melt glue. Put a dab on the wood where each end of the saw tooth hanger will go and press into the dabs of glue. To increase the holding ability smooth another dab of glue over each end of the hanger so it extends over the glue pushed out the sides. garry
-
Hi Mike.. Welcome to the village where you will meet people that can help you and answer most of your questions. I too started out using a Dremel with 3 inch pin end blades. I wanted to do more detailed work so it didn't take long to switch to a saw that used pinless blades - A Delta 15 inch single speed saw which I used until I wore out the bushings in the arms and after replacing the arms I gathered as much info as possible and purchased a Hegner 22 variable speed saw which I still use after close to 35 years . As you have learned so far, you can saw an unending list of materials and make beautiful items. I have sawn wood, plexiglass, paper, bone, antler, thin metals, and more. So let the dust fly and enjoy a hobby that will last a lifetime. Garry
-
Aaron K5ATG reacted to a post in a topic:
Bent Scroll Saw Blades
-
I have a Dewalt 788 and at times the tip of the blade would bend like a hockey stick.. On some saws this is caused by the blade clamp not being able to pivot or the blade not being centered in the blade clamp. (I also have a Hegner 22 where this can happen if I don't get the blade centered in the clamp at the pivot point). In the case of the Dewalt 788 which has the same parallel link drive system as the Bauer I suspect the partial cause of the hockey stick is that the blade clamp does not pivot. After experimenting a bit I found that when I reduced the tension on the blade it helped prevent the blade bending. I reduced the tension from about the "2" position on the 788 to a touch more than "1" and it seemed to help. Try reducing the tension on your saw in small increments and see if it helps. Like you say when sawing out very small openings and your starting hole is small , especially on thicker wood, the bend prevents threading the blade through the hole and the only other solution is to try and straighten the blade with a pair of pliers.. Garry
-
OCtoolguy reacted to a post in a topic:
30 year old hegner
-
OCtoolguy reacted to a post in a topic:
30 year old hegner
-
Juan Rodriguez reacted to a post in a topic:
30 year old hegner
-
Just an addition to my comments above - make sure you put a couple of drops of oil (3in1) on each side of the bushing which holds the arm after every 10 hrs of operation. I have no side to side movement of the arms after 37 years of operation. When saw is running and you look at the blade from the front , the blade should be a solid line not blurry caused by side to side movement. Garry
-
I have a 1993 Hegner 22 with the front tension release. Think this was the first year they had the front tension. I bought it new at that time for about $1400 without stand and paid another 100 for a stand later. The only part I have replaced is the connector from the lower arm to the motor flywheel. The bearings on the connector get rough about every 15 years of use. I bought another Hegner 22 about 3 years ago as a second saw. The picture of it was only the saw. Was advertised for 750 and after 2 or 3 weeks on Kijijji dropped to 500. I live about 800 kms from where it was located so had my son look at it and see if it ran smooth etc. He ended up buying it for me. When I met up with my son to get the saw He unloaded a good looking saw and homemade welded steel stand that must weigh 100#s. He also had extra blades, a connector link, quick clamp and other blade clamps .. so I believe it was a good deal. As far as the blower bellows not there that is one of the first things I removed on my new saw and made a vacuum system from a wood stove fan that was strong enough to suck the dust off the top the workpiece and runs so quiet you cannot hear it. The blower sent all the dust straight at the operator and should never have been made that way. Newer ones have a lock-tight blower hose that can be bent to blow to the side but I prefer to get rid of the dust with a quiet vacuum system. I think the saw you mention is a good deal. Garry
-
There are quite a few questions in the above posts. I hope some of the comments below will help. I have a Hegner 22 that I bought in 1993 and I am still using it. The only part that seems to wear and cause a knock is the link connector bar, which I have replaced about every 15 years. I have never tightened my tension 2 turns. When I change blades because of breakage or to a different size I adjust the tension - turn the tension knob until all play is taken up then tighten it another 1/2 to 3/4 turn. There may be times that you have to re-tension the blade because the tension knob turns as the saw is running. Gordon re blade tip bent like hockey stick - caused by the blade not being centered in the bottom clamp. Place the blade into the bottom clamp until it hits the clamping screw, back the blade away from the screw just a hair and tighten the screw , in this way when you tighten the screw it does not touch the blade and cause it to move. Make sure the blade is lined up with the pointed tip of the clamp, this is most important. Making tight turns with any blade may be assisted by taking a fine sandpaper, attaching it to a flat strip of wood and , while the saw is running hold the sandpaper against the back corners of the blade at about a 45 degree angle to remove the sharp corners along the lower 1 to 2 inches of the blade. This will allow the blade to corner more easily. I have only used this method a few times and that was quite a while ago, but worth a try. When making tight turns always keep the saw running, I find that I am most comfortable at a speed of about 1300 on the dial of the Hegner. Stand at the front of your saw centered facing the blade. Do not push the wood to either side. Note: To check if you are pushing the wood to one side or the other , as you are sawing stop the saw while hold the wood still. After the saw is stopped , lift your hands off the wood, and if the wood moves to either side of its own accord you need to adjust your sawing as you are not pushing straight back on the wood. When turning the wood use one hand as the pivot point hand which does not move or moves very little and apply a little pressure down near and to the side of the blade, the other hand is used to turn the wood very slowly while slowly pushing the wood through the blade. Only stop after finishing the curved cut if you stop. Do not move the wood when the saw is stopped. I believe I have seen tables for band saws which give the radius of a circle for different sizes of saw blades. I think the same would apply to the scroll saw in that a 2/0 blade would be able to saw a tighter radius than a number 5, or 9, although a number 2/0 and a number 5 will both be able to turn "on the spot". (higher blade speeds would help "on the spot turning" . When you are turning and the blade is at a 45 degree angle I am thinking you are forcing the blade to turn faster than it is able to saw. The only time my saw blade is at 45 degrees or teeth not facing the front is if I stop the saw and turn the wood. Increasing your saw blade speed may help. Breaking blades - In MHO over tensioning and under tensioning both cause blade breakage. Under tensioning I believe is worse than too much. When sawing puzzles , which I have sawn only a few, you must turn the wood first one way and then reverse and turn the other way in order to saw the tabs and openings for the tabs. I find that if I am sawing small ornaments and saw one direction then turn to the opposite direction that it is much like taking a piece of wire and bending it back and forth in order to break the wire. The more sharp turns one way and then the other the more often blades will break because the bending weakens them. What do other puzzle makers feel about this theory? Maybe slowing the speed at which you push the wood through the blade will help reduce blade breakage, but keep the saw speed up at the same time. Garry .
-
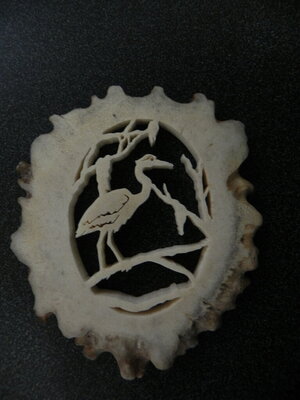
I just finished a cutting of the Great Blue Heron .. Was a bit of a challenge as it is only 1 3/4 inches x 1 3/8 inches sawn in moose antler. Still working on a frame for it. comments,questions welcome. Garry
-
Are you looking for any particular patterns or year of Hobbies patterns. I have number of Hobbies patterns/weekly magazines but I have not been able to go through them and put them into catagoies , etc. yet. I happened to get them from a friend who moved and stopped dong scrollsawing. The oldest pattern I have found so far goes back to about 1919. One thing I did notice is that the old patterns are mostly small - Kleenex box covers, letter holders, small shelves with birds, dresser mirrors, etc and wall hangings. Patrick Speilman's books have some of the old patterns , but I don't know how easy they are to find now since he has passed away. His scroll sawing handbook and other of his books were my guides through my early years of scroll sawing back in the mid 1980's . Does Hobbies (not sure of the name they go by now) sell some of the old patterns yet? Will have to start making a list of what I have and putting them into files. Garry
-
I have two 22" Hegners, one purchased new in 1993. I used the saw almost daily up until about 2012. Maintenance is minimal in that a few drops of oil on the bushings every 10 hours. The second Hegner is a 1996 model that I got on Kijiji in 2022. I have not used it very much yet. I have learned to listen to the saw as you use it and it will tell you when something needs attention. Example - the pivot pin for the front tension lever sometimes works loose and needs to be reset in its proper position. The back tension rod may work loose and need to be retensioned . Not enough tension causes the saw to run noisier. I have replaced the link connecting the lower arm to the flywheel after about 15 years of sawing (twice). There was a bit of a knock when the link was starting to wear. I also have used the Dewalt 788. I find it more aggressive than the Hegner. Also when making sharp turns the Hegner is able to turn easier as the stroke is more vertical than the Dewalt; the Dewalt has a much more noticeable back and forth movement as the blade moves up and down and makes sharp turns more difficult. I have no experience with the Pegas so cannot really comment on it. I find the Hegner to be easy to use and quiet. Changing blades from one starting hole to another is quick, just a few seconds is required. The blade holders can be set up with different sized blades if required - I use a small magnet to hold the blade holder with blades installed set on the stand to the side of the saw. All in all I have not regretted spending a little more to get the Hegner and I would not hesitate to get another if needed. Garry
-
When I have done craft sales in the past I used a wire grid system that is also used in retail stores ( similar to Barb,s). Use a black cloth draped behind the display so the scroll sawn articles contrast and show up against the background. Connectors are available to join more than one wire panel so they can self support on the floor or tables depending on size of panels. This could be done using plywood cut to an appropriate size, painted black and covered on one side by chicken wire also painted black. Join panels by hinges. Tom, most scroll sawn work does not show very well against a white background . Maybe a frame could be made and attached to wall and chicken wire stretched across. These wire systems provide endless ways of displaying your scroll sawn work. When using fabric for backgrounds different colours can be used. All the best in your sales. Garry
-
Sorry for the clarity of the pics as they are taken from 35mm prints that were a little fuzzy. The eagle pattern is from Southwest Scroll Saw Patterns by Patrick Spielman and Dan Kihl 1994. The canoe scene is from a leather tooling book by Stohlman. The top two photos are sawn from slices of birch at the original size of the patterns ( about 8 x 5) while the bottom two are sawn from slices of deer antler; the same patterns reduced to about 1 1/2 x 1 inch. The canoe scene in birch is finished with satin waterbase varathane; the eagle is also finished with varathane but in I believe an oil base which changes the color of the wood. These were sawn probably 20+ years ago. The shadowbox frames are painted first with a black stain, then sprayed with speckle stone paint. Will add some more pics as I get started on the Heron. Garry


