


MrsN
-
Posts
1,984 -
Joined
-
Last visited
-
Days Won
9
Content Type
Store
Profiles
How-To & Articles
Scroll Saw Reviews
Clubs & Organizations
Clubs & Organizations International
Pattern Shop
Suppliers
Village University
Help Desk
Forums
Gallery
eBooks
Everything posted by MrsN
-
where are the pictures?!
-
Most of the trivets I have made are 1/2"
-
The easiest way is probably a panel saw, but those are huge and expensive. I like the method of setting plywood on ridged Styrofoam and using a circular saw to cut it down. The wood is supported by the foam so you don't have the bending/twisting/falling that happens when you cut on sawhorses. If you are good (or accept square-ish) you can follow a chalk line, if not clamp a straight edge as a guide. I am good with using a mostly straight 2x4 as a guide but you may want more accuracy.
-
This is so cool!!! What a great project!
-
I am moving about an hour away. I have a moving company to help me with a lot of the stuff. I will have a spot to set up my tools, which is really nice.
-
great work so far!
-
In a few weeks I will be packing up and moving again. I am not really looking forward to the packing part since I feel like I just unpacked but hopefully it will be a good chance to organize everything again. Do any of you have any good shop packing/moving tips?
-
My first saw had a plastic insert around the blade that didn't really sit flush with the table. I cut a piece of cardstock the size of the insert and used packing tape to stick it to the table.
-

It's Summer, Options For Cooling The Workshop
MrsN replied to Iguanadon's topic in General Scroll Sawing
I had one of those portable units for my apartment. The bedroom windows open the wrong way for a window unit to fit well, the portable unit worked great. it cooled the room really well. -
How big are coping saw blades? If you get a chance can you take a picture of the saw or tell us the name? I have a couple of old scroll saws at school. They are pretty much worthless for any actual scrolling. They require a thick blade, and are really tricky to get tensioned correctly.
-
I worked on the beach scene that Neptun made for me this weekend. I was having the kind of day that I just could not stay on the line, but it was still fun to hang out in the shop so I kept cutting, sort of thinking I was just making firewood. I left it on the bench and came back to it today and decided it wasn't too bad. I asked my boyfriend and he said it looks like a nice beach, so I guess it is ok. If you look at the pattern http://www.scrollsawvillage.com/topic/19425-beach-scene/you will notice all the differences.


-
I watched a video on the Jet. The concern I have with it is the big slot in the table. Lots of places for delicate pieces to catch and break. The opening also looks bigger so that small pieces might require a secondary table to be supported at all.
-
Yay!!!! I love when I can be helpful.
-
Bring a blade and a piece of wood to test the saw out!
-
I don't really get the image that you are trying for, but it looks like it will be interesting. One of the ways to cut something like this is to cut all the sections apart and then put them back together like a puzzle. This is called segmentation and often the pieces are colored in some manner before they are put back together. When drawing some thing to cut, remember that you will be cutting on all of the pencil lines. If you cut all the way around the shape (if two pencil lines touch) the section will fall out.
-
I found a couple pictures of my old blade holders! Built out of 1/2 inch plywood and 1/2 & 1/4 inch dowels. The blade tubes are 3/4 inch PVC pipes. The larger holder has an diameter of 8 inches and the inner raised part is 4 inch diameter. The smaller one has a diameter of 5 inches and was really a result of a miscalculation on my part (I cut the circle an inch too big, but didn’t notice until I had all of the holes drilled) But it turns out it works great for my sanding “bladesâ€, so if anyone asks “I planed it that wayâ€


-
I have most of my blades in the bags they came in stuck in a drawer in my shop. I pretty much only use one type anymore (#3 Ultra Reverse Flying Duchman) I have a glass butter dish that I picked up at a thrift sale that reminded me of one my grandma used to use. I glued a couple of magnets to the bottom and stick a dozen blades at a time on for me to use.
-
I love the idea of making a fancy clock, but I have no idea what I would do with it so I keep putting it off.
-
I have a couple of Porter Cables at school, Check the alignment of the blade with the set screws like JohnR48 explained. When we use the saws a lot at school I end up "fixing" this every couple of days. Putting some lock-tite or similar on the threads would help to keep everything tight.
-
I have done a few projects with tree sections. I used pieces about 12" in diameter and between 1/2 and 1-1/4". My ex-husband and his buddies liked to play with chain saws and try to see how thin and even of a cut they could make, I got first pick of the pile. It works best if the tree is long dead and dry before you cut the tree cookies, less warping and cracking once they are cut. When cutting a cookie from a fresh tree you will get all sorts of cool warps and cracks. One piece ended up warping into a bowl, it looked really cool. Some pieces have small cracks that the epoxy method works great with (I used one of the self mixing syringes of clear epoxy). Some pieces end up with really big cracks, but can be incorporated into the finished project. Some pieces are just fire wood. I would guess that 30% of the big cookies were useable when we cut them. I could have probably had a better return if I had a thickness sander to make an even piece. I also cut quite a few ornament and jewelry pieces from branch sections. The little ones warp a lot as they dry, and some species are less prone to cracking.
-
A few others I have done in the last month or so. The Doctor who I think came from images I found on the net. The bluebird and sunflowers is another pattern from Russel.

-
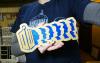
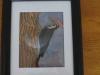
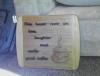
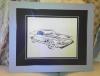
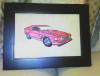
I have been really bad at getting pictures of my recent cuttings, but finally got a few to share with all of you. First, is the palliated woodpecker. Russel (Birchbark) made me the pattern from a picture from my boyfriend's dad. I made the cutting for his birthday. I decided to color it to make it a little bit more fun. Second, is a coffee related cutting I designed and made for my boyfriend's mother's birthday. As I was stack cutting Russel's "Death before decaf" for a friend and his mom I ran across a different saying that I thought was better for a mom type. "This home runs on love, laughter and really good coffee". She makes really good coffee and loves to laugh so it fit really well. I also made her the patriotic star ornaments for her "all season tree". I just googled stars and picked out one that I could cut. The death before decaf pattern is from Russel (Birchbark) I cut it from 1/4" oak. I also cut Mahendra's pattern of a mustang for my boyfriend in my spare time. I colored one and left one natural. Thanks for looking!

-
I was wondering who would claim to be "that guy" I really think you are all fantastic!
-
For simple shapes I use the "auto shape" feature of Word. (the other word processing programs have similar features. It is pretty easy to size an oval to what I want and print it out.
-
Sometimes the best artists are not the best teachers. To explain things well and encourage/inspire people to challenge themselves is a gift. With many aspects of scrolling there is no best way to do something, so it is often good to get multiple points of view and try them. One thing I will say is that this site is the best collection of scrollers, and the best place to learn new things about scrolling. The members here are awesome (except that one guy )


