


preprius
-
Posts
1,520 -
Joined
-
Last visited
-
Days Won
10
Content Type
Store
Profiles
How-To & Articles
Scroll Saw Reviews
Clubs & Organizations
Clubs & Organizations International
Pattern Shop
Suppliers
Village University
Help Desk
Forums
Gallery
eBooks
Everything posted by preprius
-

Favorite Projects 2025 - Scroll Saw Challenge
preprius replied to Travis's topic in General Scroll Sawing
I used the search tools and filter in bragging rights menu to remind me of my posts. In 2025 i posted 6 projects in bragging right area. My most replied was my model toy space shuttle. But the most I liked was making and delivering a black "Wenge" wearable wooden cowboy hat. My second runner up is making a name block out of 2"x2"x8" purple heart turners block. The both customers liked my work. The customer for the model toy was me. Me. Mark Eason

- 31 replies
-
- 13
-

-
- scroll saw challenge
- challenge
- (and 3 more)
-
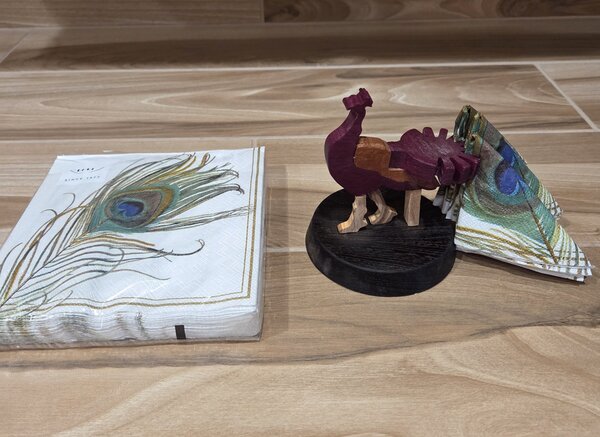
Update, peacocks legs broke at front ankle so i had to make them thicker. Here is a new pic with napkins.
-
Very clever. I like the removable stick that allows you to balance the weight. It also allows easy switching of bakery items. A whole series of bakery figurines and products. Fun.
-
@JTTHECLOCKMAN I saw napkin holder patterns in pattern library and they inspired me. It was pretty top heavy with purple heart. I just needed to beef up the mass of the stand. Wenge is pretty heavy. The base is 4inches diameter. I still like the use different wood for coloring. I just ordered some peacock napkins from amazon.
-
an ex-coworker got married in India and now he came back. I created this for his wedding gift. purpleheart body and tail napkin slots, lacewood, wing body olive wood legs wenge for base. i wanted extra backend support with maple. All pieces are from scraps. once the legs to base glue is cured I will use Osmo polyx protective finish. Me. Mark Eason

- 9 replies
-
- 17
-
-
This village is addicting. I have learned so much. Me. Mark Eason
-
here my experience. Poplar can have some hard areas. as you cut around notice where these hard areas are. If there are more than 3 area, I pencil mark them. In the hard areas the blade can grab and the machine will change motor noise. Go slower in those areas. The blade may break at those marked area. If it does, go 1 higher blade size. I might slight increase motor speed. Not much. The intent of faster speed is the teeth won't dig in as much. My blade opinion is #1 pegas MGT. or #1 super skip. Mgt blades can catch on upstroke. On the letters I wont use mgt (reverse teeth).
-
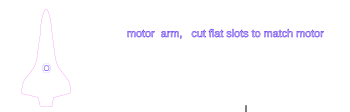
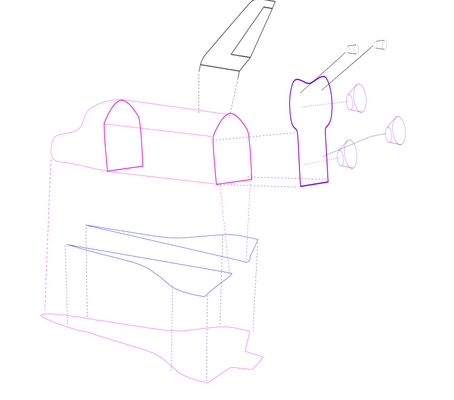
Here is some screen shots of inkscape pages. . . only 3 pages. really only 2, pg 3 was the assy sketch I already showed. Pg 4 is the pattern to create a motor arm. pg 1. pg 2 pg 4.
-
ooh I like the grind spade drill approach. i did do the exacto groves for the window i also used a scratch awl, tiny one that used for metal. I am not planning on doing more, but if I do I will approach staining better. Thanks for the tips.
-
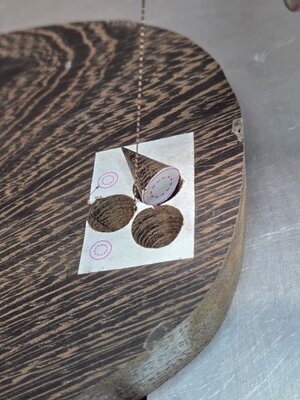
In my mounting I drilled holes so the points of the cones went into. I knew that my drill bits are not the same angle as rockets. So I had some issues of wiggly rockets. I should have used epoxy putty instead of thin epoxy. So for you , keep the mounting in mind on your project. Also the cone depth 0.75" scale of actual rockets matched my wood thickness. I have experimented with 1.5" cones a few years ago. Actually made cone inside cones.
-
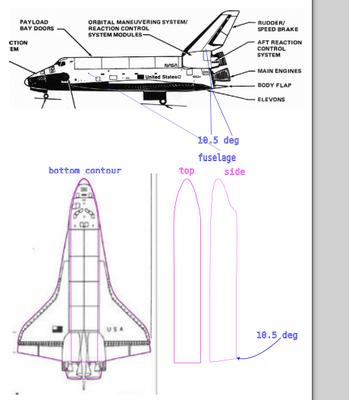
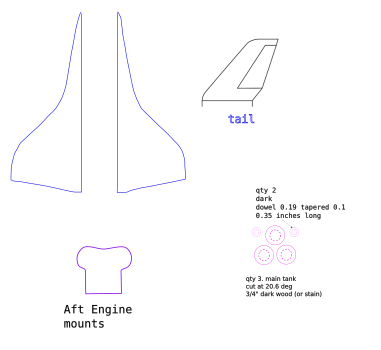
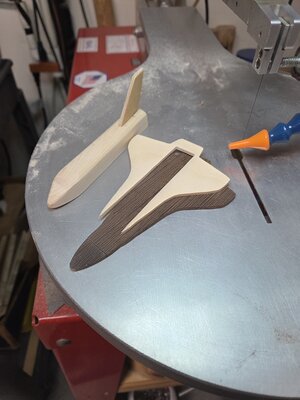
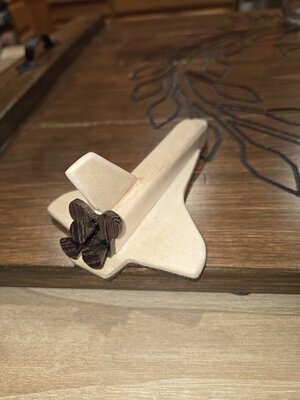
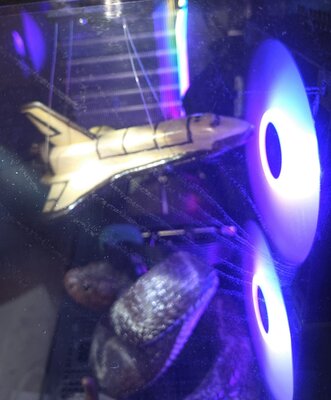
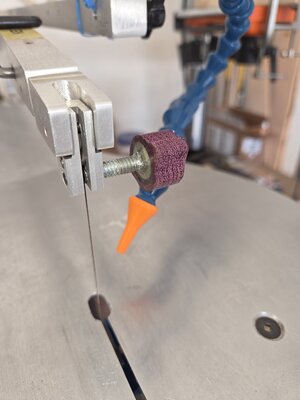
I took on a small challenge. Create a 5.5 inch wooden space shuttle. My guidelines: 1) scale model 1:266. Final tip to tail is 5.5". Main engines are to scale and mounted at proper angles. 2) only stain (no paint). Kinda intarsia but 3D. Bottom wood is Wenge very dark. Fuselage is Maple, Top of wing is Baltic Birch (ran out of thin maple). Windows are stained, using Java wipe on gel. I found a website that showed 'decals' for the a space shuttle model so I just resized the window decals in inkscape and traced a besier curve over the picture. I then printed the sheet and create my own stencil. Spray glued the paper sheet and put on fuselage, then applied stain. The right side window have issues. My blotting technique or gluing the paper down caused bleeding. Another technique was to put grooves in so stain bleeding won't go too far. I did the fuselage by using the compound cut concept. I put a small 1/8" router bit in my drill press. And slid the fuselage to create a slot for the tail. Here is the inkscape exploded view for wood pieces assembly. I decided to NOT create the white back covers for the Orbital Maneuvering System (OMS). I bit too complex for a model/toy. The 3 Main engines (nozzles) were mounted using T88 epoxy. Orbital maneuvering nozzles are assembled later. Here is the picture of cutting the cones. 3/4 Wenge. Blade #1 super skip, diameter 0.4 inches. Table angle 20.1 deg. Stained. . . The intent of this model / toy was to put inside my desktop computer glass case. I made my own Christmas toy. It is hanging from a motor that spins really slow. If anyone wants the inkscape file just shoot me a message. Suggestions (for next time), are always accepted. Questions are ok too. Me. Mark Eason

- 14 replies
-
- 17
-
-

-

-
i recently broke my blade retention knob. i did the epoxy wood (purpleheart scrap) fix and it worked. what i learned is 2 procedure. 1. check out super glue CA and baking soda videos. 2 use structural epoxy , i found t88 from "system3".
-
ooh, the grain says to me, the wind is coming down from the mountains. Good job.
-
Very nice. you captured the shadows really well. Me. Mark Eason
-
Entry tools are good to feel the basics and to see if you like the intricacy work. I started wiyh a cheesy starter saw. Mine also was in the garage for 11yrs. I said I will join this village and to really see what this tool can do. These guys can cut some beautiful stuff. They helped me thru my begineers frustrations. They also helped with with cheesy saw limitations. After 4 months of entry saw frustrations it was time for me to get a better saw or stop scrolling. @OCtoolguy he helped me find a great used saw and everyone else helped me get better. It has been 4yrs for me and i really enjoy this hobby. take a look at galleries and ask questions. Me.Mark Eason
-
Nice projects you show there. Welcome to the village. We normally say ask alot of questions. But with you I request more pictures. It looks like I and villagers can learn new tips and tricks from you. I also agree that scrollsaw is very versatile tool. Me. Mark Eason from California.
-
Advice needed regarding used scroll saws to consider.
preprius replied to Skyhawk7's topic in General Scroll Sawing
Great choice. This village helped me find and get a used hawk 4 years ago. I am the 3rd owner and it has never gave me any issues. I am not fighting entry level scrollsaw issues any more. Me. Mark Eason -
@Roberta Moreton Yes I am limited by my imagination. Sometimes I like to use others imagination to kick start mine. LOL. Me. Mark Eason
-
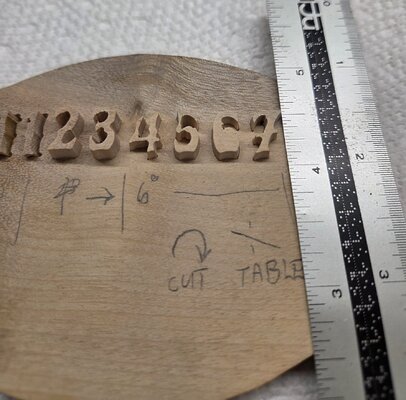
What is the smallest text size that has been done using relief (emboss) technique? Followup question. What is smallest text size for inlay? Here is my attempt on 1/4 thick wood. the inner portion if "3" broke out and i purposely did not cut out the hole from the 6. I used #1 blade due to 1/4" wood. Text size is slightly less than 1/2". the 0 and 1 , I cut the wrong direction. So i added notes for table angle and cut direction. I am not consistent at direction of table tilt. I overthink cut direction or I forget to think about it. That is why I do a trial run on scrap wood.
-
Very nice. Yes southwestern for sure, color turquois, hatchets, skulls and feathers. I can hear a native american Indian chanting and dancing. Me. Mark Eason
-
Back to the future is a very good theme. You captured the lighting very well. Even the flames on the road.
-
I created 2 more. I found out my old boss /friend from 20 yrs ago came out of brain surgury. His wife helped him thru 3 various forms of cancer in the past 10 yrs. These are for her. Purple cancer symbols for caregiver. I used canarywood and magic sculpt (2 part epoxy soft) putty to embed the symbol. He plays music for the church, and he taught guitar to her kids. Her first husband passed away from cancer 12 yrs ago. She has been through a lot.
-
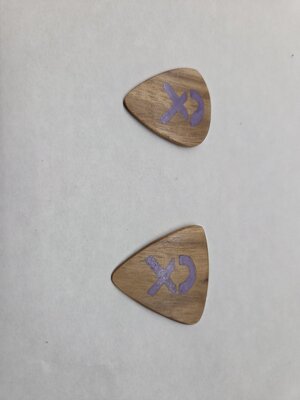
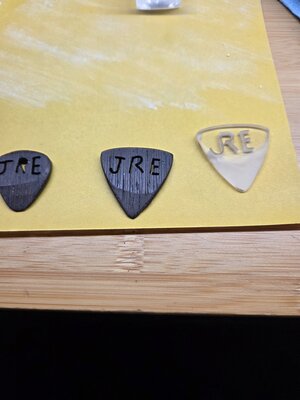
My chiripractor asked if I can do guitar picks. I searched on line and found many companies sell wooden guitar picks. One company showed how they make them using CNC. Well here is my attempts pic attached. Wenge wood 2 sizes, 1 plastic. All texts hand drawn. The "r" dropped out.
-
The train came out wonderful. This pattern focuses on the train which in this case is great. Just a little smoke and shadows of the people add realism. All this allows the scrollsaw cutter to worry about mistakes. But the viewer has no info about pattern. Now about the boards... I have 3 bamboo cutting boards that I can play with. Thanks for bringing that up. This also got me thinking about going to good will and getting wooden tv trays to do inlay. Great work.
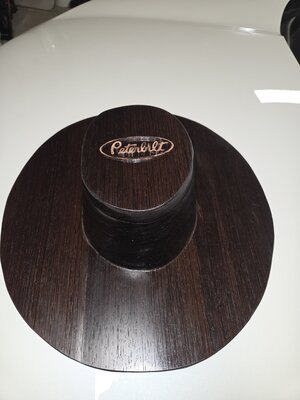
-
Dave Monk... My patience was about to go away after 2 rings took 3 hours. It was due to a dull package of blades. I got a new package of blades and ring cutting went back to 50min per ring. Sanding took just a bit longer. My 1st hat took about 20 hr. second and 3rd was down to 14hr. This Wenge hat is hard I might not do this wood again unless customer insists. After the ring broke and long cutting times I really considered to change to black walnut and stain it with Java. But my stuborness persisted. But my view of patentience for 3d chess pieces needs much much more than 1 of my hats. My observations... I wear my hat everytime i leave the house. I get maybe 3 comments a year in my home town. Some show general interest. Most say it shows good craftsmanship. If you think about when would users would wear this hat it would be very rare event. Cowboys usually don't talk unless needed. So most comments come from women. Cowboys also like tradition. When I wear it to Idaho I get at least 3 comments a day. But overall not many people will buy one. A $500 hat is not in the budget. I have made 7 hats... i have 2 hats, 1 hat was for my brother, 2 of my hats were a method of my ex employer to reimburse me for my expenses for my last project. 1 hat was for made for marketing. A lady in Idaho. Ladies like it more so I put it on a lady for spreading the word. The last hat "Peterbuilt" was for neighbor that cleared my land of weeds for 3 years. So technically I got paid for only 2 hats. There is a method to "turn" a wooden hat on a lathe. It starts out with a stump 50lb wet. See youtube. The turned hats wont fit perfectly. These I have seen on musicians. My method starts with 2ft of board 3/4" thick board. Mine fits the contour of the users head perfectly. Lasers cant make it, CNC can do it but takes more boards. So scrollsaw is best tool. As you can tell I like doing them. As the old commercial says... try it you may like it, Mark E does. (okay it was Mike not Mark E) Me. Mark Eason


