


preprius
-
Posts
1,525 -
Joined
-
Last visited
-
Days Won
10
Content Type
Store
Profiles
How-To & Articles
Scroll Saw Reviews
Clubs & Organizations
Clubs & Organizations International
Pattern Shop
Suppliers
Village University
Help Desk
Forums
Gallery
eBooks
Everything posted by preprius
-
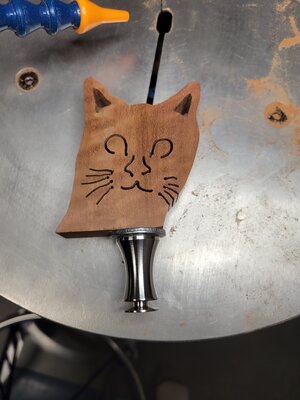
this is a winner. i dont need to see the other entries.
-
yep this village is here to help. Me. Mark Eason , California
-
correct, bottle stoppers don't have to be round. Or can openers Or bottle openers


-
it is very ..... C o l o r f u l. nice work. Is every color a segment?
-
ok 1 other note. Black walnut hat brim. I purposely wore the curved brim in the rain several times. The curved brim went flat. Yikes.... Do I have to rebend the brim after it has been sealed???? So I just put it in the house on my desk. The next day it was back to the proper bent angle. I did not have to do anything. Me. Mark Eason
-
I order 1/8" wood from cherokee for all my cowboy hat brims. I butt glue 6" x24" together to make 18" x 24" then cut the flat brims. I ordered canarywood thinking some one would order a hat. I had the 3 planks sitting flat in my shelves on garage for 3 yrs NOT glued. It did cup a little bit. It did split a little bit. I used it 3 months ago and I struggled to get a good butt glue joint. 1/8" wood is not available in big widths. To butt joining them is interesting. I glue sandpaper to a known 90 deg surface. I have a flat quartz top to lay the 1/8" slat on. Then slide the 1/8" board back and forth against the 90 sandpaper, to make nice square edges. I use a needle glue applicator to one of the boards. Then I push boards together and add weights to hold both sides. This also keeps the slats flat on the quartz top. Too much glue will squeeze out causing more sanding later. Dont starve the joint but dont over glue it either. Problem with canarywood was solved by buying a new bottle of glue and ordering 3 more slats of canarywood. I think it was the old titebond 3 bottle of glue that was the cause. But I will only order 1/8" thick wood when I will use it within a week. Cherokee wraps it up so it won't absorb moisture. I did not store the canarywood wrapped up. Other woods I have ordered 1/8".... black walnut, maple, canarywood, red oak, padauk. Only 1 customer wanted a flat brim "red oak". Once the flat brim had protective finish on it it stayed flat. All other brims were purposely curved to about 35. degrees. Make sure the edges are sealed with protective finish. Me. Mark Eason
-
all those antlers are good for: napkin holders. stocking holders Christmas card display rack. Ring display ornament rack
-
Nice cutting. The labs are so cute. The right pup seems a bit distracted by the ducks in the water. The mothersday plaque has some nices smooth cuts. Nice contrast also.
-
it would be nice to have Bushton to publish thier serial log file on this site? Or their site again.
-
dog dust collector?
-
Great post. I agree with you. I too use both. The spirals can do feathers or fur really well. Bear fur , coyotes, dogs etc. Get a few different sizes. Outer edge of feathers can give feel of actual soft feathers. Viening with straight blades can not give you the accents unless your up close. They also get filled in with the protective finishes. Use spirals instead.
-
Thanks all. My first hat took about 20 hours. It seems I am getting a bit more confident. Cutting the rings is about 20min per ring now, not over an hour. So total hours is near 14 hours. Except the bending of Paduak. 4 hours of trying then 6 more hours of experiments. But there is no deadline for these hats. I told the customers I keep them informed of progress but my schedule is low priority. I also say they need to participate in the hat topper selection. If they don't it will be blank. I make sure they don't expect it for at least 5 weeks. I ask if they plan on parties they plan to attend. Like weddings or anything formal. Upcoming rodeo? Also if anyone has questions, I am here to help and assist. Me. Mark Eason
-
2 people ordered my hats. Both orders are from ex-co-workers. One wanted Red Oak ! He wanted a symbol called Ahm. Being one with the universe. Flat brim. The other guy chose Padauk !! This guy wanted a bear showing claws. Brim curved. If you bend Padauk let's form a new discusion. It did not bend like other wood did. So I had to experiment. Me. Mark Eason


-
I asked chatgpt to give me a list of categories of this village. then I wanted it to add tip and tricks into each section. I had to tell it a few it missed. pasted below.... **Categorized Tips & Advice for Scroll Saw Art Forms** --- ### 1. Intarsia - Use woods with natural contrasting colors (e.g., walnut, maple, cherry). - Shape pieces using a drum sander or Dremel for depth. - Dry-fit often—subtle changes can throw off alignment. - Use reference photos to inform contours and shadows. - Avoid plywood—solid wood gives better shaping results. --- ### 2. Functional Projects - Reinforce weak joints with dowels or glue blocks. - Choose durable woods like oak or maple for longevity. - Use templates for repetitive shapes (e.g., handles, brackets). - Ensure all moving parts (e.g., lids, drawers) are sanded smooth. --- ### 3. Portrait - Start with high-contrast photos and simplify in photo editing software. - Use #2 or #3 blades for fine facial detail. - Use a lightbox or tape over a window to align multi-page patterns. - Back portraits with black felt, matte board, or velvet for depth. --- ### 4. Fretwork - Drill small, precise pilot holes to reduce tear-out. - Use fresh blades and slow speed for intricate cuts. - Tape top and bottom of the stack to reduce splinters. - Clean up fine cuts with needle files or micro-sanding tools. --- ### 5. Trivets - Use hardwood for strength (e.g., maple, beech). - Avoid excessive inside cuts to maintain stability. - Round over edges for a finished look and safer handling. - Apply heat-resistant finishes or leave unfinished for safer use. --- ### 6. Puzzles - Use softer woods like poplar or Baltic birch for smoother cutting. - Number or mark pieces on the back before cutting. - For name puzzles, slightly round edges for easier handling. - Add pegs or knobs for younger children’s puzzles. --- ### 7. Ornaments & Seasonal Decor - Lightweight woods like basswood or thin plywood are ideal. - Include a small hanging hole or loop in the design. - Seal with clear coat to protect delicate areas. - Consider stack cutting for efficiency. --- ### 8. Layered Art / Segmentation - Paint before assembly for cleaner results. - Use a numbering or labeling system to track layers. - Slightly round exposed edges for depth. - Use flat spray adhesive to tack layers without glue seepage. --- ### 9. Inlay & Marquetry Cut both the inlay and background at the same time for tight fits. Use veneers or thin woods for better layering. Apply thin CA glue or wood glue with a toothpick. Clamp flat during drying to avoid warping. Use an angle calculator or bevel gauge to precisely match angled cuts when inserting thicker wood into a base—this ensures flush, clean seams with minimal gaps. --- ### 10. Lettering & Signage Use bold, clean fonts for better readability. Sand and seal inside edges to prevent fraying. Layered backings can improve visibility on light-colored walls. Use double-sided tape or mounting tape for easy hanging. --- ### 11. Finishing (Including Dye) Sand progressively up to 320+ grit before applying finishes. Use wood dyes for vibrant color that maintains grain visibility. Test dyes on scrap wood to preview results. Apply clear coats like shellac or polyurethane to protect and enhance. Use steel wool between coats for silky-smooth finishes. Avoid oil finishes under water-based topcoats—they may not bond well. Use painter’s tape to mask off joints or areas not to be dyed. --- ### 12. Compound Cutting Use stacked patterns—glue side and top views on adjoining faces of a square blank. Drill entry holes before interior hollowing. Use aggressive skip-tooth or reverse blades (#5 or #7) for thick cuts. Cut one side, tape the offcut back in place, rotate, then cut the second side. Wrap the blank in packing tape to reduce friction and heat. Sand inner curves with files or rotary tools. Practice on pine/poplar before moving to hardwoods. Use CA glue and blue tape to temporarily rejoin pieces between cuts.
-
- 5
-

-
wow nice spiral graph. What is the diameter?
-
I started out using the wrong blade. I used a 00 skip blade and set the angle at 0.2 drgrees. For a 1.5" thick cut the blade was too small and I was pushing too hard. The Blade broke twice. So I sent a #1 through the same cut. And then got bad results. I should go to the #3 and set a 0.9 deg. or a tad less. I will try again and not be so impatient.
-
Here is some pics for discussions.... This is quick and dirty experiments using the crappy inlay from before. I installed both symbols facing each other. The next one shows the rings stacked. Everything was falling apart. So I used super glue to finish the experiment. it seems a bit complex. But might be doable. Am I going down a path of future failures? Will the symbols fall out with the cold or hot weather.


-
oooh , interesting.
-
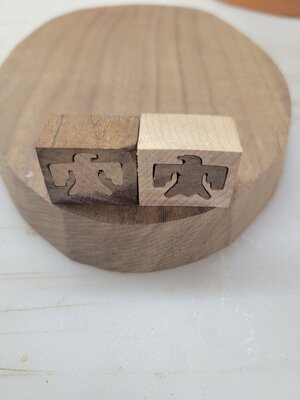
The end grain was my first thought as I duplicate the " board to bowls" concept. The bowls I was thinking is about 8" diameter. But the bowls were just a starting point. The final goal is to put symbols on my wearable cowboy hats. The wall thickness is 1/8". The symbol inlay would have to be inlay in the circle pattern.


-
@Scrappile how large, diameter, are those scrollsaw animals? Were they end grain? Oh were those symbols just glues on, not inlay. Sorry for so many questions. Wow, that is a really nice project. Good teamwork. That does give me the idea that I might not need end grain. Any thoughts?
-
Advice wanted I was thinking on how I could spice up a bowl with symbols. Like southwest western Indian symbols. Has anyone done this? Here is my work in progress. My bowl board is 3/4" thick. So if I make a symbols it has to be less than 3/4" tall. So my attempt sucked. The top eagle did not fit in bottom at all so I re cut it and have too many gaps. The white maple should have fit into the black walnut. But did not. I need more practice. The black walnut actually cracked. Probably due to end grain and only 1/8" spacing. The next step is to take this inlay and put into the bowl board. So when I cut the rings I will have western symbols. Yes all rings will have these symbols. Unless I cut 2 or 3 rings first then put the symbols in the bowl board. If the bowl is round I could rotate the rings and symbols to any position. This inlay concept avoids the symbols across from each other. My final test will be on a cowboy hat. Which is not round. But I have to get better at this end grain small inlay. Discussion is welcome. Me. Mark Eason
-
interesting. layers and segmentation, and painting. The white around the mouth are not the same layer as the white in the eyes. Nice. I think the baby is hungry and then he can go play.
-
Since I use the angle setting I quite often, I noticed that the table got a bit of play in it after I tighten the hold knob. It about 0.4 degrees. So I noticed saw dust in the guide track. I removed the table. I saw a nut missing from the back side that hold the plastic guide on. I figured out that cap nut was not the problem. Then took off the guide bracket. Cleaned out the aluminum track with small art paint brush. Lots of dust. But noticed a bit more purple heart dust. Purple heart does have oil. Anyway cleaned out dust. Took 600 grit paper to aluminum sliding surface just to help scratch off oil residue. Applied Johnson wax to all sliding surfaces. And put it back together. Smooth operation no wiggle after tightning the front knob. Replaced the back cap screws. They act only as a lock nut for the Alan screws that go into the plastic slider. These assert pressure on the plastic guide to spread the plastic for a slight friction on aluminum. I waxed the top table for good measures.


- 1 reply
-
- 5
-

-
-
on the bench. But not a challenge to anyone in the village. Red Oak cowboy hat, wearable, in the making. A client wanted red oak. Why not try a new wood type. So here is the rings glued together. The wall thickness is 0.12 inches. Not sanded yet. Me. Mark Eason

- 45 replies
-
- 6
-
-
- scroll saw challenge
- wip
- (and 2 more)
-
osmo polyx is a wipe on wipe off. It penetrates and brings out grain. It is my 2nd most used protective finish. Armor R Seal is my #1 but it is not hard wax.


