


JTTHECLOCKMAN
-
Posts
4,163 -
Joined
-
Last visited
-
Days Won
32
Content Type
Store
Profiles
How-To & Articles
Scroll Saw Reviews
Clubs & Organizations
Clubs & Organizations International
Pattern Shop
Suppliers
Village University
Help Desk
Forums
Gallery
eBooks
Everything posted by JTTHECLOCKMAN
-
https://scrollsawartist.com/scroll-saw-patterns/religious-inspirational/other-crosses/?page=44 I do not know who the pattern belongs to but I did check 2 of the largest pattern makers Shiela and Sue Mey. If may make a suggestion. if you can not find that pattern and you are into looking at others I would look at the link I posted. Sue has 44 pages of crosses alone and they are really beautiful. May find something that can take the place of the one you want.
-
I thought King was a Canadian saw and the excaliper which is same saw was American/ China. OK what am I not getting here? Something is fishy. Their 22" saw is $449 and their 16" is $749. I bet it is the other way around. And you get a free stand with purchase. My goodness. That is a $130 extra.I see the 16" is not available any more. Even if this is China made that beats all their other China made saws they are selling. Including the Dewalt. It says they are made in Taiwan from what I can find out. https://www.woodcraft.com/products/king-industrial-22-scroll-saw?variant=46242636595338&gclsrc=3p.ds&msclkid=a5fb64a9548311ca1f410d8f21b8238e&utm_source=bing&utm_medium=cpc&utm_campaign=PMax | Feed Only | tROAS 1500 | Relaunch 15%2F09%2F2025&utm_term=2331514407219523&utm_content=Current Asset Variation
-
Man the price of those saws went up big $$$$
-
Good luck. Could you share where you got the saw? Yes keep us in the loop as to progress. I would ask them a question if they set the saws up and test, before they send them out? Curious to hear his answer.
-
Wow Kevin I have never seen that either. A refurbished saw and they are selling close to the original price. As mentioned there are quite afew of this design saws out there. Seems that is the go to design these days. I just do not get for the price of that saw they should be unbox and start using ready. I am sorry but just my thoughts. I have heard good things from people here about that saw. I believe that Harbor Freight saw falls in the same catagory. If that be the case then $280 is even better than Grizzly. Excaliber same catagory. Dewalt is a good midrange saw. I put this Pegas saw in the midrange saws.
-
https://pegas-scroll-saw.com/# It is amazing I can not click on the reviews. Now they claim Swiss engerneering. Any Swiss watch I had worked liked it should when bought. It is one thing when a saw gets older and things start to break down and you need to repair or tinker with but to have to do this stuff with the arms and the vibration just does not make sense to me. I love my RBI saws. Set up and scroll the very first day. Even my Hegner. Now the Dewalt that uses that same type linkage was a set up and scroll. Back in the day when they came out of Canada the biggest problem was the table needed some adjutment but that was scrollers preference. That was a $500 saw.
-
You do what you want. It is your saw but as I said if it were me I would not even touch it and tell them to move the motor and ship it back so it does not move in shipping. What if you had no idea what end is up on a screwdriver. yes there are people like this. What those screws just loosen up on their own. This tells me they were never tested for accuracy. $1000 + saw and you have to fiddle with it to make it run smooth. WOW. I hope you get it to work for you. Happy scrolling. Look forward to seeing some projects come off of it.
-
I hate to say this but in no way shape or form should you have to do any of this to a brand new saw right from a dealer. I would be on the phone the very next day I saw this. And tell them the next saw they send out better be dead on right or else take it back and return your full amount or a lawsuit follows. I am dead serious. You are messing with a warrenty. If those saws require you to do this then I would stay far away from them. They are not worth the money and the headache. These are not cheap saws. Where is the quality control? They should not leave the shop unleass each saw is tested. Not like they sell millions of these.
-
may help a little https://www.bing.com/videos/riverview/relatedvideo?q=how+to+get+rid+of+vibration+on+a+pegas+scrollsaw&mid=AC2894F75A3F5A1A64B2AC2894F75A3F5A1A64B2&mcid=0395C729DEC84D0CAC315E61F91FF3E5&FORM=VIRE
-
Make another call.
-

Advice needed regarding used scroll saws to consider.
JTTHECLOCKMAN replied to Skyhawk7's topic in General Scroll Sawing
One thing I caution you on is when setting up in the place you will eventually use it make sure the legs are splayed properly and the saw sits level on the floor and on a solid surface preferrably a concrete base. Do not put rubber mats under the legs. Never carry the saw by the saw. Always the base. make sure all bolts are locked down and secure. I am sure Kevin can give you a few more tips like oiling the cam over lever and things if he sees this posting. Not much else but to sit back an enjoy the new toy. You will not regret the purchase. Takes a little fiddling to get comfortable with blade changng and how to set the proper tension and inding that golden sawing speed. Every saw runs into harmonic inbalances that make the saw vibrate a little but tweak up or down and they go away. Enjoy and look forward to seeing some projects come off the saw. -
Dave I had to take another look at this piece and have to say this is extrordinary not only finish results but the method used. I like the others need abit more explanation as to the method. Now I have done a few projects over the years where I tried cutting pieces out and laying them within the base piece but no matter how hard I tried there is always gaps. yes very tiny but my OCD gets the best of me. The reason for the gaps is the kerf of the blade. I tried to cut on one side of the line for the base and then cut on other side of the infill piece if that makes sense. I figure this should make up for the kerf of the blade. No matter what size blade you use there is a kerf. I can cut 2 circle pieces seperately an lay them on top of one another and no way are they going to be exact cuts and mirror each other. Now this method you can say plays a roll in Intarsia by the way you lay pieces next to each other. But there you can cheat by sanding to make a better fit. Now I consider myself a fairly good scroller with a steady hand and keen eye. I use a good saw and good blades but have to say if you can do what I think you are doing you are a far superior scroller than I ever can be. Is there a video or other photos of your process that you can share? If not can you make one. Or maybe with more detail explain this method so we all can enjoy the fruits of your labor. This technique is quite rare especially when talking detail work such as you shown. Your double bevel inlay work is out of this world on its own but man this is topping that. Thanks. Dave I have looked through your album that you post on FB many many times because right after you show another piece of art it just draws me to it. I have to say there are many talented scrollers here but you have to be the best of the best. Your Intarsia work is out of this world for many reasons. The ideas and projects are well thought out and the woods chosen go all so well. The cutting is first rate. Those of us who use the scrollsaw know the time and difficulty that is involved in pieces you make. No machines to sit back and watch them cut by themselves and no outside help from aliens. Then you take scrolling and woodworking in general to new levels by making other projects such as boxes and planters and so on. This is not a remark made to embarass you but is a remark to praise you and to applaud you for the work you do and give you the accolades you deserve. I hope others can check your work out and follow you and you continue to give us the pleasure of enjoying your talents. Now I have to say there are a few projects that at some time in my remaining years to be able to simulate and add my own touch to your ideas if you do not mind. But when doing them I will be continuing asking myself what would Dave do in this situation. Thanks again for sharing.
-
As I mentioned if the BB comes out of China the grade is usually bad. Knowing where it comes from sometimes is difficult. They do not put their little stickers on each sheet. Another plywood that gets confused with BB is VietNam plywood. Looks like BB but has thinner top layers and more voids. Find a reputable company and stay with them. I have no idea about this other wood you guys talk about used for lasers. price will tell you if good quality. Again I use Oochoo woods.
-
If you look at most marquetry clubs they tend to use Dewalt 788 saws. A couple reasons. The ability to tilt the saw toward them. When doing that type of scrolling you usually are doing very fine and small pieces so constantly changing pieces of veneers. The ability to tilt the table is easy. The ability to insert blades which are very fine. I suggest look up Utube videos.there are many. To me though the Dewalt is the saw for that kind of scrolling over RBI or Hegners I know nothing about excalibers but maybe on the same platform. Just an opinion.
-
I am in the same boat. I have so many patterns from so many sources. I have just a large plastic file cabinet with 6 drawers. This past winter I had to replace the divider panels between drawers with Plywood because they kept caving in from the weight and would not open. That helped alot. But I also have a ton of patterns in boxes that are some of my larger patterns. No ryme or reason. If I need a pattern I would have to hand sort. Good luck with the file system. Being I do not scroll any more I am not worried about those things. I have other organizing problems with all my pen making equipments and supplies.
-
Moisture can do it. Again you do not say what type plywood. But moisture and temp changes cam delaminate plywood. As well as grade of BB plywood. There has always been talk in the woodworking community that BB coming out of China is a poor grade. Storing properly will help but nothing is full proof.
-
I think the first thing you need to answer is what type plywood.? Plywood comes in many types. For scrolling many people like to use Baltic Birch or Finish Birch plywood. next tell us where and how it is lifting? I suggest a light sanding before doing any project is always a good idea. I do not recommend sealing the plywood. No need to. This will interfeer when you want to finish it or if you are making a projects that requires gluing. If you are painting and really want to seal it then clear dewaxed shellac would be my choice. Again tell us how and when it is lifting. If because you attached a pattern then you need to change method. Low tack painters tape under the pattern will help or repositonable spray adhesive will help. There are other methods too.
-
Why are you sanding the blade? That will always dull a blade. If you are sanding the backside corner edges to make them smoother for turning purposes then use a sanding board. Some people use a fingernail file sander or these. They come in all type styles but it is a stick with sandpaper on it. https://www.ptreeusa.com/abrasive_detail_sanding.html If you touch the teeth in any way with sandpaper you dull the blade.
-
Because you are use to it. I will say you did not center the blade in the clamp when you installed it. It maybe fine but bet you are maxed out how far straight up and down the blade is. When that happens you now have added more back to front motion instead of straight up and down motion. This can cause overcut when cutting pieces out especially small delicate pieces. If your top holder is locked down this increases even more. If the top holder is allowed to pivot as much as the bottom you will be OK. I still suggest shoot for straight blade insertion in clamps at all times. Again I did not like those clamps much on that saw. yes it is a great saw but now they have options to change those clamps an I would have.
-
I use FD Supior puzzle blades and love them. They are a milled blade and not a stamped blade. This means they should cut the same both directions because the teeth are not all pointing in one direction. On stamped blades it is indeed possible to make tighter turns in the direction the teeth face because they are cutting faster. Many people get around this by sanding the edges off the back of the blade to help making turns smoother. This gets toiugh to do with thin blades such as puzzle blades which really do not need it but you could try to see if it helps you. Puzzle blades are thin and require a lighter touch when using because they break easily. Using a speed that is as fast as you can handle because of vibration or control helps. You have to let the blade do the cutting and not force the wood. This is fact with all woods and all projects. Yes bass wood is easier to cut with. BB plywood has many layers and has glue so this wears blades faster but is a more stable wood. 1/4" is harder than 1/8" wood in any species. That is just fact because you are cutting more material. If you are having better control and luck cutting one way than stick with that. No need to keep switching directions. As far as Hegner. i had one and had no problems. Need to make sure your clamp is not cracked. They had problems with those clamps. Because you tighten down on such a small piece of metal it can stress the metal of the clamp which acts like a clamp. Thus the different size clamps. One size does not fit all blades properly. That is important. Setting the blade in straight and to the back of the clamp is important but straightness is not critical but shoot for it. Those clamps are made to pivot in the holders because of the triangle end shape. They rock back and forth at times when cutting to help keep the blade from breaking. They seek their own straightness when tensioned properly. I will have to say and this is just my opinion, they are not the best clamp if you do alot of fret work because of the way they work. I did not like them. Scrolling is all about touch. It takes much more practice to learn to scroll in both directions than it does to learn one. I say this because your dominate eye moves. You may not think it but it does. This means your hands follow and the pressure you apply has to match. You usually break more blades in one direction than other because of this. Again just my opinion. Some people master it easily and the larger the blade the easier it is. Here are some examples of my use of the FD puzzle blades. I will say it took me a few tries to get the feel of the cuts but after that it goes smooth. I use an RBI 20" saw. here is Steve Goods version of explanation of blades. https://www.stevedgood.com/scrollsawblades.pdf



-
I guess answer below is what you are after. I still do not get it because waterbase is not thick. Artist paints are thick but meant to be so. Any top coat finish use a wipe on and that is as thin as you get. You do not say what paint of finish you are using. If using acrylic paints then thin as you see needed. No rules just taste of what you like. Thin with whatever is the carrier of the product. oil or water.
-
Why would you want to dilute a finish?
-
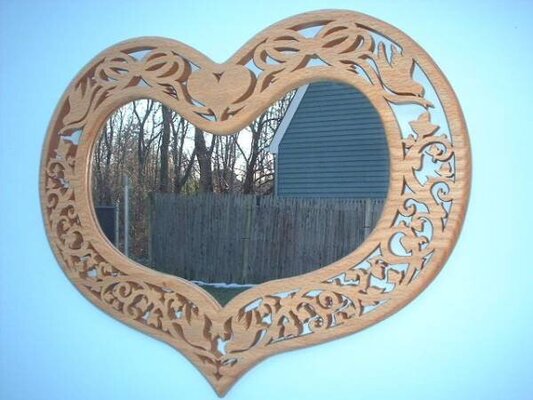
Way before Fed X came around and opened stores where you can copy things of any size with great accuracy, I use to do that with many of my projects. Especially the mirrors I use to make. I made a couple different sizes of the same style and needed to increase the plans. But I would do them in quarters and then tape all lines together in proper order. It worked well. yes alot of extra work but worth it.
-
https://www.scrollsawvillage.com/articles/beginner/5-reasons-scroll-saw-blades-break-and-how-to-prevent-it-r134/ https://scrollsawnewb.com/10-reasons-why-scroll-saw-blades-break/
-
Thanks. Just something else that floats through my brain. One and done. Eventually I will make a music themed pen to go with it. That is on my to do list.


