


JTTHECLOCKMAN
-
Posts
4,163 -
Joined
-
Last visited
-
Days Won
32
Content Type
Store
Profiles
How-To & Articles
Scroll Saw Reviews
Clubs & Organizations
Clubs & Organizations International
Pattern Shop
Suppliers
Village University
Help Desk
Forums
Gallery
eBooks
Everything posted by JTTHECLOCKMAN
-

Kinda of an odd question for layered projects.
JTTHECLOCKMAN replied to Hawk's topic in General Scroll Sawing
The biggest thing with plywood is the end grain and multiple plys seen. Many people including myself see this use as cheap because they refer to plywood as cheaper than solid woods and many times it is. But we all know BB is not really cheap because of its construction. But that is a stigma that has to be overcome. Then there is the stability thing. With solids woods and depending how thin you are making, the warping factor comes into play and thus plywood wins out there. Then there is the staining thing. BB or any plywood does not take stain well and look as good as solid wood. Again the ends take stain differently than face of BB. Some people get around this by painting. Now you can get shades of plywood but they are only with veneer top layers and again the end grain is what jumps out. Cost wise you are probably in the same area because now you have to buy stains and do that work as opposed to working with nature's woods. I am in the soild wood arena. -
Kinda of an odd question for layered projects.
JTTHECLOCKMAN replied to Hawk's topic in General Scroll Sawing
That is a tough question because we have no idea what type project this is. When you say layered, what does that mean. Steve Good does alot of projects that are layered. The guy here Fox something or other does all layered projects. Some people paint layers. Is this a 3D project or some sort of scene project? need more info or examples. -
What in the world are we looking at. This saw has some mileage on it. What tray? All that foam is rediculous. That is not stopping vibration of any kind. Put some rubber pads under the feet of the saw. Clean that up. I see you use a aquarium air pump for dust removal. How is that hooked in your circuit. ?
-
When people come on any forum and they have a problem, what happens is they do not give enough info and then the questions start and it takes awhile to get to the root of the problem. I suggest you give us more info. When you say you plug saw in outlet it trips breaker. What breaker? Is this a GFCI outlet and if so move it to one that is not. Is the saw off when you plug in? It better be. If it trips panel breaker then try a different outlet and or different circuit like in a different room to be sure it is not the outlet causing the problem. But if saw is off and the breaker trips then it is in the cable leading into saw. could be a damaged cable, bad male end of chord. After this we need need more info. if plugged in and does not trip but does when saw is turned on the more than likely the switch has gone bad. Are you using a foot switch and if so what kind. See how far this has gone just from your one line statement. I also do not know what you mean you replaced the power cables. What does that mean? There is a fuse on those saws and did you check that. Man I just looked at your other post about the vibrating saw. My suggestion is to step back and clean that mess up. You can do alot better job of setting that saw up. Take all that foam off and get some plywood and attach to base and then some thick rubber pads or cut pieces off something. they sell them in Home depot. That will help take some vibration out. Make sure the stand is sitting on a solid surface floor and legs are spread properly. I see the cables used and they look way too small and shoddy. Please invest in better electric cables. Also I see you have an aquarium pump as dust remover. I assume the one on the saw does not work. How is this connected to the saw? This can be your problem of tripping breakers if that pump is not working correctly. Any pumps has start up current draw. Again I point to shoddy cables. I am not knocking your set up but you can do better and enjoy the hobby more.
-
Sanding Puzzle Pieces After Cutting
JTTHECLOCKMAN replied to Gordon Wu's topic in General Scroll Sawing
It takes me 2 blades per bill. Now with puzzle blades they do break easily too. Sometimes your fault and some times manufacturing fault. Blades are the one thing that just is not a big factor when doing scrollsaw work. yes I know you are looking to get a feel for amounts needed. But ordering more than enough for a project is always a good thing. I order blades by the gross. Saves money. I am only an FD blade user these days. As far as cutting goes I have a complete woodworking shop with all the basic tools. I use my tablesaw to cut these as I do most my dimensioned lumber. Once you get the exact size for the width, just run a bunch of strips. Then you set up for the length and I use a stop block after I zero in on the right size. Nothing to that. Simple when you have the right tools. Not sure what you have available but am sure you can compensate. Top coating is to protect the finish on the paper. I chose lacquer because it did not darken the paper and kept it looking natural. I chose flat because that is what money is. Not gloss. Finally these are prop money and not real money. It is the same money that is used in movies and TV shows. You can get new money with no creases as these are or you can get what looks like used money and all crinkly. If you look at the bill you will see on top prop money. Have to say there were reports of people passing these type money as counterfeit.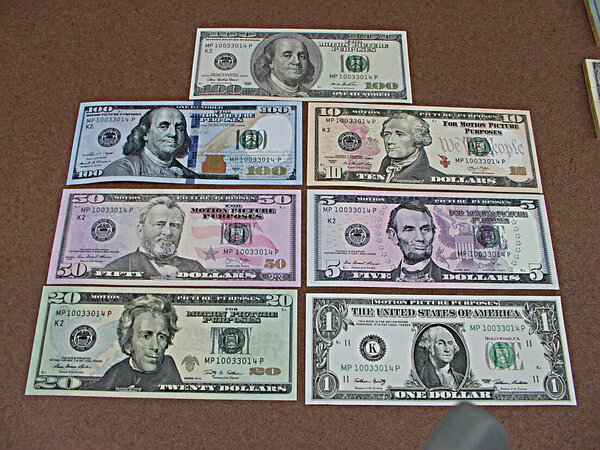
-
Sanding Puzzle Pieces After Cutting
JTTHECLOCKMAN replied to Gordon Wu's topic in General Scroll Sawing
My method is simple. Yes always sand the BB plywood before attaching paper. Second vac it off. Then what I do is spray with dewaxed shellac. I use 3M 77 spray adhesive. Yes on the roller. Need to make sure all air bubbles are out. I let dry. I then do a quick hand sand on the edges incase any adhesive over spilled. By the way my blanks are cut exactly to the size of the dollar bills. Then I spray both top and bottom with several coats of flat lacquer to seal the paper. The first coat is a light mist to not soak the paper. It would change the color of the print if soaked. After that I will spray several more coats till I am satisfied. Nothing is written in stone. Then I wait a day before I now place scotch tape around the entire blank. I am sure you could use other materials for this. The tape lubricates the blade because as mentioned they dull very quickly because of the very thin and small teeth. I then attach pattern with the same 3M adhesive. Yes when cut I then have to peel the tape off but it comes off easily because of the lacquer. just my way of doing this. Your mileage may vary. Test before committing. I have cut many of these and sold many. After doing a few the cuts become so easy and redundant your mind may wonder so stay alert. The advantage of what I do, the people actually get 2 puzzles in one. They can assemble as front or back. When they mix them they can become even more of a challenge. I do not worry about the wood because BB is a nice wood that is strong. you want to use a puzzle blade for small puzzles like this because the pieces stay together and are not too loose when cut. Use larger blades and the piece fall apart easily. When I sell them I had bought some nice resalable plastic bag that are perfect size. I then found some nice size boxes that work well too. Makes a nice gag gift. or stocking stuffer. Steve Good has the patterns on his site. Being I am sharing my method I should mention to save time in the end, I cut these in strips. Does not make a difference top to bottom or end to end. But after I cut them I place the strip aside and do the next just to keep all together. Alot more work if I had to assemble all of them. . I like doing puzzle like the next guy but that would be ridiculous. Even after I take all tape off I line back up and put together. I use a thin piece of cardboard to keep assembled and till I bag them. I in fact include said cardboard with the puzzle so that when they take out of box it is laying flat. They are the first people to take apart and reassemble again. -
Sanding Puzzle Pieces After Cutting
JTTHECLOCKMAN replied to Gordon Wu's topic in General Scroll Sawing
What kind of puzzles are you talking about? If you are talking those stand up animal puzzles then the pieces are large enough that if you have any fuzees it is easy to sand. but if you are talking small puzzles then I suggest you use Baltic Birch as material and no sanding is needed when using puzzle blades. This is the type I do. and no sanding is needed, I in fact place a front face of bill and a back face of the bill on opposite side and cut away.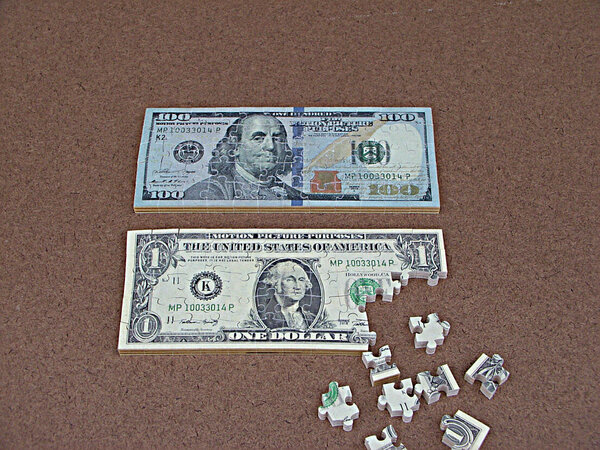
-
Absolutely. Highly recommended
-
I say you need to show photos of what you are talking about to help us understand what you are asking. My guess is you make scrolled cuttings that are pictures and you frame them. Now do you cover with glass or are they open framed.? What are wanting to achieve? keeping dust off which will never happen unless you encapsulate them. or looking for a sheen? Have to ask if you have behind glass why would you want a sheen? Too much glare will distort. What are you dipping in? Need more info.
-
I will always argue this point about setting any guage to a miter slot. The miter slot needs to be set to the blade. Then anything can be set from it. Many people overlook this. Different ways of setting this depends on the tablesaw. Just my point of view.
-
Errors. Where to begin? Have no idea how you built this so can not comment in those errors. But as Bill said movement when cutting can be a problem. People use either sandpaper on edges of the guides or clamps of some sort. You need to use a stop block to keep piece equal. The runners can have no play at all and yet slide easily. If those rails are not set right, the mistake is multiplied 8 times so just a tiny increment can mean alot in final assembly. There are many versions of good miter sleds on the net. any runout in the saw you are using will add to errors. Good luck with your project.
-
Again I will bring this up. With double sided tape you are leaving a gap between layers which can cause chip out on all pieces. No matter how thin the tape is it still a gap. Everyone is different use different methods but would like to point out some factors.
-
Those type jigs have alot of errors built into them. So much depends on many things right down to the runners for the miter slots.
-
My opinion. I do not think double sided tape is a good answer to stack cutting. What I always did was lay blue painters tape on top an bottom and then spray a sheet of copy paper both side with 3M 77 adhesive. That was the way I use to do it. Your milage may vary.
-
Quick Drying Glue... Super Glue?
JTTHECLOCKMAN replied to kmmcrafts's topic in General Scroll Sawing
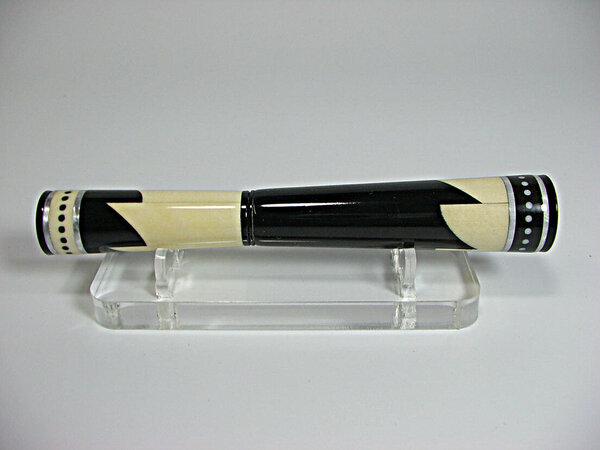
The thin CA will soak into wood quickly like a sponge. It will adhere to the wood fibers and when they are covered nothing will penetrate it. Thus Danish oil will not. You can paint over it after some sanding. If you want to have some open time, I suggest Med CA. Then you can give a quick shot of accelerator to start the drying process faster. In the pen turning world we use CA all the time as a finish top coat. A few coats of thin to seal the wood and then a few coats of Med and then we sand and MicroMesh till we get a beautiful glos finish. Many will add a coat of auto wax and bring out the shine even more. It is a very tough finish and stands up to the oils in the hands and thus the reason we use a a finish. This pen I did is a segmented pen with Gabon Ebony and Holly. It is a rollerball pen. Basically a desk pen because of the size.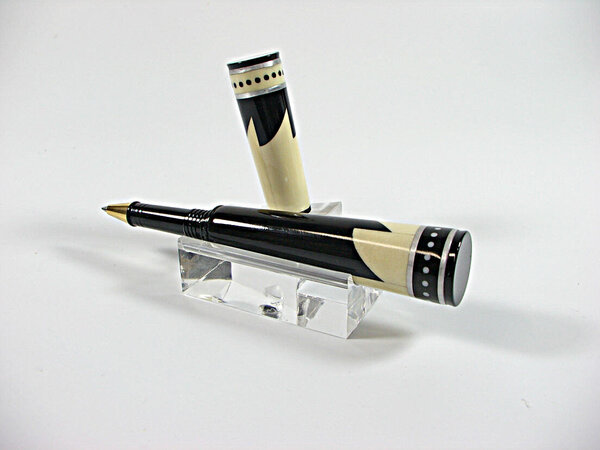
-
It is all about accurate set up. First everything must be same dimensions. When you cut the board down to 4 pieces and cut to 1-1/2" wide these must be accurate to each other. You should stand them all next to each other to see if they are truely same dimensions. Then you need to lay them on a flat surface to see they are the same thickness. If that all matches, then your router setup needs to be secure and you route all pieces from the same side. Making sure you keep pieces flat as they pass over router bit. Hold down blocks are good for this when using a router table. After all that then it is time to cut miters and this is where precision is key. You do not show your jig. You do not show what tool you used to cut miters. Never ever ever ever cut miters before doing all mill work first. Something is off and it multiplied 4 times to get that big of a gap. Take both sides and place them back edge to back edge and place against a straight board so that the top points hit board. Make sure they are 90 degrees to the board and if equal on both top and bottom and then again with the 2 sides, then your angle is off. Need to adjust. Now does the measurements you have need to be that. If you can cut small amount from all 4 corners when you correct the angle then do that and you can save the pieces. If the pieces are off in any one of the steps will throw frame out of wack. That gap is actually larger than you show because the pieces are not lined up. This same practice applys when doing molding work around windows and doors. If I may make a suggestion and ditch the strap clamps or any other claps. Use blue painters tape. We make boxes this way and it is a true method of gluing because it does not squeeze all glue out and puts enough pressure on the joints. https://www.bing.com/videos/riverview/relatedvideo?&q=glue+miters+with+blue+painters+tape&qpvt=glue+miters+with+blue+painters+tape&mid=69988717F634E728105B69988717F634E728105B&&FORM=VRDGAR
-
It is acceptable because that is what oil finishes do. Lesson learned as they say. If you want a product that off gasses quicker or is less odor then use shellac. Even lacquers and Poly will take some time to stop smelling. BLO will smell as much as Danish oil because it does not have the hardeners in it. As mentioned, exposing to air circulating around the project helps. Think when you paint rooms in the house and that is waterbase paint. The smell lingers. Same when buying furniture it too off gasses. Buy a new car and that new car smell is all the plastics off gassing. It is a product of finishing. Solid finishes that adhere to the top of the wood will off gas faster because it seals the bottom side of the finish. Oils will linger longer because they really do not fill those voids. Nature of the product.
-
Tape For Backers Instead Of Glue
JTTHECLOCKMAN replied to kmmcrafts's topic in General Scroll Sawing
I answered this in your other thread with what I use FastCap tape. Excellent tape. -
Quick Drying Glue... Super Glue?
JTTHECLOCKMAN replied to kmmcrafts's topic in General Scroll Sawing
Believe me it is. It is for special projects but man it works well. I use woodworkers double sided tape for many things like jigs for cutting things on tablesaw and also for turning projects on the lathe. But that stuff is thicker and is easier to peel off. The speed tape is not tape you want to come off. I should also mention, the other day I just bought their zero clearance tape. I needed for my miter saw to make up for the years of cutting into the throat plate. I needed more accurate cuts so instead of buy a new plate or even making one, I heard about their tape and looks like the problem solver for me. It is very thin but the top is a slick plastic. It would be good for doing cuts on a scrollsaw that you need a zero clearance too. many people use various methods such as playing cards and tapes over the slots and things like that but this tape would do great on that too. Just a side note. https://www.fastcap.com/product/zero-clearance-tape -
Quick Drying Glue... Super Glue?
JTTHECLOCKMAN replied to kmmcrafts's topic in General Scroll Sawing
If you are looking for great doublesided tape that is clear then look at the line called FastCap. Best stuff around. Not cheap but you get what you pay for. You can get in many different sizes. It is very thin and clear. I use it alot in the pen turning world. https://www.fastcap.com/product/speedtape https://titebond.com/product/glues/e8d40b45-0ab3-49f7-8a9c-b53970f736af -
Quick Drying Glue... Super Glue?
JTTHECLOCKMAN replied to kmmcrafts's topic in General Scroll Sawing
Just a thought and observation over the years when seeing these type projects, you can make the exact same project without the tabs and just glue end grain to flat grain. If you are worried about strength you can do alot less tabs. It is basic box making when you break it down. -
Quick Drying Glue... Super Glue?
JTTHECLOCKMAN replied to kmmcrafts's topic in General Scroll Sawing
CA will break the bank no matter what glue you buy. Not cheap. In the pen turning world CA glue is a good glue for a finish on pens. Not all Ca glue is flexible so that probably not a problem but can be because wood moves. I always have used Satelite City CA. (Hot Stuff) The big glue on the market is GluBoost They have many varieties depending on open times needed. Thin Ca which you buy in those squeeze tubes is just that type and is water thin. The mid range glue gives more open time and is thicker and is called gap filling CA. This can be hit with accelerator. Thin does not need it. It soaks into wood too quickly. Then there is another thicker level but to me too much for what you want to do. If I were you what I would do is use wood glue on all the fingers except the top and bottom one and use a med CA on those. Now you have time to put together and line up and when set just hit those 2 spots with accelerator and it will be fixed and the wood glue can do its thing designed for what its purpose. They do this alot in woodworking when making many items. They sell flexible thin needle stems to replace the caps for tight areas. here is my links. This is what I use. You can get all this on Amazon and many different varieties. People like to use Gorilla CA glue for wood projects. Just a safety note or two. CA fumes are flammable. They are strong odor. They do make odorless CA but again step up in price. They sell different size bottles for a reason. CA does not store well after opened on a shelf. If unused can be stored in Freezer and needs to be taken out well ahead of time of use to room temps before using. Do not apply heat. CA glue can be removed with acetone only. people use nail polish remover because that has acetone in it too. Do not splash on eyes, hands or any skin parts. Use accelerator sparingly. It hardens in a hurry and can smoke some so beware. DO NOT apply to cloth and leave it. It can start a fire. This is any brand. CA is a product that gets hot when curing. The link I gave for Satellite Glue has alot of info as far as do's and don'ts. This can apply to just about all CA glues. https://www.ebay.com/itm/376130378359?var=0&mkevt=1&mkcid=1&mkrid=711-53200-19255-0&campid=5338590836&toolid=10044&loc_physical_ms=96777&customid=8e94463bb07a1aa73a302ebe33d02499&gclid=8e94463bb07a1aa73a302ebe33d02499 https://www.caglue.com/ -
I am doing basically the same procedures as this except the double sided tape I use is turners tape. That stuff is strong and no residue left. But any clean up I too use acetone. I always did the spraying paper both sides when stack cutting. But when I do a simple scroll pattern I put blue tape under the pattern.
-
All the years I scrolled well over 30 years, the mask I used was the 3M N95 masks. Changed them often but lungs are clear and boy have I had alot of chest XRAYS over the years. I wear them any time I am in the shop making dust. Now when I turn I wear something similar to what you have with a face shield.
-
It should have no effect on the saw. That level with the table is just a guide. There is nothing written in stone it has to be that. All saws have some sort of mechanism to tension blades. The RBI has a wedge. The Hegner has a screw in the back like this. The Dewalt relied on an open clamp system where you can slide the blade up or down in the clamp till it sits right. All saw blades are not the same length. You will find out quickly if you break blades to loosen the tension. It is a touch and feel thing. The thinner blades may need less tension than a larger thicker blade. Over time you will figure it out. We all do. Good luck.


