.gif.3b913229ce2c6305bb30dba58a8387b0.gif)

kmmcrafts
-
Posts
9,642 -
Joined
-
Last visited
-
Days Won
142
Content Type
Store
Profiles
How-To & Articles
Scroll Saw Reviews
Clubs & Organizations
Clubs & Organizations International
Pattern Shop
Suppliers
Village University
Help Desk
Forums
Gallery
eBooks
Everything posted by kmmcrafts
-
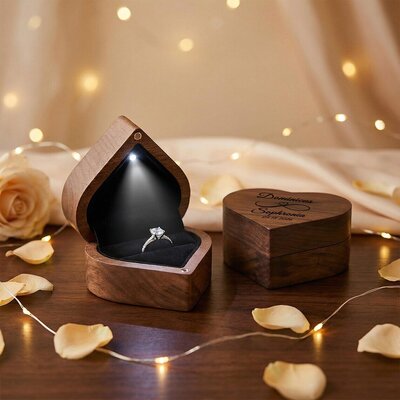
I haven't purchased any yet and not sure I will. I found them on Temu and Alibaba.. But I never found any in the heart shape. Lots of them on Etsy but they're people selling as a wedding ring box and offer to be engraved.. also not cheap at $20 per box for a plain box, though I did not search much on etsy so maybe there is someone there selling them at a wholesale price. Over the winter I found the barrel hinges and magnets on eBay in bulk so I ordered 250 magnets for $12 and the 50 hinges were $15.. now I'm not sure I'll make any boxes, LOL.. I might make some since I have a few already made to see if they'll sell. I really like the lighted one and may have to order a small amount to engrave on just to see if there is any value in doing so. My daughters wedding last summer got me into making some wedding stuff and the venue where she had her wedding wanted my info to give out to other clients of theirs after they seen the things I made for the wedding. They really liked my wine barrel card box. I have a few other card boxes in the works now. Also making wine bottle wedding gift boxes to see what those might do for selling.
-
The CNC could make these close to that 8 minutes as far as run time to make it.. way more time in prepping the wood and the machine to run it plus, sanding, assembling, and finishing time.. which if I was mass producing them I could be doing all the hands on stuff while the machine was running the second batch etc. But yeah, I try to charge $1 a minute for CNC or laser run time + materials etc.. just doesn't add up to be worth it in many cases. Yeah, I can get them on temu for around $5.00 each. and have seen some other sources in quantities of 25pcs and up to 1000, lol. I think they're neat little boxes but I don't think I'll mess with them.. I never did find the heart shaped ones like in the photo I posted though. All I found was standard square styles. I've been toying with selling wedding themed things because the small amount I do offer is really good sellers but, I don't have many ideas or options for other things.. not a lot of varieties of things and I keep searching for things that may spark my creative side.. A lot of what I do find is stuff like this box.. mass produced and just personalized with laser engraving etc. and I'm more looking for things I can make rather than buy and modify as I like the more hands on as a maker.
-
I found where to buy these for $1.98 each if I buy 1000 of them.. I should be able to figure out how they work without breaking all 1000 of them by taking them apart.. I've always been a master at making things never work again after taking them apart to see how they work, .. If I don't have it all figured out after 1000 pieces then I give up.. I knew these must be mass produced for these Etsy sellers to be selling them for $20 plain box or $30 with engraving. I don't think I could make them without all the fancy lighting for that low of price even mass producing them with my CNC.
-
I've been making a few ring boxes just playing around and I run across these boxes doing some research. Any idea on where they get the light and parts to make this work. I've done some searching on YouTube and found a person that put a battery tea light into the box to sort of create this but then you'd have to turn on or off the light via tea light switch and seems like you'd have to make a big bulky box to hide the tea light. I suppose you could remove the light from the tea light candle and use the circuit board / battery etc. but still would be stuck with the on/off switch. I'm thinking the people on etsy selling these is buying them and just doing the engraving. I wouldn't mind even finding the blanks if anyone knows anything of that. The video's I've seen make it appear to have the light come on when opened but it may just be already on like would need if using a tea light. Mostly just thought it was a neat idea and mostly just curious on how they work without having to buy one to take apart, LOL
-

Having problems with my new scroll saw, please help
kmmcrafts replied to Archer's topic in General Scroll Sawing
I don't know if this even makes sense but the motor is mounted on a circular ring with the slots for adjusting the blade etc.. so if you moved it half way in one direction but run out of electrical cord to move it further, couldn't you move it in the opposite direction to rotate to the same position of the other half of that circle to achieve the desired position? When I adjusted my motor I run into the same thing sort of but, I was able to dial it in but the cord is stretched about as far as it'd go. however for me I could turn it slightly more but it was starting to get more blade movement so the sweet spot for my saw was just a hair before the cord was stretched as far as it'd go. -
Having problems with my new scroll saw, please help
kmmcrafts replied to Archer's topic in General Scroll Sawing
I recommend starting at the beginning and tuning the saw as I believe it is way out of adjustment to be having the arm hitting the table. First thing to do is adjust the upper arm so it is parallel to the top of your saw table by turning the adjustment knob at the back of the saw. I like to use some blocks of wood and put them under the upper arm at the back then you can slide the boards from back of the arm to the front until you get the arm level ( parallel ) to the saw table. Once you get that adjusted you should never adjust that knob again.. many people mistake this knob as a blade tension adjustment which it is in some ways but when you use it for that you should always mark it and put it back to where the arm is parallel as you may find it's easy to keep adjusting it and slowly you end up with the saw being way off. I suspect this may be the issue you're having here. You really shouldn't need to adjust this for blade tension other than it you use really small blades like 0/2 and smaller. Most of us just install the blade with a little slack when using the small blades. Once you have the upper arm adjusted then you can adjust further with the saw motor. I like to put something with a straight edge behind the blade. With blade installed and tension applied, adjust the saw speed as slow as it will go then run the saw and you will see the blades forward and backward movement. You can loosen just slightly the 3 screws that hold the motor on just enough so you can rotate the motor assembly in the provided slots and while running on slow speed and watching the blade movement you will see as you rotate the motor the blade either moving more or less in a rocking motion. You want to have as little rocking motion as possible and you may need to turn saw off and completely remove the motor screws and rotate the motor to the next set of slots and replace the screws snug them enough so you can still rotate the motor and turn saw back on and repeat until you get the blade going as straight up / down as you can get. It'll take some tinkering to get this dialed in but once you do the saw will run smooth as butter.. Just for your info I had to rotate my saw to the different slots 2 times to get it dialed in.. -
Congrats on that score. You can't go wrong with these older saws. I'd like to find a deal on a older one like this or even a good used Pegas, Jet and some of the other brands that were built good before they started being made in China.
-
Beautiful work you have done as always.. Congrats on the new saw!! I don't think you can go wrong with the older style King 21" but I don't think the newer models are any different than the Harbor Freight saw other than maybe the color. Shame that they keep tricking people buy using the brand names that was once considered a good solid saw and making them cheaply and selling them at half the price they used to be.
-
Isn't Aspen and Sycamore a domestic wood? She listed all the Exotics in her order on one of her replies. I don't have a clue what most of those look like as some I never even heard of.
-
Congrats on the new saw, hope it gives you many yearsu of joy making sawdust. First time I ordered from Bear Woods it took 6 weeks for them to just put it in the mail and give me a tracking number.. and I messaged them after 4 weeks and they claimed it was just mailed out a week earlier or so but them a week after than I got the notification that it had just been mailed out. I get that mistakes happen but how you handle something tells me all I need to know.. instead of lying to me that it was mailed out how about owning up to a mistake and maybe throw in a small pack of blades or some discount for my next order etc. honestly I don't even care about a discount or anything just tell me the truth can go a long way but, to say it was mailed out and then a week later they actually do mail it out.. Let's just say I won't be ordering again from them.
-
Took around 6 days to get the stick in the mail for me.. I opened it up and seen what the content of the package was as I had ordered other stuff too. I set it aside and low and behold if I can't find where I put the darn thing now, LOL.. I guess I should have just downloaded it so that way at least I'll know it's in a file on the computer somewhere. Anyway, it'll turn up when I least expect to find it and I do have it somewhere now.. just where? I don't know but I do have it. LOL
-
Interesting, I have a local supplier of many exotics but out of your list I only recognize Leopardwood, Bubinga and Sumac.. I've probably seen those at my local store but I don't recall any of these other names. They do have a fairly large room that is only exotics so they probably have it or have had it and I just forgot the names. Now I'm going to have to go look up the ones I've not heard of.
-
Likely the customer will be confused by which to buy unless you explain in detail the benefit or lack of for each.. Most woodworkers don't really know what is best let alone someone just shopping for a toy. When you give too much options and a customer has to think about it it gives them time to shop other shops and deters the purchase. Just my thoughts.. Even if you write a lengthy description of the types of finish.. most shoppers don't read the entire listing. I do think the option of unfinished or finished may be a good option as I've had many request for things to be unfinished as they wanted to do the painting / decorating it on their own.
-
Hmm, I've changed my mind then... I'm not buying one now.
-
Those have been hot sellers for the laser engraving community. They buy them and engrave / personalize them. Ammo cans too. I haven’t tried it but those that do say they sell like crazy. As soon as I buy a bunch of boxes and learn the techniques to engrave them the fad will be over and I will be stuck with a bunch of the boxes, This would be nice to store my CNC router bits and the tools I use for it though so maybe I should get one and practice engraving on it.
-
Yes I think you are right.. I believe it was Varathane water base lacquer.. and it wouldn't spray correctly.. rather than a nice mist spray it was more like spitting droplets. I used to like the water based polycurlic spray in the teal can.. I had read where others had issues with that stuff spitting like that. I went through a lot of cans of that stuff and then bam, I started getting cans that spit like this so I only use this stuff in the quart can and a spray gun. But the smaller batches I typically do much more of it's much more convenient to grab the spray can and get it done without having to clean spray equipment etc for 5 or 10 ornaments or less. IF I'm just building inventory then wait until I have 50 - 100 ornaments or whatever to do all at once with the spray gun.
-
You have any specific brand of Lacquer you use? I'm kind of wondering if some paint manufactures use the term "lacquer" as a clear coat finish rather than actual lacquer solvent finish type. Typically lacquer solvent base paints are pretty fast to dry. I bought some hardware store brand and it didn't even smell like lacquer and took much longer to dry than the Watco lacquer I had always used. Then I tried some other lacquer which I can't remember the brand name of now but it also was a disappointment. I've always used the Watco brand and it was starting to get hard to find and one store told me that Rustolium ( Watco ) was changing the formula to meet the environmental standards and all the local stores were out so I ordered several cases online a couple years ago. I'm now running out soon and I see they brought the Watco back and it seems to be the same stuff as far as I can tell. Many of the cans I purchased had defective spray nozzles and some seem like they don't have as much air pressure as they did ( probably why it was cheap and on sale).. so I'm kind of thinking about maybe switching to something else. Krylon has been a very good paint for my tractor restorations etc. in my past hobby and is what this triple thick glaze is that I've been using.
-
What Dan posted is exactly what I have.. now that you mention it.. I did do some puzzles back in the beginning of my scrolling days and I used this to topcoat the puzzle picture once I glued the picture to the plywood.. Forgot about that.. so this stuff is older than 2005, LOL. It does give depth to the pieces I made.
-
Anyone use this clear coat? Just wondering your thought and opinions on this stuff. I've had some cans laying around here for probably 20 years or more as my mother-inlaw used to do ceramics and I guess they used a lot of it to top coat after they paint the ceramics. I did some test spraying on some small projects and while it doesn't dry as fast as the lacquer it does cover really well on wood that really soaks up the first coat or two so I'm kind of impressed and I don't recall anyone ever recommending it as a top coat on here. The stuff I have is very glossy though and I'm not certain if they have anything other than gloss. Also wondering if anyone knows if they've changed the formula at all over the years, as a lot of paints / clears were good back then but the EPA crack down on some of the chemicals and now many of them aren't nearly as good as they used to be. Trying to decide if I should order some or not. LOL.. Probably should buy one can and see before ordering a case. Anyway, just wondering if anyone has used it and their thoughts of it.
-
I agree, I could see the stand part being nice for both phones and tablets etc. speaker portion isn't really needed though. I don't know whether I'll make any more or not. There is nice possibilities for some very nice ones and could do themed ones as well. Not sure if something like this would sell or not really. Kinda like clocks used to be good sellers but now days they're far and few for sales.
-
Yeah, I was kinda wondering the same thing. I made this one just because I was curious about the sound that comes out of it and whether it really did work. That being said, I could see a office worker or similar that has a small workspace would like something like this.
-
Strange, I went to the blog to order the USB and when I click on it, it takes me to a log in page and I don't have any accounts. Anyone else getting this? I tried it on both chrome and edge browsers thinking maybe something was wrong there. EDIT: I clicked cancel and then the page loaded and was able to purchase.. Not sure what was happening but it finally went through.
-
Thanks RJ, It was certainly a fun and interesting experiment. I think I'm going to scroll saw 2-3 layers of 3/4" Walnut or Spalted maple and make another one. The slot for the phone in the top was a bit narrow for my phone with my case on it but perfect if I took my phone case off so making the slot wider on the next one I do in hopes of making it fit with my phone case on.
-
I've always wanted to buy the patterns but never did get to it. Is there someone still maintaining the site and handling the sales? I know if something ever happen to me my wife is about clueless of how to do much of anything online and the things she has to do for work she will be at the computer for 5 hours for a 15 minute thing just because she thinks if she clicks on something she's going to accidently delete it or something. ... Used to have my computer set up to open a new screen when you click a link and she would freak out because she couldn't figure out how to get back to the other page, . Anyway, I'd love to buy the stick but I'm not sure if I would actually get it.. Let me know if there is someone still working the site and mailing these out etc.
-
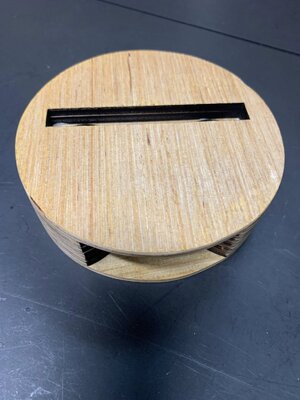
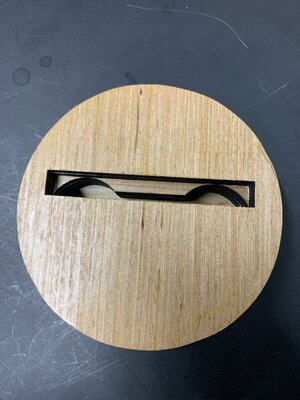
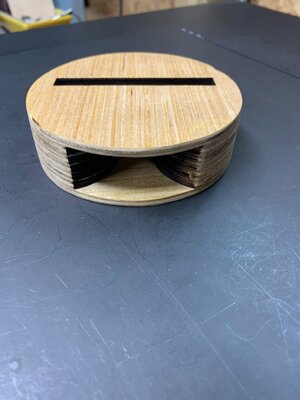
Playing around yesterday morning and made this phone speaker amplifier thing. So basically a thingamajig . It’s a phone stand and you set the phone in and it amplifies the sound and directs it out the front for a lack of a better description. Works pretty neat but maybe should have made it taller. This is just several layers of 1/4 inch plywood glued together and I found that the sound gets better the more layers I added. Thought I’d practice with cheap plywood before I actually use some nice walnut or oak etc. on the CNC and carve it from two solid pieces. This one was cut out with the laser for quick testing on cheap materials. Actually think this could be done very easy on the scroll saw and probably much faster than the CNC etc. Side Note: My son sent me a video a few months back where a person was making these and having a hard time keeping up with sales.. they had them priced in the $150 - 300 range but more complex than this simple circle.. they were horn shaped and probably fairly large in comparison. Maybe they were made on a lathe I'm not sure but that's another idea for those running lathes.