
.gif.3b913229ce2c6305bb30dba58a8387b0.gif)

kmmcrafts
-
Posts
9,642 -
Joined
-
Last visited
-
Days Won
142
Content Type
Store
Profiles
How-To & Articles
Scroll Saw Reviews
Clubs & Organizations
Clubs & Organizations International
Pattern Shop
Suppliers
Village University
Help Desk
Forums
Gallery
eBooks
Everything posted by kmmcrafts
-
So sad to hear this, prayers for the family and the many friends. RIP
-
Very nicely done! Love the colors chosen.
-
You know way more than I do about finishing wood.. I know in the automotive side of things you would never get away with putting lacquer over any kind of a oil based finish.. The solvents clash and winkle / lift the paint.. I would think a poly would be a much better choice for a topcoat over a oil solvent type finish.. If I was top coating anything over a blo or Danish oil I always used polyurethane but it's good to know lacquer will work too since I like lacquer better than the poly.. Just never brave enough to ruin a project over a oil finish so poly had always been my go to for top coating in those instances.
-
I dip mine in Danish Oil... I think a lot of people just dip in mineral oil but I like Danish oil for the small amount of polyurethane in it as well as the driers that help it dry out good. I've had mineral oil stuff seeping oil out as long as 10 weeks after dipping them so I don't like that stuff for that type of purpose.
-
First thing first when tuning these saws.. so first make sure the upper arm is the same distance from the table top of the saw at both front and rear positions.. Adjust it by turning the knob on top of the saw at the rear of the saw. Once it's completely parallel to the table top is when you start adjusting the motor slots. I keep a block of wood just the right size that just fits under the upper arm between the arm and table top so I can easily check to be sure the arm is still parallel. As these saws get older that knob at the back likes to start turning on it's own and will need readjusted periodically. Having that block of wood handy makes for quick checking and adjusting.
-
You might be able to get it closer to a straight up down by removing the bolts in the slots and moving the motor to the next set of slots. I had to do this 2 times on my Excalibur before i could really get it dialed in.. and doing so made the saw a whole lot more quieter and smoother running too.
-
Welcome to the village! I don't think they're making them anymore. I know there were a few other designs but I personally liked the Jim Dandy Easy Lift the best. I had one on my Dewalt back when I had a DeWalt and it was a wonderful upgrade / add-on. There isn't much to the thing and if you could find some pictures to look at it'd be quite easy and cheap to make and could get all parts for making it at a hardware store. Nothing more than some flat piece of aluminum about 1 inch wide and drill some holes for the bolts and make a slot for one of the bolts to slide in then a spring at the back for holding it up.
-
Oops, I didn't realize you're in Canada.. I'm not sure where to source the part.. The Bellows is hard to get to come out sometimes.. because the smaller end is pushed up over a nub on the linkage arm mechanism and it can be a slight bugger to get the new one pushed back up over that nub too. Small amount of dish soap might help make it slide over that nub but usually in my case I get too much and then make the whole thing slick and then can't get a good grip on it to push it on, .
-
Sounds like the bellows has went bad. Raise the upper arm in the upper position and on the bottom side of the arm is a removable plate held on with a couple screws. I believe you can access it from there. Seyco should probably have the part in stock I would think. For what it’s worth my saw has a bellows on both the upper and lower arms so you might be able to take the lower one apart and switch it around to the upper one. They are used on both to keep the linkage from slapping the inside of the machine. When you put it back together you can make the air line come out on either side so you can swap sides too. Hope this helps.
-
Just to follow up, we soldered the wire on better and I just put it back together and it works like it should now. This had been an ongoing problem over the last few years with this saw running jumping speeds around now and then. If you have this with your saw and you can solder you might try resolder the wires before buying parts.
-
Some might be to do with what servers the email has to go through? I don't know but I can say that 15 years ago my friend sent me an email and I never responded.. so he mentioned it while we were on the phone.. turns out I never received any email from him.. that is until 10 years later.. so email can take a tour of the world just the same as USPS I guess.. I have no clue how that email took 10 years to be delivered but they are not always instant like many people think coming from someone that does a lot of emailing with customers etc.. Heck I have two emails.. well.. maybe more than that but I have sent myself emails of photos etc.. and in some cases it has taken 2 days for that to actually come through.. most times it's only minutes but there have been a few times where it has taken a day or two..
-
I always made the puzzles mostly from 3/4 Poplar but have made them out of many types of hardwoods too. IF you really want a challenging cut try one from 7/8" Hickory.. Don't ask how I figured that one out, and of coarse I used one of the bigger patterns on this one too, I think it was the cabover semi or the bigrig semi pattern..
-
I do so many custom one off custom orders etc. of usually small items that it’s not even close to being worth using a spray gun just to spray one or two ornament sized projects. I do use the spray gun on production runs where I lay out several projects at once. I’ve been buying the watco brand lacquer in spray cans by the case online at max warehouse and so far it’s been way cheaper than anywhere else. This reminds me that I need to order some more. Usually order a few cases but really only use a case or two per year and then buy the quarts locally for the spray gun. So many of the finishes have changed up their formulas and I just haven’t been overly impressed with them. I bought some water based deft and instead of spraying out the can it just spit and bubbled etc. I used to like the blue / teal colored cans of the water based poly Uralic but that too started spraying poorly. That’s when I moved over to the lacquer. I like quick drying finishes much better than the slower drying oil / solvent based finishes.
-
When I first started making these I was using superglue to glue the wood circle to the plastic badge reel... They hold good but someone dropped there badge and the circle part broke off.. SO I started using E6000 and I like the hold but the glue is really kinda stinky for a few days and very slow at drying / setting up.. Then I got the idea of being able to change the wood piece.. I really like the self adhesive stuff I bought as it's strong but it is also hard to remove the piece too.. Nice to be able to just peel and stick that tape, as the E6000 glue is really stringy and can be a mess if not careful plus the dry time etc. I'm going to try cutting a much smaller piece of this tape and see if it might be easier to remove the piece if there is less surface area to be Velcroed. Just thought maybe someone here may know of a better product to use. I'm also been thinking in dots or small circles if they had the stuff like I have in "dots".. I don't know how this will work but something similar to this. Dots. The issue I see with the dots linked above is they're two part.. Male & Female and I could need more of the one than the other and would need to pay attention to what one is stuck to what part.. The tape stuff that comes off hard that I have sticks to itself so there is no wrong way to stick them. So that is a plus. Just they come off so hard, LOL.. But I'm going to do some experimenting with smaller pieces.
-
This is why I was trying to stay away from magnets.. especially since wife works in healthcare and around this types of equipment etc.. They have special badge reels they sell for the MRI and other imaging departments that have no metal in them etc. Lots of professions have to wear these.. I know many teachers do around my area anyway..
-
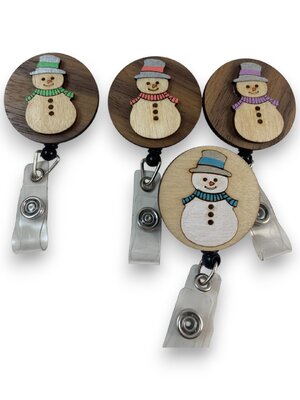
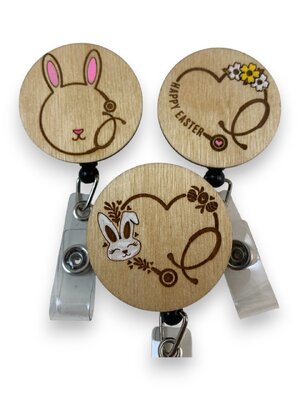
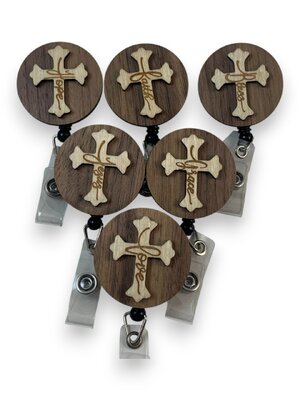
The good old days.. now there is no guard.. just a computer that scans a barcode and opens the door.. also believe this is how they clock in now too. I have sold a few on etsy but most sales have been with her coworkers.. I've done several hundred in sales just with them.. Everything they can think of to put on their badge.. from engraving pictures of their kids to their dog etc.. Done some campers on them.. I have some for about every holiday that I've done so far too.. Almost everyday she comes home request with someone wanting something. For instance Friday she came home and someone wanted a Pomeranian dog.. so not knowing what colors of wood and styles she wanted I made about 5 different ones and my wife texted pictures now she wants all 5 of them, .. Selling for $15 each.. bulk blank reels are about $0.25 each and so far I've made most of these from scraps in between the ornaments I cut..
-
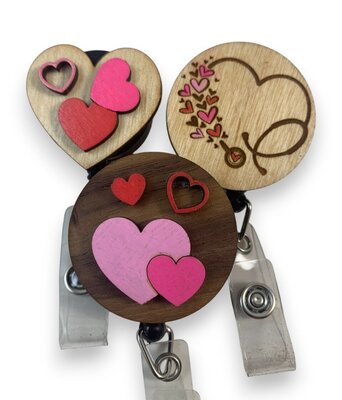
I started making I.D. badge reels back in November and boy has it gone wild for sales.. I got the idea since my wife and her co-workers all seem to want a different badge reel for all the different seasons / holidays etc.. that maybe gluing magnets etc.. to the reels and the wood so they could use the same badge and just change the wood pieces out to whatever themed one they wanted.. I have not tried magnets yet as the badge reels I use have a plastic body so I would have to glue metal to one of the pieces and the magnet to the other.. Then I run across this 3M like plastic Velcro self adhesive tape.. It works great BUT it's some really heavy duty stuff.. I barely can get the pieces to separate, LOL.. a screwdriver or something to sort of pry it up helps but then I'm worried about them breaking things just trying to change the piece out. Wife says no to normal cloth type Velcro as she is worried they'll come off too easy if they get caught on something etc. Anyone know if they have a lighter duty stuff similar to the 3M tape I bought? Or have any other suggestion.. Just looking for some ideas that I can maybe try or at least look into. Link is the 3M stuff I bought, it says heavy duty but so far in my searches all of them say that.. The badge reels are only like 1-1/8 inch in diameter so there's not a lot of surface area. I cut the tape down to a 1 inch square.. thinking I might try making them 1/2" squares so there is less surface to grip so strong might help. https://www.ebay.com/itm/167112766455
-
The switch I believe is fine.. the issue is the solder came apart on one of the wires that connects to the switch.. IF I wiggle the wire around the speed control seems to work.. I don't have a solder iron but my son does so I'm just going to have him solder the wire back on.. It currently only has one strand of wire connecting it.. and Yes.. I've replaced these switches before on one of the older Hawk scroll saws I have. Back then the part was $3 but now I see they're nearly $10 by the time I pay shipping.. Still beats buying the part from Seyco at $55 plus shipping.. But anyway.. will try to solder first and if it still has issues then I'll buy a new switch. For those that can't solder you can buy them with wires already soldered on and could probably use a crimp on style butt connectors to connect it to your existing plug.. They seem to be around the same price with the wires as they are without.. I'll just solder the switch but thought that might be an option for those that can't solder.
-
In the automotive repair sector they “ claim “ you should not solder connections because of vibration as solder doesn’t flex and over time the solder will get very small hairline cracks and as you say cause heat and stress on electrical systems. These days with onboard computer systems in cars makes for a really bad situation with soldered connections. If you watch videos or have one of these style saws many of them that plastic piece where the switches are mounted really shakes on some of these saws. Can’t be good for these soldered connections on the switches. There are a lot of people out there that repair / restore car dash lights and gauges because the solder on the circuit board of the dash gets hairline cracks and cause issues. My son had to resolder his digital dash cluster on his 1984 Nissan 300ZX because of hairline cracks in the solder of the circuit board. Looked fine with the naked eye but under magnifying glass could see tiny cracks. Really only had to heat up and slightly melt the solder. Anyway this makes me wonder about all the other Excalibur type saws that I see where people are having speed surging issues etc. and need to replace the $55 switch. Some have also had to replace the circuit board as well, probably fried it from poor connection and got hot from the switch. lol If you have speed surging issues you should stop running it and if you’re able to solder maybe resolder these connections on the switch. Might save you from spending a lot money.
-
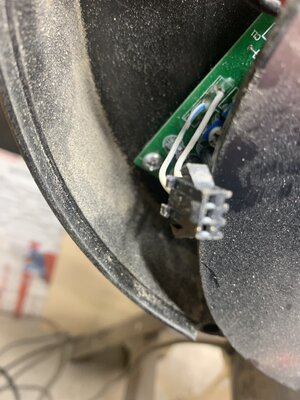
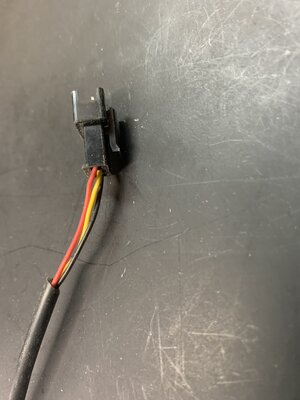
Well duh! Looking at the wires on the other end of the plug that goes to the circuit board just now and I see there is only two wires there so I assume the red wire isn’t even connected to anything. And looking more closely at the pigtail on the switch end I see it looks like the red wire is cut right flush with the sheathing. Assuming they bought the pigtail premade and it came with three wires but they only needed two.
-
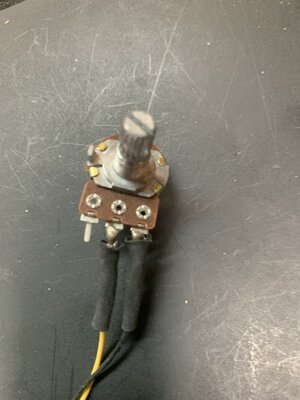
Before I stopped scrolling two years ago my Excalibur speed started acting up. I toyed around some with it and fount the mounting nut to mount the dial ( pot switch ) was loose so I blew some air around it and then tightened up the nut which seemed to make it work. Haven’t used the saw much since other than just a quick cut of something that my laser didn’t cut all the way through. Other day while trying to cut out the candle holder ( post in the bragging section ) the saw was mostly stuck on the lowest speed but if I wiggled the dial around I could saw one handed and hold the switch it would work. Was hopeful that it wasn’t the circuit board but once I found holding the switch and it made changes I was certain it was just the switch. I never looked to closely at this switch and always thought it was a part of the circuit board and was only sold as a controller and board together. This morning I looked on Seyco for the parts and found they do sell just the switch with wire pigtail. Figured before I order any parts I’d take it apart and inspect it. Plus I wasn’t about to pay $55+ shipping for a $5 switch that I can solder to my pigtail plug. Upon inspection I found that there are three wire pins on the switch but only two wires connected. On the plug end there are three pins and wires so is one missing? Also found that on the black wire at the switch is really loose and only has one or two strands of wire even soldered which is making me think this is my problem and maybe no parts needed. I’m really curious what the red wire is doing since it’s not connected to anything on the switch end but is connected on the plug end. Maybe this could be a problem? I’m going to take this to my son to have him solder it for me as he is way better at soldering than I am and try it. I’m going to see if I can see how many wires are on the Seyco parts in the pictures. I read somewhere about some of the China made saws had only two wires where the replacement had three but it worked fine anyway so maybe I don’t need that red wire. I’m far from understanding any electrical stuff like this but maybe someone knows why there are some two wire switches and some are three?
-
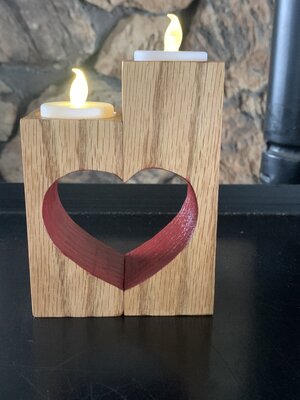
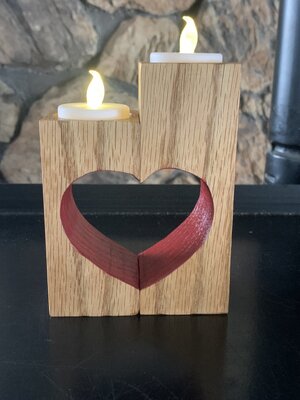
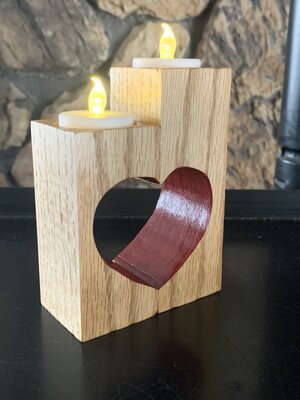
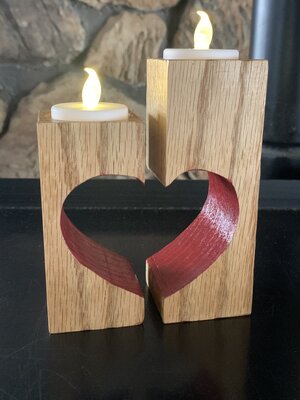
It is red oak and you're right it will bleed like this. I put about 3 coats of shellac on it before painting the red in hopes of sealing it so it wouldn't bleed so badly. When I make CNC carved signs and they want it made from oak.. I seal it up with 3 coats and then sand it down smooth and then spray 3 more coats so the grain is sealed up very well. Sometimes even then you end up with some bleeding but usually minimal and usually can be sanded out. This here isn't really visible even with my glasses on but the camera sure picked it up.. Maybe time to get my eyes checked again, .. I have several more of these 2 x 2 pieces and many are made from Cherry and other hardwoods.. however the oak ones are the only ones no currently being used as stickers for stacked up lumber that I have sitting around.. Guess I better get to work making things to use up that lumber so I can get to those Cherry ones..
-
I haven't scrolled much at all over the last 2 years.. This morning I started a simple project but quickly learned that this is slow as watching paint dry so I ended up finishing the cutout with the bandsaw.. LOL.. I really don't have the best blade of choice on hand for cutting 2" thick Oak. These were stickers from a bundle of lumber I purchased several years ago.. I kept them around thinking I'd collect enough of them to make a glue up of a nice heavy cutting board but that never did pan out.. I've almost tossed them in the firepit a few times over the years but today I found a use for one of them. LOL.. I have several of these 2 x 2 blocks that were in bundles of lumber I've bought and these where in between the layers for air flow around the stacks of lumber. EDIT: I put several coats of shellac on these before painting the red and in the photos I can see it still bled some in the grain.. To be fair I didn't see that without my glasses on, .. All good as I'm placing this on my night stand so it's not like I'm gifting it to someone..

- 8 replies
-
- 14
-

-
The laser users use this stuff a lot because it stays flat better than plywood and many times it's maybe cheaper depending on where you get it and what you get. That said I hate that stuff for my laser and would much rather deal with the slight warpage of my BB plywood. Fairly simple to just make / use some pushpins to hold the plywood down flat onto the lasers table. Anyway, MakerFlow is one source I purchased some sample panels from.. They have good both sides in many different species.. I ordered from KJP from the link that Barb posted above but they're out of Canada and it took nearly 2 months to receive my order due to setting in customs. That said I read the other day they have a better shipping solution for their USA customers. I do not know what that is though.. I liked the plywood they offered much better than that of Makerflow. The "TruFlat" stuff I purchased had way too thin of a veneer on it and then also the Walnut was not even Walnut, it looked as though it was painted to resemble Walnut but the other TruFlat pieces appeared more like the actual species and may have been painted or whatever too but the Walnut just doesn't look correct at all in my opinion. Other than if you need good both sides and the price I prefer the 5/32 project panels from Home Depot.. I think they are not HDF though.. and I also don't think the plywood from KJP was HDF either unless you buy the TruFlat from them maybe? Truflat is definitely different core than the others.. https://makerflo.com/search?q=plywood&options[prefix]=last
-
I use my cell phone and tape it to the cheap menards / harbor freight style magnifier light when I make videos for YouTube.. Not sure how the magnifier lens affects the cell phone but I used to have many people comment on how they liked my videos showing a good close up of the cutting process.. back then most people were using some sort of cell phone clamp and the view would not be a direct view of what you were cutting but rather a side view or some other indirect view that never really showed the cut line / blade etc. Anyway for me it was much harder to cut since my cell phone was small and I was always used to the larger magnifier glass. But I did okay with it and made a few videos of me cutting projects out. I don't do a lot of posting on youtube but if anyone wants to check it out.. there might be some videos where the view if off to the side as I did experiment with a phone holder that had a flexible arm.. but most are just done by setting my phone on top of my magnifier light. I don't know if this link will go to my channel or not.. It might be just a link to my youtube dashboard or whatever so may not work. Can always just look up KevsKrafts on YouTube. https://www.youtube.com/@kevskrafts1519


