


Wichman
-
Posts
1,944 -
Joined
-
Last visited
-
Days Won
48
Content Type
Store
Profiles
How-To & Articles
Scroll Saw Reviews
Clubs & Organizations
Clubs & Organizations International
Pattern Shop
Suppliers
Village University
Help Desk
Forums
Gallery
eBooks
Everything posted by Wichman
-
A word of warning. If you use a respirator, do the maintenance and keep the valves clean, These are typically a thin flexible disk and can be wiped down with a soft damp cloth. Memorial day I was tilling the garden with a small "Mantis" style tiller, I wear my respirator when I'm doing this to limit the dust I breath in. The exhaust valve stuck shut and I couldn't breath, I set the tiller down and removed the respirator. My chest was hurting so I shut everything down, put stuff away and went inside to cool down and relax a bit. Two hours later my chest still hurt, unfortunately/fortunately the urgent care centers in town had shut down. Called my brother to take me to the ER. ER>Admission to hospital>Angiogram>two stents>home the next day. I do not recommend this ride 0/5 stars.
-
Yes, I wear a mask and I recommend everyone do so. Years ago I found that I am allergic to and sensitive to the VOC's released by hardwoods while scrolling and planing them. I have to wear something to stop the VOC's, so just a particulate mask will not suffice, for me, your milage may vary. I use two different masks depending on what I'm doing; the first, a true respirator with replaceable filter types, there is a VOC cartridge with a P95 prefilter, and a P100 cartridge. The second is a "nuisance" mask that has a charcoal filter layer that I use when I'm out and about and there is "stuff" in the air (windstorms and wildfire smoke are two). this maks is quite effective and doesn't scare people. https://www.harborfreight.com/paint-and-body-respirator-kit-large-56983.html https://www.harborfreight.com/multipurpose-nuisance-dust-mask-with-replaceable-liners-94222.html For the shop air (my scroll saw is inside my house) I use a box fan and air filters that fit (20 x 20"), this fans runs 24/7 and continually cleans the air. https://www.amazon.com/dp/B088BWBD95?ref=ppx_yo2ov_dt_b_fed_asin_title&th=1
-
Sigh. This the kind of simple idea (after the fact) that I often times don't think to write up, because it's just too simple. This along with shifting the light to each side, front, and back to see what works for a given situation, sometimes for different pieces and at time rotating the piece 90* each direction and 180* (depending on the grain structure and sheen). Good on you for sharing.
-
About that Femoral nerve, I've had issues for years with leg pain and pinch points. One solution, among several, is to use a chair with a "tractor" seat. The seat is shaped for comfort, and if it works for seating on a tractor being bounced up and down for hours it's worth a try. These can be found on Amazon so you may be able to find them locally or have them shipped. I limit my time in the seat to 1/2hr at a time anyway, then get up and move around for a few minutes, then continue. Chair pads just don't cut it for some reason, but the tractor seat, oh yeah.
-
I found my current awl in a utility knife set (Xacto knockoff) from HF it had two of the awls "tips" in it, I haven't broken the first one, even after many years of use, I have dressed the tip once. I also use a "bead reamer" that fits into a Dremel moto tool. I'll use this if the wood is tough and I have many holes to deal with. Link to the HF set: https://www.harborfreight.com/deluxe-hobby-knife-set-39-piece-96551.html after searching several pages on Amazon I found a similar set there: https://www.amazon.com/FASTPRO-40-Piece-Precision-Included-Grindstone/dp/B0D53MJRV7/ref=sr_1_132?crid=CS5YAEIOIZHI&dib=eyJ2IjoiMSJ9.tmQeJuJ4QuVQwkJO8MdU2-KICXfzaPdpMDBfrv6vZp4zSQ8_QkrN6XQ5cu7Gi7UJaEh-EQuLZa5vztwvOOV42K946X3o_a9q-OHFvOnIxA2Md09gfQ5B242StHhebl-f5jBO85LAW9lR9cO-YiFYN6g0U1l-bO16xBmnLS4B4Kur1xeeFLsyvVK0kSDEi4GQGK7pEAKasK8gZAV2lBS4Yr6hMwYTWrrLIZutNxJS5UDiaoE-Mxmv69S6sSMJd6u9PAufYWzGj0pxofCwAVxL-ub-qB0843wf5Qy1miAEs4Y.7ibj0ZQeaXOGo2LIbq5Zr24rOljrzqBfT6gJoKBjDmE&dib_tag=se&keywords=xacto+knife+awl&qid=1779582563&sprefix=xacto+knife+awl%2Caps%2C297&xpid=Hymy35rPHLocp Amazon bead reamer: https://www.amazon.com/SE-DF83510-Tapered-Diamond-Reamer/dp/B001HBXN8C/ref=sr_1_18_mod_primary_new?crid=3902PSJE7DOE&dib=eyJ2IjoiMSJ9.3qys9FA_giBiOnUGLpG17QbfTs5aB3pN_3CQP8UqCDUssiWgGsYwwuC83idgH8HFvC36wI0voF7mMnJeKSQwXkFcOp79ZjqXrMCuF8Q4qraFZr3FoD3RCluuCGFmOmwv3c6Y9mGfB5ee8ne3VVlf3hEeyVwesDE_4Ew-RSxAQs4o3_91X0SzprGhb04WNDGy3ikR23yOb3SrXUUOjb2_NZaXDTLTgpeOlsFdl9IWJchVmeKyZFRiu_66DEgit3Bm9sbiBs8igaX3gCQ5mOfpQ-xsuAXcSW1PyKyp_6FiYO0.bZPP6Bx3qBF-G1zUekYt8mv6A2xcF9fO8uS6YAiLuEk&dib_tag=se&keywords=bead+reamer&qid=1779583702&s=hi&sbo=RZvfv%2F%2FHxDF%2BO5021pAnSA%3D%3D&sprefix=bead+reamer%2Ctools%2C282&sr=1-18
-
A better closeup of the shellac issue:
.thumb.jpg.352a9db0ceff95e34c7e0d7943dd1771.thumb.jpg.455110359e851182d59147c9100c278c.jpg)
-
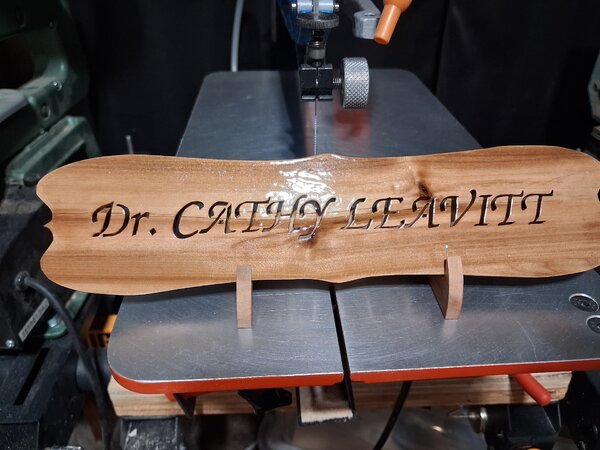
My latest project; a nice desktop name plate for a newly minted Doctor. I'm not sure of the wood, but I liked the grain and color. FD Polar #1 blades throughout. I had to use super glue to hold some of the design together, then many coats of shellac, with the final coats from a rattle can. One issue I have is the shellac pulled away from the short edges about 1/16". Any ideas why? I took two pictures, one for the look and another to show the shine.

- 3 replies
-
- 12
-

-
Welcome to the village from SE Idaho
-
Just left an Amazon review for book two.
-
When I was a kid it was written: LXVII
-
Just posted my review of the first book on Amazon.
-
Take the plunge on the Hegner and learn how to switch to the short stroke. You will not believe the level of control. I've tried about every blade available and I keep coming back to the FD Polar blades, I use the #1 for 90% of my cutting, I'll change to a #2/0 for detail cuts, #3 or #5 if cutting gentle curves.
-
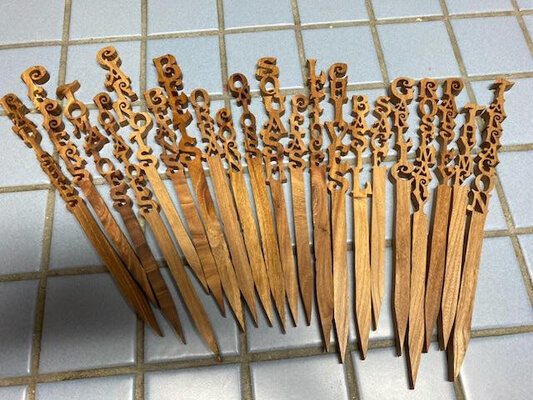
A set of plant markers I made for a friend. Once she saw them she refused to use them in her garden as they were "too nice"
- 14 replies
-
- 13
-
-
- garden
- scroll saw challenge
- (and 2 more)
-
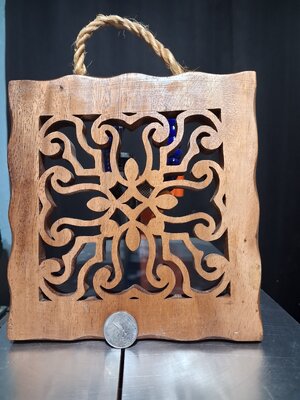
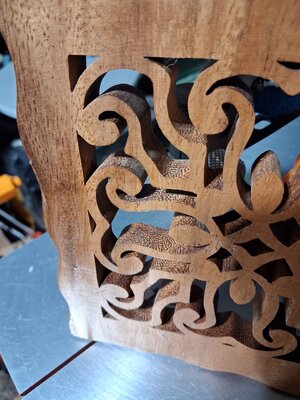
I find these small cheese boards occasionally at the local thrift stores. By the time they've gotten there, they are in sad shape, just a little to warped to use anymore, so I take them and cut a nice trivet pattern in them. If they're not used as a trivet, they still look good as a decoration. Wood: unknown, 1/2"thick Blades: FD Polar #1 Finish: BLO Pattern: From the SSV pattern library; Bobscroll: Can anyone tell me what kind of wood this is?
- 4 replies
-
- 12
-
-
The issue isn't the cold, per se, the repeated cold metal and warm, moist air is the issue. The moisture in the air will condense on the metal and that's a bad mix.
-
Hey, you made it! Great! Welcome to the Village from SE Idaho.
-
https://www.etsy.com/listing/1877061682/lama-multilayer-svg3d-mandalalaser?sr_prefetch=1&pf_from=shop_home&ga_search_query=lama&ref=shop_items_search_1&pro=1&sts=1&dd=1&logging_key=467b3f18c752a7d97f4b6a98702445c0d5546e07%3A1877061682
-
Locally; Lowes. Online; Amazon at: https://www.amazon.com/Washers-Commercial-Standard-Stainless-Quantity/dp/B01MEHT3EO/ref=pd_ybh_a_d_sccl_1/137-4733945-9562620?pd_rd_w=yERTo&content-id=amzn1.sym.67f8cf21-ade4-4299-b433-69e404eeecf1&pf_rd_p=67f8cf21-ade4-4299-b433-69e404eeecf1&pf_rd_r=DV5E747JMCJA92ZXQX5J&pd_rd_wg=Y1ynv&pd_rd_r=60db8cd8-21aa-43b6-80a0-49af5687f83f&pd_rd_i=B01MEHT3EO&th=1
-
I can get the extra small #2 screws and washers at my local Lowes, they carry them in the 1/4" length. I use the panhead screws instead of counter sunk heads, as I find that adjusting the length using the washers works better with the panheads. I have found that the vast majority of adhesives state to allow 24 hrs (at room temperature) to fully cure.
-

Inventory strategies, software, apps, or templates?
Wichman replied to Wichman's topic in General Scroll Sawing
I think I need to discuss this with an insurance person. I can understand if items are just value added, with minimal physical time involved ( no offence intended ) but I track my time when I'm cutting a project, it's what I base my prices on, the time involved in cutting project is, by far, the most expensive aspect of what I do... -
Inventory strategies, software, apps, or templates?
Wichman replied to Wichman's topic in General Scroll Sawing
I don't remember the how or when but if I make a purchase at HF I have an email copy in my inbox by the time I get home, and HF is only 5 miles away. -
A question came up about what to use for inventory control. Do any of you use any software to deal with this, paper trails, insurance needs, or ??? I can see three major areas to track; tools and the consumables that go with them, raw materials, and finished products. Each of those main areas could have more than one subclass. Any ideas?
-
How quickly did the pictures sell, how many more could you have sold if you had more? And, yes, we have to use the "shotgun" approach to find what sells in a particular market.
-
When I first saw your project, very nice by the way, the stand reminded me of a "Moai", one of the giant easter island heads. I looked online and Steve Good has a pattern. I intend to modify the pattern so that slots will be cut across the bridge of the nose to hold the picks. This will allow the younger users to "pick their nose". I'll see myself out.
-
It was a member of a scroll saw group, they have not responded to the additional pictures I posted in response. Sometimes you just can't win.


.thumb.jpg.352a9db0ceff95e34c7e0d7943dd1771.jpg.ef226df09431db39530436b7c4d28f93.jpg)


