
Leaderboard

.thumb.jpg.95d348aa76923344a5cab534cc1b3bc1.jpg)

Popular Content
Showing content with the highest reputation since 03/30/2025 in Posts
-

Anniversary plaque for Daughter and Her Husband
heppnerguy and 22 others reacted to MarieC for a topic
This a modified Charlie @Charlie E rendition. Thank you Charlie! I changed the pattern he sent me because I wanted an Irish look (since they love Ireland) I had to actually cut and paste the letters and used white-out to make the pattern I wanted, plus she likes plants/trees so I added some leaves. Attached is the pattern Charlie made me as well as my final work. I also decided to do some hand carving since I wanted a bit more depth. I used green satin fabric in epoxy for the background over a thin sheet of Paruvian walnut.
 23 points
 -

Finally off the Saw
Mike Crosa and 20 others reacted to Scrappile for a topic
Wanted to do something to remember the beautiful Pheasants, which used to be plentiful in our area. Now it is very exciting to see one. Been hearing on but have not spotted him yet. This is a Mike Williams pattern, 1/4" BB. Both straight and spiral blades were used. Got to take a day and make frames, I have 4 pictures waiting for frames. 21 points
 -

Some Newbie Work
danny and 20 others reacted to ChristopherLGroves for a topic
Been a woodworker for 50 years but new to scrolling this year. These are my first two Sheila Landry designs I did in 1/2 inch cherry
 21 points
 -
To see all of the projects, scroll to the end of this post At the end of December, a friend gave me a collection of hardwood cutoffs including maple, mahogany, and poplar boards that varied from 1", 2' and 3" in thickness. I was overwhelmed by all the choices and couldn't decide which project I wanted to do next. I studied the selections in the Scrollsaw Village Pattern Library and found five patterns that would be great for carved fretwork projects. I have always worked on one project at a time and decided to try something new and work on all five projects at once and vary which piece I was working on. Start by adhering the pattern to the wood with 3 M Super 77 adhesive. Drill vertical pilot holes with a drill press. Cut all scroll work with New Spiral 1 and 3 blades by Flying Dutchman. Carve the scrolled fretwork with a Foredom Rotary Carver using various bits and cutters. Add color with artist oil and acrylic paints. Sand and finish with Minwax Wipe on Poly. Backers for pieces 2,4,and 5 were made from 1/4" luan sprayed with satin black paint. This first project, Tiny Kitten, was designed by Steve Curtis and cut on a mahogany board 11" x 11" x 2" thick. The other 4 projects will be posted on the forum each week. Thanks, Dick Mira


 19 points
 -
I finished cutting this in late February, I believe. Been sitting on my table saw waiting for me to decide what to do with it. Nothing yet. I want to do something with it. It is cut in. 1/2" popular wood, A Finoa Kingdon pattern. I really enjoyed cutting, as I do all of her patterns, I have used.
 19 points
 -
Old Pickup in Walnut
danny and 18 others reacted to ChristopherLGroves for a topic
This is also a Steven Good design. Made this for my grandson who loves all things truck. He is thrilled with it


 19 points
 -
.thumb.JPG.9a7aa766bef7875bafab20816ec3b2f5.JPG)
Retirement gift
Hudson River Rick and 17 others reacted to Jim McDonald for a topic
Working 57 years at one place is special and when that place is a university, it is extra special. So, a friend is finally pulling the plug in about 10 days and I cut him a copy of the school logo in 3/4" cherry. Picked up some fresh #3MGT blades from @Denny Knappen and they ripped right through this project. (My first real cutting since cataract surgery.) The base is weighted by a few ounces of BBs in glue. Below are pics of the campus statue, the derivative logo and my cutting. Felt good to get some sawdust on my fingers!

 18 points
 -
Bog Buddies, pattern by Judy Gale Roberts
 18 points
 -

Southern Pacific 6022
flarud and 17 others reacted to Kris Martinson for a topic
Another "Great American Railroad" pic completed today. 11 x 14 x 1/8 inches Baltic Birch ply. Pattern and cutting by me from a painting in an old calendar..thumb.JPG.f16a0806172269e9ef8eb874490f34c2.JPG)
.thumb.JPG.a93a5d63b091c238e1d9b2479e68466c.JPG) 18 points
18 points -
I “decided” to add some Tolkien to my favorite clock today. “I wish it need not have happened in my time," said Frodo. "So do I," said Gandalf, "and so do all who live to see such times. But that is not for them to decide. All we have to decide is what to do with the time that is given us.” - J.R.R. Tolkien

 18 points
 -

Something new
Jim McDonald and 16 others reacted to rdatelle for a topic
Thought i would try something new. This is a Sheila Landry Pattern. It's around an 8 x 10 and made out of Walnut. P.S. I don;t smoke weed. LOL! ! 17 points
 -

Finally making some sawdust
ChelCass and 15 others reacted to jerry walters for a topic
Watching a video by Tyler @artisanpirate where he made a candle holder I had to try it. Many time he closes his video with "If I can do it, you can do it". So I gave it a try. Came out pretty good, but the leaves are fragile. Broke two of them, one when gluing it, the other when staining. Fortunately you can't see where I repaired the breaks. Made this with pine, stained with Minwax gunstock. The second is a small clock with shelves from a pattern book I had by Diana Thompson, Compound Scroll Saw Creations. All the clock patterns call for small clock inserts which I could not find anywhere, so using inkscape I increased the size of the pattern to accept the 1 7/16-inch clock inserts. This was made with poplar and stained Minwax cherry. I'm pleased with both. Jerry
 16 points
 -
We are expecting our first Grandbaby the middle of August. We found out a little over a month ago that it will be a boy. I put the last coat of clear on a couple of days ago. The saddle and bridle were made on the scroll saw, pretty much everything else was cut on the bandsaw. With help from my wife we have 2 and 3 coats of paint on the different colors. I bought another branding iron a few months ago for items specifically made for the grandbaby,, I branded a small oval piece of BB ply and attached it the rear of the platform. I know that it will be quite a while before he can enjoy the horse but I plan to give it to them at the baby shower at the end of June. The plans for the horse were purchased from Toymakingplans.com. We have made a few things and have a few more in the works to get completed before the shower as well. The baby shower theme is "Beachy"... yes, I guess baby showers have themes! My wife found an old Little Tykes car that was red and yellow and repainted it to the color scheme of the baby shower and I made a surf board that attaches to the top of it. I modified the surf board rack a little from what the pictures show. I have some small straps coming from Amazon to secure the rack and board the the top of the car. I'm also working on a mobile that mounts above the crib. Hoping to have it completed in the next few days.


 16 points
 -

Spectraply birdhouse
TexasDIY and 15 others reacted to scrollerpete for a topic
Denny made birds for the miniature birdhouses with Spectraply, Idecided why not try to make the birhouses with it. Here is my first try.
 16 points
 -
.thumb.jpg.95d348aa76923344a5cab534cc1b3bc1.jpg)
Lighthouse
FrankEV and 15 others reacted to barb.j.enders for a topic
Next! Pattern designed by Fred Martin. Interesting tidbit we are from the same home town. Woods used - Bloodwood, Yellow heart, Aspen, Birch, Walnut, Ambrosia Maple, Eucalyptus, Black Ash and a 2x4 so probably Spruce. One coat of shellac. It is about 6" x7". 16 points
 -

My grandson the builder(not)
Dak0ta52 and 14 others reacted to Allen levine for a topic
My 4 year old grandson built himself a fort out of his magnetic tiles only problem is he didn't think it out and built himself into it with no way to get out my daughter told me not to worry she gave him his juice his water some snacks and his iPad so he's good
 15 points
 -
Our Wedding
PawPaw Vern and 14 others reacted to rdatelle for a topic
Just finished this wedding piece my my cousin. Made out of oak with a few coats of poly on it. The lettering I cut out of Walnut. I used Steve Goods keychain software to cut the lettering. I want to thank Don who redid the pattern I had on here with the butterflies. I did make the bottom a little longer to fit all the lettering on.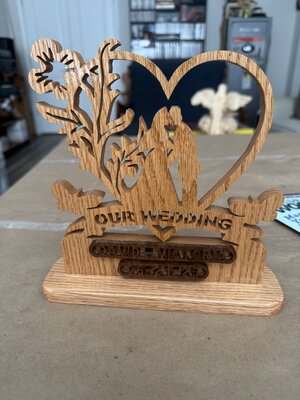 15 points
 -
Light scroll project
red river and 14 others reacted to Allen levine for a topic
After our week in the Amish area of pa i saw a lot of pieces of art this one caught my eye because it gives me scroll/fret practice the one I saw was black metal on rough oak I picked up a piece of 3/8 inch ply that was the base top of a pallet that had tiles on it insaw it next to dumpster and the contractor told me take it all but with my back I only took the 4x4 piece of plywood it had some stains but I cut the best piece of it had a lot of shorts from cedar decking I used for my sons outdoor furniture and some bird houses so I used them as a back its raised a bit with 1/2 inch dowels its basically finished but I want to clean up the black painted surface and spray some polyurethane have a look the original is also shown

 15 points
 -
Below our garage was a cistern, which was not used for intended purpose for many years. When we bought this place we planned on using this area for storage. After a few years we realized the water getting into the basement and cistern was excessive. We didn't have much stored in here but much of what was in the cistern got moldy, including the door. Since then we had out basement/cistern waterproofed and gave it a few years before we felt comfortable using this are again. Since retirement, I've been looking at project and decided to clean and paint the cistern. We now call it the dungeon. The walls and floor are now painted and I added some more lighting. What a difference! I am using it for storage of seasonal decorations and most of my wood. Two racks on the wall, six cubbies for small wood, and I built a mobile storage cart for in between sized cutoffs and boards. Currently I'm using the front half for my wood storage and back for everything else. We needed a new door so I decided to build one and below is the result. I'm very happy with it (corners are square and it fits the opening nicely). Wood is ceder and pine. I made the decorative accessories (fake hinges and bolt heads) out of scrap wood and painted to match the handle. I may add a small window with bars to go along with the dungeon theme. BTW, I'm glad I'm not tall as the ceiling is just under 6 feet high.


 15 points
 -

Fox on a stump
scrollntole and 13 others reacted to ScrollerGuy for a topic
After a long, cold winter I'm again able to do some scrolling out in my scroller shed without freezing my .... Here's a Russ Beard design cut into 1/4 inch Baltic birch with Pegas 1 & 3 MGT blades. It was stained white, added a black backer and placed into a frame made from scrap 3/4 inch pine stained gray. Finished size with frame is 10.25 x 13.5 inches. I really like Russ Beard's designs and have already started another. Lots of holes, but easy to cut. 14 points
 -
Ready for some good ones
wombatie and 13 others reacted to scrollerpete for a topic
We all need a good laugh, hope this help


 14 points
 -
Cardinal with Flowers
ChelCass and 13 others reacted to barb.j.enders for a topic
Pattern designed by our own @FrankEV. Thank you Frank. Woods include Bloodwood, Yellowheart, Wenge, Aspen, Poplar, & Walnut. Backer is live edge reclaimed Elm. Three coats of shellac as the finish. 14 points
 -

Dog Portrait - Abby
Allen levine and 12 others reacted to Denny Knappen for a topic
Dog Portrait - Abby pattern by Gayle at the Scroll Saw Cafe. I enlarged the pattern to fit the wood. I used 1/4" Baltic Birch plywood 12" square and backed with black mat board. Cut on the Pegas Scroll Saw using Pegas #0 Spiral blades. I kept the large pieces in place for sanding the fuzzies off the back side. After sanding, a light coat of spray Shellac, another light sanding with a Mac Mop, and a final coat of spray Lacquer Clear Gloss. Comments welcome. 13 points
 -
"Spidey" 46,5cm x 37cm, backer board 8mm, Spidey 4mm thick, 'cheap' DIY store ply, done with a hand held fretsaw with a #3 blade. This was my first complex one. Every single piece is a floater, cut out by hand, sanded, painted and glued in. Took me about three weeks.
 13 points
 -

Monkeying around
ScrollerGuy and 12 others reacted to LabradorBob for a topic
 13 points
 -
I've got five of these cut and only one is really useable. It's okay as this was a test of my limits and the materials limitations. All the tails broke at 11" (out of 14") , so I think that's the limit, for now. Many of the smaller details broke, so I'll limit myself to closed edge patterns for now. I still like the concept, now to adjust some patterns
 13 points
 -

Fretsaw project: Sisyphus meets Indiana Jones
heppnerguy and 12 others reacted to yamatetsu for a topic
"Sisyphus meets Indiana Jones" 45 x 60cm, backer boards 4mm, landscape 4mm, Sisyphus & Indy 4mm, 'cheap' DIY store ply, done with a hand held fretsaw with a #1 blade. Found this online-cartoon by Mark Parisi ("Off the Mark"), just had to do it. That look on Indy's face is priceless. This seems to be a simple pic, but it actually was a lot of work to get it done (cutting all those simple straight lines ... two holes to drill, sawing the line up, sawing the line down... about more than 150 times). It didn't help that it's too big for my fretsaw. Because of that, cutting the letters was tricky, I couldn't cut Sisyphus, Indy & the rocks out of the 'landscape' board, and some of the straight lines were tricky also. This time, I used stain instead of paint, looks great. 13 points
 -
Lighthouse #2
Jim McDonald and 11 others reacted to Kris Martinson for a topic
I enjoyed cutting the last lighthouse pic, so I made another one.
 12 points
 -
Great weather for the Fort Worth Art Show this past weekend. It was a long busy four days so my wife and I are pooped.
 12 points
 -
Kingfisher in 1/2 cherry
danny and 11 others reacted to ChristopherLGroves for a topic
I often see these cool birds when trout fishing on Rivers in the Northeast. They have a swoopy flight pattern and a raspy caw call. Very entertaining bird. Getting better at cutting the self frame. Used 9 degrees off from 90.
 12 points
 -

Birthday Card on the cheap
ScrollerGuy and 11 others reacted to don in brooklin on for a topic
For my wife's birthday, I went to Hallmark to buy a card. A cute card that pops up (her fav) was nearly $8 + tax CAD or $6 US The regular cards that are supposed to be funny but not at all were $5 -$6. So the cheapo in me said I can make a card. Done it before and she seemed to like them. So I then spent probably 3 hours or more designing, cutting and painting. Return is about $2 per hour. Not bad for an old retired guy. LOL She liked it anyways. Size is 5 x 8 to fit envelope PS: The heart and maple leaf matched the sweat shirt I had stitched. 12 points
 -
Tennessee Magnets
jollyred and 11 others reacted to Denny Knappen for a topic
Tennessee Magnets my design. Unknown wood 1/4" x 1 3/4" x 5 3/4" backed by 3/8" Baltic Birch plywood stained black. I used a 1/4" Rare Earth Magnet on the back. Cut on the Pegas Scroll Saw using Pegas #1 MGT Blades. After a light sanding with a Mac Mop, dipped in diluted Shellac, another light sanding, and another dipping. Comments welcome. 12 points
 -
Only drawback is, in Alabama, its legally probable cause to search my truck.

 12 points
 -
Just finished cutting these. I probably won't put any finish on them, the side cuts just don't have enough of a kerf to prevent the finish from glueing them shut. The patterns are from Wildwood designs. The designer is not listed on the pattern. 1/16" Basswood, FD Polar #2/0 blades for all cuts. I couldn't remember what direction the grain should run, so the first two I cut were 90° to each other and one snapped as soon as I got it off the saw. I cut the rest with the grain running lengthwise. I kept all the fallout that was recognizeable.

 12 points
 -
Well my grandkids wanted to know if I could make some bangles out of wood for them to sell and make money. I found a pattern on Sue Mey’s site. There were 15 different designs and three siges, sm, med, and lg. I have to say they were not that easy to make. Very slow process. Uses 1 1/2 x 1 1/2 x 4 inch square. Made some out of Walnut, Cherry and Birch, also made two out of Cedar and Butternut which I didn't take a picture of. Used a #7 skip blade


 12 points
 -
The only thing better than having a few scrollers who call me once in a while and have long, great conversations is to have one (or more) come to visit. Yesterday @MarieCcame by. I think we had a great visit. My wife and I almost talked her almost to death and made her suffer through another one of my burnt barbequed hamburgers. After lunch, we went down to my shop, and she showed me some things about my Hawk I was not sure about. And we talked about scrolling for quite a while. The last time she came, @heppnerguy was able to come, also. Marie and I both agree the only way the time could have been better would have been if Dick could have been there too. But it was a great time.
 11 points
 -
Angel fish (Steve good free download)
Matt B and 10 others reacted to Allen levine for a topic
Practicing my unsteady hands used a 2/0 fd blade for 1/4 inch and broke or bent 3 blades i used a 9 blade for 1/2 inch pieces base and stem all pieces again came out of bins i know the pattern uses the same species for stem since it's part of tail but I used what looks like white oak or ash and sapele scraps for fish inhave a boatload of poplar from all the other projects so made the grass with that took me approx 3 hours to cut and sand Used some old stain and I routed a small curve around base im still struggling with tight turns even with 2/0 blade i ended up using a 3 blade to finish the 1/4 inch pieces much easier for me
 11 points
 -

2/0 Jewelers blades and giant popsicle sticks. A match made in heaven!!
Roberta Moreton and 10 others reacted to crupiea for a topic
All of my work is done with 1/8" baltic birch and 2/0 jewelers blades. The reason I use these is they have like 50 teeth per inch or some crazy thing like that. I have used FD and pegas 2/0 blades in the past and they are great but have their limitations. Mainly, they are very flexible and hard to control so doing very tight cuts is difficult. Plus the lack of teeth makes blow outs are tear outs a common thing. The jewelers blades are stiff , thin, combined with lots of teeth make fort great tiny inside cuts flawlessly. Talking in the mm scale cuts. Sounds great but the downside is the lack of reverse teeth. Just like any saw without reverse teeth, they will make an absolute mess on the backside of the wood. This leads to blow outs, tear outs and lots of repeated work to fix the mess. What I used to use was another piece of 1/8" baltic birch as a backer as I had a specialty yard near me where I could get endless amounts of it for a reasonable price. Times have of course changed plus I moved so no longer have access to it so needed a new backer source. this is how the giant popsicle sticks come in to play. They sell them in the craft section of walmart for a few bucks for a big pack. They are 1/16" sp perfect backer material. Just lightly spray them with 77 and let it become super light to the touch. hardly tacky at all. Thats the trick. it should be just the slightest bit of tacky, just barely enough to stick. Put them on the back of the piece and thats it. Too much tackiness and you wont be able to remove the popsicle sticks so its really use the lightest spray of super 77 and let it dry to barely tacky. Just finished a very intricate piece, no tear outs and it looks great.11 points -
Not so much bragging rights. I'm posting this as a "lesson learned ". As y'all know, we learn from our mistakes, not out victories. I was working on this hummingbird, ⅛ ply frame ans attempting to use stained glass for the colors. It was not going well. Between trying to fit the small pieces and the shear cost of the glass, not to mention the "cut you" factor, I bailed on using glass. So I'm giving another run with epoxy resin and have learned much with this hummingbird . As you can see in the pic, bleed out from the epoxy was crazy, something I hadn't counted on, but learned something which, in my opinion is a win. I know I didn't get a solid, full bond between the hummingbird frame and the backer board (painted silver). I plan to try to paint the frame to cover up the epoxy bleed, at any rate, wanted to share for anyone wanting to try or if you have suggestions on how to improve the process
 11 points
 -
Lighthouse and Leopard
RabidAlien and 9 others reacted to Kris Martinson for a topic
I cut this lighthouse picture for my friend and pastor. I cut the leopard picture for my neighbor.
 10 points
 -
I have seen several of Steve's patterns uploaded here, whole and in part, in the past. This is just a reminder that he doesn't want the patterns uploaded to other sites. See today's blog post.10 points
-
10 points
-
Quilting queen(Steve good free download)
wombatie and 9 others reacted to Allen levine for a topic
Made this for my wife who has become an avid quilter Spanish cedar no finish 3/4 inch thick took me approx 8 hours of time ive seen quilting queen plaques made of wood for 5.99 so scrolling is not a way to make money I'm guessing to site administration if I'm putting too many of this small scroll projects on here please feel free well I mean you can erase them if they are using too much bandwidth not sure if I should keep posting these small projects
 10 points
 -
Yesterday was an awesome scrolling day for me. I was actually able to spend most of the day at my Hawk saw, and it was incredible. I've had the Hawk about a year now and it did not start good. I'd been using a Delta P-20 that I got back in late 1998 and that's all I used until my daughter asked if she could have the Delta , I taught her on it when she was about 8. So faced with getting a replacement, and the Hawk is something I've always wanted for as long as I've been scrolling, I found this one. After I got it home I really wasn't impressed. You see with the Delta I was a die hard top feed for the blade, for more than 20 years. The Hawk, while it can top feed, fir me it was difficult if not impossible. Fast forward a year and I finally found a groove with the Hawk which is what lead to yesterday's awesome scrolling day, the result of which you can see from my dust tray I have under the cutting table on the Hawk. After a rough start a year ago, the Hawk is now my number 1 saw!
 10 points
 -
Momma and baby bear on rocker(Steve wood free download)
OCtoolguy and 9 others reacted to Allen levine for a topic
My 2 year old granddaughter was over yesterday and who knew she now is learning words at a rapid pace in preschool i have an 8 foot plywood silhouette grizzly bear against a tree in my yard(Winfield collection pattern)with 2 baby bears climbing up tree she kept pointing and saying bear bear so I showed her the baby bears and told her momma bear and baby bears i mentioned to my daughter I saw a momma bear pattern online she asked me to make her some I'm guessing she is going to sell at school fund raiser its a wood puzzle used what I had laying around Spanish cedar for large puzzle sapele for small puzzle ps3 blade 1.5 hours for all 4 cut and sanded not making anymore but I have a new kind of respect for the guy in shipshewana I watched cut postage stamp puzzles with his foot pedal scroll saw i think im getting the hang of it but small pieces and curves im getting a lot of blade movement drifting just taking my time water bottle in pic to show scale size


 10 points
 -
Last Christmas I made set of Gnomes, they became popular, so I decided to make a big set of holidays gnomes. Set includes 24 patterns: 3 gnomes for each of 8 holidays: Christmas, Thanksgiving Day, Independence Day, Easter, Halloween, Valentine's Day, St Patrick Day and Labor Day. Size of each gnome is about 6,5 x 4 inches, consists of 4 layers, stand and hanging ring are optional. Video of making one of gnomes Holidays gnomes pattern


 9 points
 -
This is an @alexfox pattern slightly modified, actually all I did was not add the middle layer. This time instead of leaving the wood untreated I painted it and in my opinion a success. No bleeding of the resin into the wood Anyhow, here it is.
 9 points
 -
Lil mermaid sculpture (Steve good download)
crupiea and 8 others reacted to Allen levine for a topic
A lot more difficult for me as I'm not experienced at all the fret work but I believe it came out ok 5 hours 45 minutes into this project all pieces are cut need to fine sand then fit the dado into the base better I chose maple and poplar as this one I'm painting wanted bright colors wood can't offer heres where I'm at days over gotta go get my grandson out school and bring him to speech therapy lotta driving but it is what it is im the uber grandpa like so many others here I'm sure The 1/8 th thick pieces I'm glad I told Mr goods advice and stack cut because one tail snapped off when I was trying to take tape off glad I had another piece
 9 points
 -
Many scollers asked me to make layered american truck pattern, finally I made it. Project size 9,5 x 7 inches, stand is optional, recommended to use wood stain or 2 types of wood American truck pattern Video of making project


 9 points


.thumb.JPG.9a7aa766bef7875bafab20816ec3b2f5.JPG)


.JPG.14caaeab0048e67c926c50be8f2a5c01.JPG)
.JPG.7b6666cd661aa9a61387a00f383cbc46.JPG)


