


Wichman
-
Posts
1,954 -
Joined
-
Last visited
-
Days Won
48
Content Type
Store
Profiles
How-To & Articles
Scroll Saw Reviews
Clubs & Organizations
Clubs & Organizations International
Pattern Shop
Suppliers
Village University
Help Desk
Forums
Gallery
eBooks
Everything posted by Wichman
-
The tails didn't break while cutting them, they broke while bending. The short one broke while I was sanding I used paper coffee cups as the bending form and used another cup to hold the dragon, gently twisting with the curl, in place while it dried. I was able to stack 4 at a time to dry.
-
I've got five of these cut and only one is really useable. It's okay as this was a test of my limits and the materials limitations. All the tails broke at 11" (out of 14") , so I think that's the limit, for now. Many of the smaller details broke, so I'll limit myself to closed edge patterns for now. I still like the concept, now to adjust some patterns

- 7 replies
-
- 13
-

-
Just finished cutting these. I probably won't put any finish on them, the side cuts just don't have enough of a kerf to prevent the finish from glueing them shut. The patterns are from Wildwood designs. The designer is not listed on the pattern. 1/16" Basswood, FD Polar #2/0 blades for all cuts. I couldn't remember what direction the grain should run, so the first two I cut were 90° to each other and one snapped as soon as I got it off the saw. I cut the rest with the grain running lengthwise. I kept all the fallout that was recognizeable.


- 4 replies
-
- 13
-
-
Also there's a large wall hanging pattern on Steve Good's site; search for "physical" in the pattern section
-
Who is checking? You are, or at least your conscience. Hopefully.
-
Too bad it's Sue May ( I don't like the conditions of use; 1 pattern = 10 items, 2nd purchased pattern = 10 additional items, if it's a hot seller, or you have lots of family, buy a commercial license, no details of what that would cost. And it's poisoned the well of pattern companies, The Winfield Collection has changed to the same concept. )
-
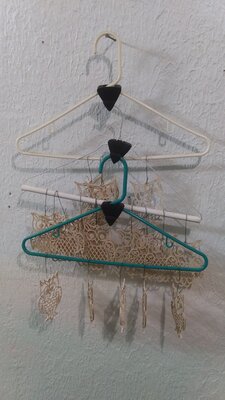
So, I tried the garment bag. It worked well, no ornaments came loose after riding around in the truck for a couple of days. The style of garment bag that I used ( side zipper that came about 3/4 of the way up the side of the bag ), was not the style to use, I need to try one with the zipper that goes to the top of the side, or up the middle of the front. Another change was to drill 3/32" holes in the hanger instead of notching the top. When I loaded the hangers in the bag I placed T-shirts in-between each hanger with ornaments. I also use shawls to display shawl pins, so those could be used for padding as well.
-
Welcome to the village from SE Idaho
-
That's Willie nice
-
Just sharing a new (that I know of) idea for dealing with lots of ornaments. Plastic coat hangers, with notches cut into the top of the hanger rail. For storage I cut notches ( SS #2 Olsen spiral, if I had them I use a #5 ) every 1/2", for dipping I'll only go 5 ornaments per hanger. For storage I have the hooks of the wire ornament hangers in line with each other, for dipping I have them at right angles. I can get 25 ornaments per hanger for storage. I picked up some "miracle" hanger thingies. With the first package of 18 thingies I can store 525 ornaments easily. Tomorrow I'm going to pick up an inexpensive garment bag and see if I can transport the ornaments across town with it, hopefully without any damage.


-
From what I can see, the top of the square hinge pin needs to be flush with the top of the retainer washer that sits atop the unit. If you glue those two pieces together first, let the glue cure, and then assemble the box upside-down, finishing by glueing the bottom of the square pin to the bottom of the box. Using this method will reduce the chance of glueing the box shut, and will provide a retention mechanism.
-
Welcome to the village from SE Idaho
-

Dumb question #another - What do you cut?
Wichman replied to new2woodwrk's topic in General Scroll Sawing
How are you producing your patterns? If you are able, change the fill to a light gray and the lines ("stroke") to red. The contrast helps to see the line. -
Wow, less than a year and I've got it done!


-
While it would be fairly simple to make a jig for the cutting of the slots; spiral blades, an oversized auxiliary table, a fence rigged at an angle across the table, and square dowels (as many as needed) the width that matches the pattern and an adjustable stop system for the length of the slot(s) to be cut. But cutting one of these would be mind numbingly boring (for me). I made a fence for my Hegner several years ago to prove ( pictures ) a point, so I know it can be done.
-
You need to make one, fill it with cookies, take a picture of it and caption the picture; "come to the dark side, we have cookies" This is a cross over between the burnt edges of the laser cut and the dark side of the Sith.
-
Welcome to the village from SE Idaho What scroll saw did you get?
-
A Little Something for the Bottom Feeder
Wichman replied to Scrappile's topic in General Scroll Sawing
I use a needle awl ( 1/16" shaft, from an xacto knife set ), a bead reamer, or a bead reamer Dremel bit depending on the project and how many holes there are. I'm using the needle awl on the current project, 1/16" basswood with #71 holes ( .026" ). -
Pictures of the dragon cup wrap:


- 45 replies
-
- 10
-
-
- scroll saw challenge
- wip
- (and 2 more)
-
RJ, Here is one I did last year. I still need to work on the contrast between the segments, glued back together with polyurethane glue. I'm thinking of glow in the dark paint for the moon.

- 45 replies
-
- 7
-
-
- scroll saw challenge
- wip
- (and 2 more)
-
No, just segmentation with stains.
-
The third project, a test to see how far I can push myself and the material. This will be a decorative coffee cup wrap. 1/8" basswood cut with 2/0 FD Polar blades, speed reduced to 800 for control. The tail is 14 1/2" long and should wrap around the cup 2 times. This is a decorative piece and is intended to be for a cool display only, far to fragile to actually use.


- 45 replies
-
- 9
-
-
- scroll saw challenge
- wip
- (and 2 more)
-
Second project, a smallish plaque with a coyote howling at the moon. Forget to add info on the first project, I switched back to the long stroke on the Hegner, I just couldn't get it to cut the 7/16 plywood on the short stroke. For this project the plaque was 1/8" plywood so I switched back to the short stroke. I used 2/0 FD Polar blades and reduced the speed to 1000, my usual speed is 1400. This one's going on the back burner as well, I need temps in the 60's to be able to stain outside and let most of the solvent evaporate before bringing it back in to allow the stain to cure fully.


- 45 replies
-
- 10
-
-
- scroll saw challenge
- wip
- (and 2 more)
-
Welcome to the village from SE Idaho .
-
Finished cutting, now on to painting and staining. I'll put this on the back burner untill the weather warms up a bit more.


- 45 replies
-
- 13
-
-
- scroll saw challenge
- wip
- (and 2 more)


