.gif.3b913229ce2c6305bb30dba58a8387b0.gif)

kmmcrafts
-
Posts
9,642 -
Joined
-
Last visited
-
Days Won
142
Content Type
Store
Profiles
How-To & Articles
Scroll Saw Reviews
Clubs & Organizations
Clubs & Organizations International
Pattern Shop
Suppliers
Village University
Help Desk
Forums
Gallery
eBooks
Everything posted by kmmcrafts
-
If it runs quiet and fairly smooth it probably doesn't need any rebuild. I'd just run it and see how it runs.. The switch could just have dust built up in it and maybe blowing it out with a air compressor or a can of air will make it work again. Usually if you have a bad bearing or two it'll run loud and have quite a bit of vibration.
-
I may be wrong but I think you have to change both top and bottom for the Jet otherwise there was a alignment issues? I thought I read that somewhere? Edit to add: Maybe this was to remove the round barrel style clamps of the lower arm? I know a lot of people do not like those clamps. They are the same clamp as the early Hawks had and either people loved them or hated them on the Hawks and I think it's the same love / hate for the Jet saws. So maybe people were wanting to replace that with the Pegas and keep the Jet upper clamp.
-
I often wondered about the clamping power. I know there is adjustments to make it clamp more or less and I always figured maybe more clamping power because there is more surface area for clamping.. but maybe not as you had mentioned. Interesting to see some users perspective on it. Maybe I don't want to buy a Jet for my next saw.. heck.. no more than I cut anymore I'll likely not wear out the saws I have.
-
I don't know much about the Jet clamps other than I feel like I would like them better than the Pegas. I like the idea of it anyway. I have toyed with the one on the showroom floor at my local lumber supplier store. BUT I have read online about jamming issues and some other problems with that upper clamp too so maybe the idea is good but functionality isn't? I've always thought to myself if I ever buy another saw of this style to replace my Excalibur the Jet 18" is the one I would go with. I say the 18" because the distance between the blade and edge of table on the 18 is about and inch + more than it is on the 22 inch saw.. not much distance on those 22's I'm not really aware of any others on this forum that have one of those newer Jet saws. You might get more responses on one of the FaceBook groups.
-

Pegas Scroll Saw bottom or top feed
kmmcrafts replied to Christian Bergeron's topic in General Scroll Sawing
I do both depending upon the project.. that said I mostly bottom feed and only top feed when I'm working on a very large project that makes it easier to top feed.. which isn't that often. I learned to saw on a saw that only allowed bottom feeding so it's a habit to do that way.. but when big projects come I top feed just because it's easier then. -
If I had this issue I don't think I would "glue" a bigger knob onto the thumb screw but rather make a tool to use for the knob. Rather than use the bigger round screws I would use the style that has wing grips.. Hope I'm making sense with the terminology , LOL. A larger knob glued on is added weight and maybe vibration to the saw having that extra weight out on the end of the arms may also be more wear on the saw. You could just make a larger handle / tool that would slip over the wing style knob to make it much easier and being a tool you slide over it you could make it as big as you need. Another option is to just replace the screw with a square head screw or any head type and use a wrench. I was thinking a square head bolt because then maybe ( if the correct size head ) you could use a clock winding wrench like Hegners use. Just remember whatever you decide to try and do to help.. anything larger is going to be putting more torque on that small screw.. don't over tighten and ruin your blade chucks.
-
Welcome to the village! I think the preferred upgrades might be subjective to what the user is planning to use it for. Myself.... I would have a hard time having to reach to the back of the saw to release / tension the blade so an important upgrade to me would be to get the up front tension release.. others are okay with the tension lever being at the back of the saw. Another for me would be the quick clamp upper blade holder.. Some of the smaller and old saws I'm not sure if they have a option for some of these upgrades.. You got a good deal About 8-10 years ago at an estate sale I had the option to buy 3 of these saws.. but they were the small and quite old 14 inch saws, they were $60 each but I passed on them as I was a bit tight on money at the time. While there I knew one of the family so they gave me a big box of blades. After getting home I found the bottom of the box had several Hegner parts including several blade clamps.. Almost sold them on eBay but never got around to putting up a listing. Then a few years later at another estate sale guy had a very nice Hegner but was missing blade clamps. He lived out of state and was selling entire woodwork shop full of tool very cheap as he had only a few days off work to get things taken care of and get his dads house on the market. Since saw was missing parts he said if I didn't take the saw with me he was putting it in the dumpster. He already had a lot of good tools in the dumpster so I took the saw and when I got home I realized I still had those free blade clamps. LOL Funny how that all worked out. The one I got is a newer model 18" that come with the upgrades from the manufacturer so I'm glad waited for the right deal, LOL They are one of the best saws on the market and I consider any of them under a couple hundred dollars that are in working order to be a great deal. I still prefer my Hawk scroll saws but these are very nice saws too.
-
I have not only a large selection of blades that I've bought over the years, but I also have bought and been given many used saws over the years that also came with blades.. I will say there are names of blade manufactures that I've never heard of or even seen mention of. I should have wrote down those names because I no longer have most of the ones I never used as I gave many blades to Kevin ( AmazingKevin ). I sent him a couple boxes full of blades and then he got sick and last I knew he wasn't doing any scrolling anymore... so now maybe someone else has those blades, LOL. Not to change subject but anyone seen or heard from him? Last I knew he was going into a rehab place to try regain strength after having got very sick with Covid. Back to the blades.. The worst blade brand I ever used was that Vermont American. I bought and tried about every brand and most configurations of those brands. Some Olsen blades are my go to for certain projects and at one point Flying Dutchman was my go to for many years but then I settled on Pegas about 10 years ago. I also like some of the SuperSharps. There were quite a few names out there that were nothing more than rebranded Flying Dutchman that I found that out the hard way by ordering them.. which was kind of a disappointment once I got them and figured that out but at the same time I liked Flying Dutchman blades so at least they got used and wasn't one of those that I bought and didn't like that ended up in that junk drawer, LOL Now you all know, not only did I try all the different blades.. How about trying all the different scroll saw brands and styles, that's another whole can of worms there that I went through.. settled on the Hawk but like many others for certain project types and each saw has its good and bad thing. LOL.. I think I've cut on most all the different brand and models of saws from back in the day except the Eclipse.. never got to even see one in person but there were sure talked about being built like a tank.. Never see mention of these anymore.
-
Yeah I'm not sure when they became a Pegas dealer but I learned of it not too long ago by looking up something on the site to answer another question..
-
Some saws have a insert that goes into the end of the thumb screw and it has a O-ring on it to help hold it in place. The insert just friction fits inside a hole in the end of the thumb screw and when you end up with a worn screw or issues with it holding the blade you can just replace the tip / insert rather than replace the whole thumb screw. Over time they get a groove worn in them.. not so much with the ones that have the insert as the insert will spin and not clamp the blade in the exact same spot.. Here is a link to the parts I'm speaking of. You can see the end of the screws have the insert and then you can buy just those inserts and replace when needed. On my Hawk scroll saw I have to sand the ends of the thumb screw to flatten them as they get worn a lot faster than the ones that have the insert in my Excalibur.. You have to be careful trying to flatten the ends because if you sand them at any slight angle and get them uneven then they'll never clamp a blade good and tight again. I made a sanding jig from a piece of scrap wood and drilled a hole in the wood just tight enough to be able to screw the thumb screw in and screw it in just enough so the end of the screw just barely protrudes through the back and then flip it over and sand the tips with on my belt sander. You could just use a piece of sandpaper on a flat surface too which is probably the better way to do it as if you mess up holding it flat on the belt sander it'll ruin the flatness very quickly, LOL. https://seyco.com/product/qkm-06-set-of-2-round-knobs-metric/ https://seyco.com/product/quick-clamp-renewal-kit/
-
I never could understand the theory of the swivel not spinning creating this hockey stick because many scroll saws use thumb screws that do not have the swivels.. Hawk is a great example of that.. never had swivels and never had this problem unless the set screw gets backed out enough to not clamp the blade properly.. I'm not saying this isn't the case but I am saying many saws don't have the swivel and do not have this problem.. so is it really the swivel or some other issue? I'm not sure if the Bauer has the little swivel tips or not.. My China made Excalibur came without the swivels.. when I finally had to change the screws I purchased ones with the swivels.. For what it's worth I never got the "hockey stick" with the non- swivel screws on that saw either..
-
Not sure if this is the problem you are having here but when I had that famous hockey stick blade end like that it was because the set screw on the other side of the thumb screw had moved outward creating a slight hole so to speak so the blade is getting the opportunity to bend. The set screw should protrude through the hole slightly or at least be flush. Some say you should adjust the screw so it clamps the blade to where the blade side rest against the side of the slot in the blade chuck. I'm not sure that it really matters just so long as the top and bottom are positioned the same way.. as you don't want the top one to be pushed all the way to the right and the bottom one all the way to the left as then your blade would be on an angle. I'm not sure how accurate they need to be as I used to just eyeball it but the last few times I've made adjustments I used a real thin feeler gauge to be sure they both are exactly in the right spot. Just insert the feeler gauge in the slot and adjust the thumb screw until it somewhat clamps onto the feeler gauge and then remove the gauge and turn in the set screw until it is against the thumb screw. TIP: use a little blue colored thread locker (Loc-tite) so the set screw won't move easily. If you don't every time you clamp a blade that set screw will likely turn a little each time and before you know it you're bending blades again and have to readjust it yet again.
-
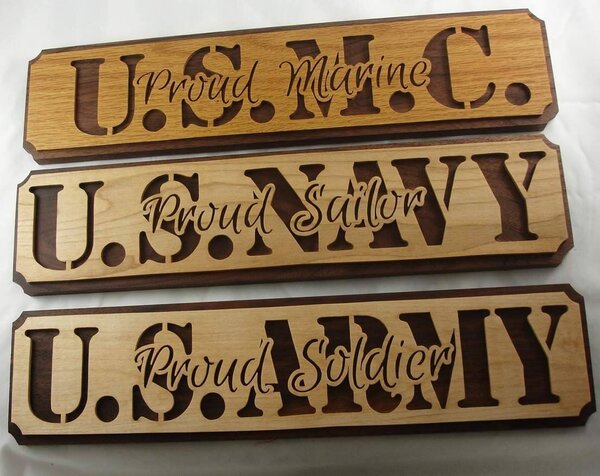
Maybe enough people complained about the whole copyright / trademark of the names so they took it down.. I got in trouble with etsy for these signs and they removed my listings. I guess I can't use the names of the different military branches. I always thought you could use the names but not the logos etc. and also thought I should be safe since the designers were making / selling the patterns but I now know they just design.. and are not perfect at knowing all the rules.. No idea but I'm not making them anymore. I let Sheila and Keith know what happen and mentioned maybe they should mention possible copywrite / trademark to those selling in the listings but they didn't change anything and listings stayed on for several years after.. I didn't know they was gone from the site.. so maybe they finally got in trouble or too many people complained to them about it. I just took a look and they don't have a lot of things they used to and now it's pretty generic in their military section.. Maybe could message them for the pattern.
-
The one in my photo is from Sheila Landry / Keith Fenton .. I bought the set but they sell the individual ones too.
-
One thing that is hard to do is cut a backer the exact same size unless you stack cut them at the same time so I always took a small washer and lay the project on the backer and put the washer down next to it and you place your pencil / pen in the hole of the washer and trace around the outer edge. This way you get a perfect slightly larger and more rounded edges for the backer and not have to try to cut it exact and glue exactly lined up. When I was doing a lot of work that required backers I would use like a wax paper or similar and spread a thin layer of wood glue out on it then I could do a production line of gluing.. dip the project ( back side ) into the glue.. this gets glue on most of the whole backer in one quick and easy step.. then just place it onto the backer and grab the next one to glue. A cheap plastic cutting board works well to spread the glue out onto too and then when you're done you can just wash the glue off.
-
I'm sure others would have a different method of what they would do than me but, what I would do is add a backer from a different species of wood for contrast.. many of my projects made from oak or maple would have a walnut backer.. I would glue the backer first and then apply your finish.. Linseed oil would make the grain of those two types of wood really pop.. however I prefer Danish oil as it has a small amount of poly in it with added driers to help it dry out quicker. The U.S.M.C in the picture is red oak with walnut backer. I do prefer the look of maple or birch with walnut backer better. If you do go the stained wood route I would use E6000 glue instead of wood glue as the wood glue works best on unfinished wood.
-
Merry Christmas Friends!
-
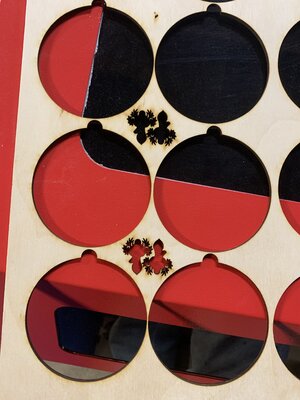
Might be a possibility if I were mass producing these all the same size and shape.. many of the small parts are a 1 off type thing where I would be wasting material to make a jig. This whole small earrings and things started from trying to use up all the small parts of a sheet of plywood. This photo shows that I'm making these from what otherwise would have been scraps from making ornaments. I normally was burning these scraps in the burn barrel or campfires.
-
Making Puzzles From 3/4-inch Baltic Birch Plywood
kmmcrafts replied to BadBob's topic in General Scroll Sawing
Yeah I agree with the hardwood. I also feel like Poplar is sometimes too bland but some of it has some good color tones. Poplar also does break easier. I know there are people that can get decent looking results from stains but most do not look good in my opinion. -
Making Puzzles From 3/4-inch Baltic Birch Plywood
kmmcrafts replied to BadBob's topic in General Scroll Sawing
I never gave it much thought to use plywood. I used to make a lot of the car and tractor puzzles that Scott ( Harvey's Patterns ) sells.. I specifically had issues with the front tires on the tractors breaking off either when shrink wrapping them or at some point in shipping or maybe even in my storage bins waiting to be sold.. I quit making them partly because of that but boy were they good sellers.. Never had much issues with the car ones but those tractors were always breaking. -
Hmm, I originally was thinking if I could use my mop sander it'd be nice but I guess I didn't think about taping to a board like that.. even though I did finally figure out to tape them to the workbench, LOL.. I might give this a try the next time I make a batch.
-
I thought the same thing but I was looking at it on my phone and didn't really zoom in on it.
-
Looks like it’s only offered in 1/2 or 3/4 as far as I can tell. Something to keep in mind though.
-
Beautiful box JT!! For some of these pieces are quite fragile I don’t want or need tape that is too sticky. I already broke two of the nes shown but no one will know because I broke the other one to match so they still look the same. They broke just pulling them off of the painters tape. Though this tape is getting old and seems to be more sticky than it was when new. What color tape is less tacky? I don’t need it super sticky.
-
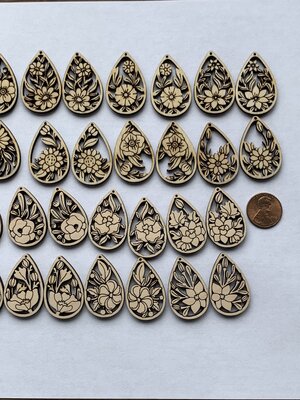
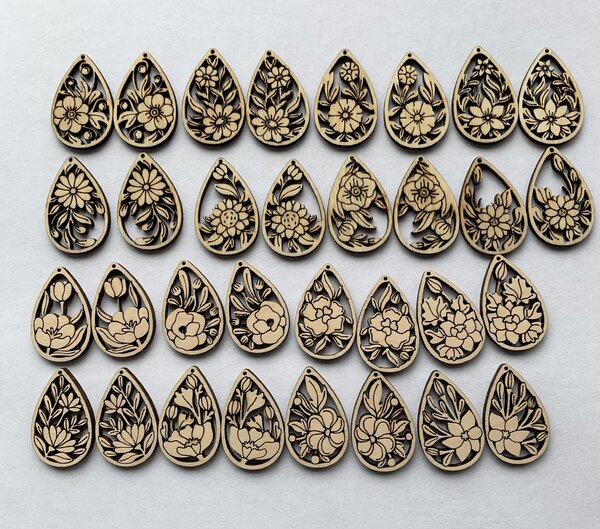
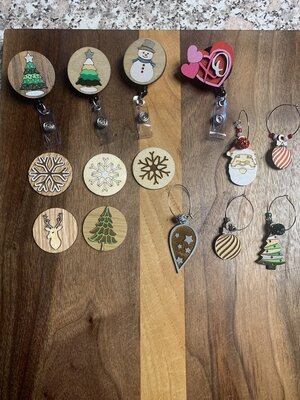
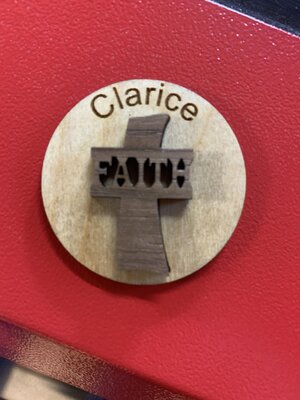
I may have already solved my issue but thought I’d post anyway to see what you guys have done with small parts sanding. I started making some jewelry and other small pieces. What started as a small gift for my wife has turned into making everyone she knows things too, lol. I made my wife a matching set of earrings and a badge real for her work. Now I’ve made about 20 more. I don’t have pictures but it was just a snowman engraved on a 1.5 inch circle cutout and her name engraved in it too. Then snowman earrings and painted details to match. Now they are talking about all the different themes for the holidays and seasons etc that I’m going to have to make. Oh boy what did I do.. So first I used my multi tool with detail sander on it. Upside down and hold the small pieces with my fingers but keep sanding my nails off. lol The parts are so small and light that they just won’t stay under the sanders. I’ve used my 1/4 sheet sander, r/o sander sends them across the shop. The multi tool was the only one that worked but now I have very short nails and no fingerprints. What I did come up with was taping painters tape down to the bench sticky side up and stick the parts on the tape and my 1/4 sheet sander so far seems to be working well. Any other suggestions from those more experienced folks out there? Here is a photo of some I made today. Was going to put a quarter by them for size reference but all I have is a penny as I’m not very rich. Actually have two pennies but didn’t want anyone to think I was flexing or showing off. Okay so first photo has the penny but didn’t show any badge reels so I added a few more pics to show a little more of what I’m dealing with.