


Wichman
-
Posts
1,978 -
Joined
-
Last visited
-
Days Won
48
Content Type
Store
Profiles
How-To & Articles
Scroll Saw Reviews
Clubs & Organizations
Clubs & Organizations International
Pattern Shop
Suppliers
Village University
Help Desk
Forums
Gallery
eBooks
Everything posted by Wichman
-
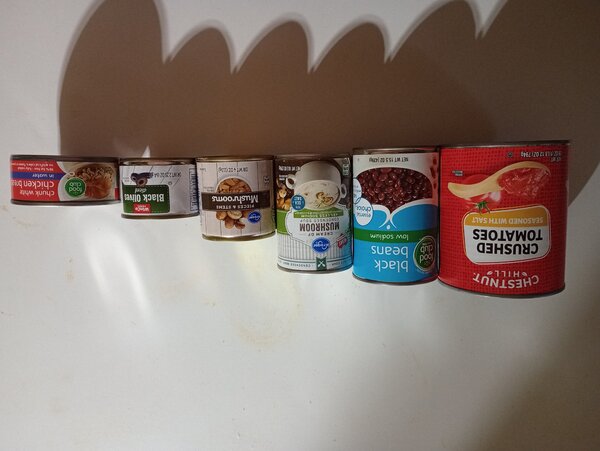
I have a tube roller I got at the dollar store many years ago when it was still a $1 store . When it dies, I'll use your pattern to make another. Non standardization is a real problem and probably one of the reasons that home craftsman are a dying breed. Used to be that a person could make things for their house that would help with organizing and storing products, now, product sizes are all over the map, what used to fit a woodworking pattern no longer fit, i.e. spice racks, tissue box covers, canned goods racks. I just did a quick survey of my kitchen and I have 8 sizes of spice containers, 2 of which fit the original spice rack plans. I am going to make a canned goods rack that the new cans are fed into the top and the old cans are removed for the bottom and in doing so the cans are automatically rotated for date. I am going to be forced into making them removable vs permanently built in, so they can be removed and the dimensions changed as needed. Here's a picture of the assortment of can sizes I have now, what a pain in the keister.
-
You could try a face shield with a respirator combo. They are available on Amazon for about $20. One set of straps. I don't use them because I wear glasses, safety glasses lens and frames, at all times. My vision is so poor that I can't see anything unless I'm wearing my glasses, so years ago I switched to safeties so I have no choice but to wear my safety glasses.
-
This is his main page, the link is on the left hand side.
-
Welcome to the village from SE Idaho.
-
Update: The problem seems to lie with my e-mail provider, the system kept giving a soft bounce reply to the e-mails ( as per Steve Good ). I have switched the blog to my g-mail account, so far, so good.
-
I found the pattern and his site here . The pattern is called "bird on tap" and there are at least two different patterns with the same primary name.
-
So far I've gotten the following: 7-10 7-12 7-13 I have not recieved: 7-11 7-14 7-15 The e-mails arrive just after 5 am and I am being very careful not to delete anything without checking. Just wondering if it's new signups or a more widespread issue.
-
I recently signed up for Steve's daily blog and they've been spotty. I have emailed Steve about the issue, but I wanted to check with others to see if I'm the only one or ???
-
Shocking!
-
This is called a visor clip, it's just to show the concept. Using a small machine screw, attach the visor clip to the back of the holder, use a small washer to allow the visor clip to stand just proud of the holder. The visor clip would allow attaching to the visor, providing the ability for the visor clip to rotate on the machine screw, with some friction so it will stay in place, This would kill two birds with one stone; if the clip is rotated so that the body of the clip is over the hinging area of the cover it will prevent accidental opening and loss of the scent packet, rotated 180°, it would allow the cover to be opened for replacement of the scent packet. ta da!
-
You are right and wrong The file that you download is named crane2023.pdf But, if you are searching the catalogue that name comes up empty, however "crane and fish" does bring up the pattern and that's only within the last couple of days. I had searched before with just "crane" and the file was not to be found. Steve must be doing some housekeeping on the catalogue.
-
In the comments on the video, even the Pirate couldn't find the pattern. It's only available from the blog post.
-
Occasionally the patterns don't make it to the pattern catalog, but, if you do a blog search on his main page, all the patterns are there. If you know at least one of the words in the pattern title, then use parentheses to limit the search to just the patterns with that word, or words, in the title. If you subscribe to his daily e-mails you will get every pattern he posts from that day forward. One way to keep the patterns updated is to create a "new patterns" folder within or adjacent to the main pattern folder, transfer the new patterns from the e-mails to that folder and once a month or so transfer them, as a batch to the main jump drive. Have you copied the jump drive to your computer? I did and use that as my "working copy" and use the jump drive as my "backup copy". On the computer you can create sub folders with names such as "patterns cut" " patterns to cut" and so on to help you organize your thoughts and cut lists.
-
Welcome to the village from SE Idaho
-

Hot Rods and Motor Bikes - Scroll Saw Challenge
Wichman replied to Travis's topic in General Scroll Sawing
About the only car related project I've done is a scrolled out a throttle plate for a International carburator. Worked like a charm for the rest of the vehicle life. Weirdest project as well, wired the silly thing on with pipe cleaners.- 25 replies
-
- 2
-

-

-
- hot rod
- motorcycle
- (and 3 more)
-
Welcome to the village, Ron, from SE Idaho
-
Angel fish (Steve good free download)
Wichman replied to Allen levine's topic in General Scroll Sawing
Kelli, The pattern is not in his pattern library, but if you search his blog on his main page for - "angel fish" - it's there. Use the quotes in the search, it limits the search. -
Welcome to the village from SE Idaho
-
Slightly rude word art
-
While at the DaFont site go to the "script" drop down menu and then select "Calligraphy", there a bunch of similar fonts there.
-
If you remember my posts about the spiral dragons and the bookmarks, both were cut out of a single layer 1/16" basswood on my Hegner saw, using FD Polar #2/0 blades. I used the short stroke and speed of 800-900 spm, the basswood cuts quite easily and any fuzzies clean up easily if you use a stiff backer board to sand on, I used a 320 grit sanding sponge for the cleanup, the fuzzies will be sticky so you need to remove them with light air pressure.
-
try this one. let us know if it works for you last supper.svg
-
Just a note JT, SG has been a member of SSV since joining in 2017.
-
A couple of things to throw out here. If you have a printer capable of printing 11 x 17 sheets then your patterns can be up to 10 1/2" wide ( compensating for 1/4" margins. If you create a page size of 24 x 36" and leave a 1/4" margin, you can take the file to OfficeMax and have them print the file for about $1 per ft. You could fit a lot of nested patterns within that space and just cut them apart vs taping pages together... just saying.
-
Did you check the commutator? That's the part that the brushes ride against. When you remove the brushes you can shine a light down the hole, you should see bright copper bars with spaces between them. Slowly rotate the motor to see if there's any damage or a piece of debris shorting two or more of the bars. I've had to take a motor apart and use a Dremel tool to clean out the spaces (metal fouling), then reassemble. With the brushes, did you check to see if they have a "glaze" on the face on the commutator side? That face should not be shiny, but rather a dull finish


